
iPhone 8 Plus 屏幕更换

简介
转到步骤 1了解如何更换 iPhone 8 Plus 屏幕。 此部分已安装前置摄像头、听筒扬声器和 EMI 屏蔽罩,便于维修。 如果您的屏幕没有预装这些东西,请改为遵循本指南。
你需要做的就是移除旧屏幕并将主页按钮转移到新屏幕,以便 Touch ID 发挥作用。
注意:如果你的 iPhone 的自动亮度功能在屏幕维修后无法正常工作,请确保你的 iPhone 已更新至 iOS 12或更新版本。 即使使用原装 Apple 屏幕,更换屏幕后 True Tone 功能也会被禁用。
你所需要的
修复工具包
本套装包含完成指南所需的所有零件和工具。

配件


工具


查看更多...
视频概述
-
-
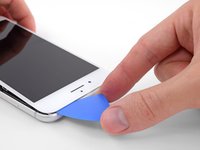
如果您的手机显示屏已经碎裂,请避免屏幕进一步的破碎,并且当您用胶带粘贴屏幕玻璃以维修手机时,请避免身体部位受伤。
-
使用透明胶带交替重叠粘贴,完整地覆盖住手机的屏幕。
-
如果屏幕玻璃的碎裂导致接下来的步骤中的吸盘难以吸在屏幕上,请尝试使用黏度较高的胶带(如粘水管用的胶带)折叠成一个把手,来提起屏幕。
Tape doesn’t hold. suction cup doesn’t work. Tape folded over doesn’t work as a handle. I’ve used 3m’ s Gorilla duct tape. The glass is so shattered I cant get a point started to remove the glass. Phone has been in an otter box for years. dropped it and shattered glass while replacing case. Now what?
When all else fails, you can superglue your suction cup (or tape) to the display, wait for it to cure, and pull.
I had issues getting the suction cup to stick on my cracked screen, so I tried using scotch tape (only tape I had around), but it didn’t work. This best thing I did was to forcefully pry the screen off (I wasn’t worried about damages because it’s already cracked) with the spudger. I think its best to find something stickier (like Duct Tape) and used that to lift up the screen.
Definitely surprised how sticky the adhesive was.
It’s amazing how a heat gun or hair dryer makes life easier to soften up the adhesive. Then use a thin iSesame opening tool to get in under the screen (start @ 90 degrees/vertical either side of the home button & slowly go horizontal) the need to use suction cups. Run the opening tool along the front and down both sides to cut the adhesive before trying to lift the screen.
Cheers Wayne
I didn’t have a hair dryer so I (gingerly) used an iron over some wet coffee filters (I mean , it is waterproof) . Then, quickly dried i off with paper towels, used gorilla tape and my fixit metal splunger . worked like a charm .
What about baby cracks? skip to step 3 or not…
As others have mentioned, suction cup and tape doesn’t work. I used the blade of a box cutter (watch fingers) and inserted just below and right of home button. Then moved spudger along the crack to tear adhesive/seal. Easy peasy.
-
-
-
将重叠的透明包装胶带条黏在 iPhone 的后玻璃上,直到覆盖整个手机后部。
-
如果在接下来的几个步骤中无法让吸盘粘在手机上,请将强力胶带(折叠到把手中,然后用它提起后玻璃。
-
-
-
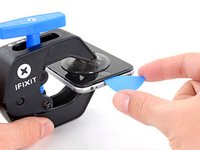
将蓝色手柄拉向铰链以解锁反向钳的手臂。
-
将反向钳手臂滑过 iPhone 的左边缘或右边缘。
-
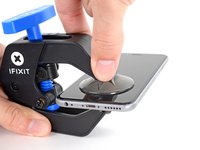
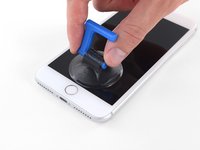
将吸盘放在靠近 iPhone 底部边缘的位置——一个在正面,一个在背面。
-
向下推吸盘以将吸力施加到所需区域。
-
-
-
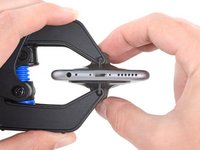
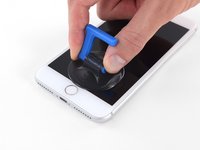
向前拉蓝色手柄以锁定手臂。
-
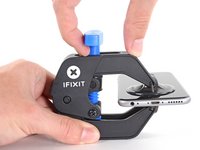
顺时针转动手柄 360 度或直到吸盘开始拉伸。
-
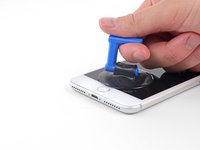
确保吸盘彼此对齐。 如果在拉伸过程中吸盘慢慢不对齐,请松开吸盘并重新对齐手臂。
-
-
-
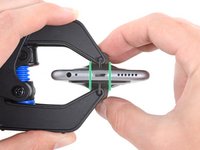
加热 iOpener并将其穿过反向钳。
-
折叠 iOpener,使其位于 iPhone 的底部边缘。
-
等待一分钟,让粘合剂有机会释放并出现开口间隙。
-
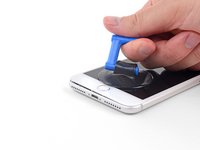
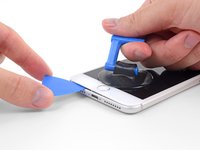
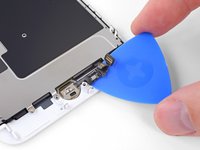
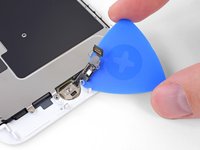
将撬片插入间隙中。
-
跳过接下来的三个步骤。
-
-
-
使用吹风机或者准备好的iOpener来加热iPhone的底部大约90秒来软化下方的粘合剂。
6/14/23 I did this repair but used a heat gun on low for 60 seconds. This allowed me to open the case as the instructions say, but in the end the Home button failed. I probably over heated it. I used this "go around" for a virtual Home button. I don't care about touch ID:
-
-
-
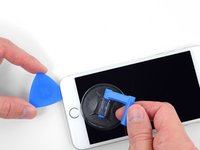
将吸盘放置在前面板的下方一半位置,home 键上方。
Using just the single suction cup that is included in the battery replacement kit probably wouldn’t open the device. An iOpener and an iSlack should be the recommended method. However, you can get it open with just the single suction cup and iOpener, but does take a lot of time.
Get an iOpener and iSlack with the battery replacement kit.
I used a flat x-acto (#18) blade knife tool to gently pry back the screen enough to allow me to insert the pick near the bottom corner. I then worked the pick under the screen as mentioned in steps 5 & 6 below then. This worked really well for me.
Kyle Luksa - 回复
I used the suction cup without heating the phone - the adhesive came away quite easily without applying any heat. Maybe due to age of phone (nearly 4 years old). Worth trying.
My screen was very shattered, and was quite hard to get suction, as my tape was very low quality. However, after pulling it up a little bit, I was able to insert a regular razor blade into the very small gap and used that as a lever.
Oh my goodness! Don't do that again. You can definitely damage something in the phone if you use a sharp metal razor blade..
cytur -
-
-
-
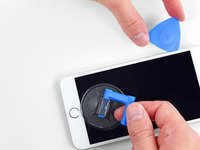
用力拉动吸盘,持续的压力将会在前面板和后壳之间创造出一个小的缝隙。
-
在缝隙里插入撬棒或者其他几毫米的撬动工具
After multiple tries and using a very hot iOpener, it will not open.
In sheer frustration, I pulled out my trusty pocket knife and managed to lift the bottom of the screen slightly, but in the process, cracked the glass from the bottom to the home button. The case is open now.
-
-
-
在您的手机的角落处滑入撬片滑向左上角,朝着音量控制和静音键方向滑动,将固定显示屏的粘合剂分离开来。
-
在显示屏的左上角附近停下。
Do not go over the top otherwise you can crack the screen. Sadly happened to me :(
The instruction should be:
“Stop near BUT BEFORE REACHING the top left corner of the display”
-
-
-
-
将您的工具重新插入到iPhone的右下角,并将其划到手机右上角,以划开粘合剂。
I had really good luck using a hairdryer on some of the more stubborn portions of adhesive.
-
-
-
在屏幕的顶部边角处滑入一个撬片来切割最后的粘合剂。
Be very careful at this step. The glass at the top will break very easy when the display is lifted too much.
Gerdschi D - 回复
-
-
在这个步骤中使用的工具:Magnetic Project Mat$19.95
-
移除四颗将显示排线支架与逻辑板相固定的十字(JIS) 螺丝,它们的长度如下:
-
2颗 1.3mm 螺丝
-
1颗 1.4mm 螺丝
-
1颗 2.7mm 螺丝
The Phillips screwdriver bit is the PH000. The measurement refers to the screw length.
Jack Harry - 回复
-
-
-
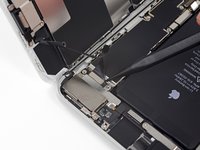
使用撬棒的尖端来将逻辑板插座上的电池连接插头撬开。
-
稍微将电池连接插头弯曲,防止在您进行维修操作时意外与插座连接。
When I reassembled the iPhone 8 Plus, I had to plug it into a Lightning cable to wake it up (just pushing power button wasn’t sufficient).
-
-
-
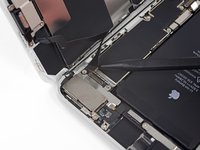
使用撬棒的尖端或者手指甲来直接将插头从插座中撬出来断开大的低显示排线。
I got hold of a iPhone 8 Plus with cracked screen that I am planning to fix.
Here is my problem:
When I tried to take out the screen from my phone, (step 15-18) I was curious about the new screen, so I tried to connect it. It was completely dead! Then I tried the old cracked one, and suddenly that was dead to! This is a phone that some fool has been inside earlier and changed battery, but I suspect he has done some more really stupid things. The Taptic Engine is living its own life and vibrating every time I slightly touch the home button. (I have a new Taptic Engine) The phone is also full of dust and small particles that does not belong there. One tri-point Y000 screw (step 18) is even missing! Now the biggest problem is that both screens are black! I know the phone is on, because I hear voice command speak when I turn on the power. The screen worked before I tried to change it? And one last thing: My new LCD screen came with new flex cables. Is it possible to switch over, so I can use the old ones?
Hi,
Is your problem solved?
Be careful of damaging MOSFETs by the LH side of the large lower display cable. After replacing the battery and turning the device on, the phone showed low charge and didn't have a charging symbol even after plugging into multiple cables and chargers. Turns out I had damaged the logic board attempting to disconnect the connector.
-
-
-
断开另一个低显示排线插头,这个就在你前一步骤断开的插头的后面。
I used the other end of the spudger on this connector and it seemed to work a little better for me. I came in from underneath the top-right edge instead of the bottom right.
-
-
-
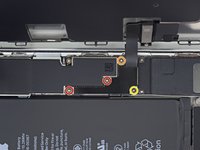
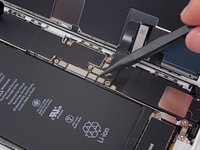
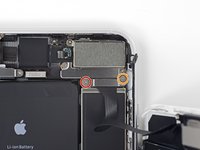
移除两个将支架与前面板传感器组件固定的三点Y000螺丝
-
1颗 1.0mm 螺丝
-
1颗 1.2mm 螺丝
una vite da 1mm e due viti da 1.2 mm???
Ciao Matteo! Grazie per l’osservazione. Ho appena modificato il testo :) La traduzione è aperta a tutti. Hai quindi la possibilità di fare le tue suggestione direttamente nel testo e sei il benvenuto se vuoi usare di questa possibilità nel futuro. Grazie ancora per la vigilanza! Saluti, Claire
The tool kit does include a 1.0 or1.2mm screwdriver! How am I supposed to remove those screws?
Bought the screwdriver that supposedly fits these screws and it still doesn’t work.
My bracket looks different. Can’t get these screws out.
kit came with wrong bit. i received 2x P02 (penta tips) and no tri point y000.
-
-
-
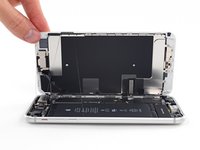
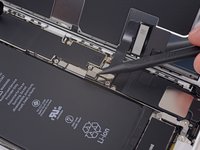
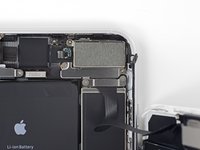
使用撬棒尖端或者支架来断开插座上的前面板传感器组件插头。
-
-
-
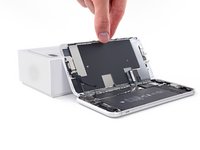
拆掉显示屏总成。
Should there be a step somewhere in here to point out when to remove the blue plastic from the new iFixit screen?
-
-
-
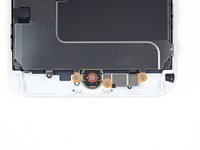
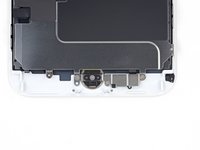
移除 Home 键与 Touch ID 传感器支架上的四颗 Y000 螺丝。
-
一颗 1.2mm 螺丝
-
三颗 1.3mm 螺丝
The 1.2mm screw on the home button stripped for me. I ended up bending the bracket on each side in order to remove the home button. I then bent it back as best I could during reassembly and screwing it down.
The leftmost screw here (attaching the display bracket to the front panel plastic) was not present on my aftermarket screen assembly. Had to pull it from the original.
same here on the one im doing now. Dont know its history.
-
-
-
从右侧向上断开 Home 键排线的连接器。
I accidentally severed the cable, now my sensor is disabled. So far this was the most delicate cable I encountered because it was so small.
-
-
-
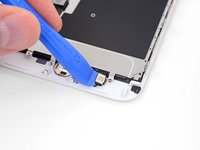
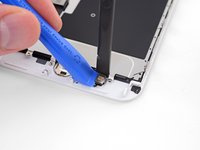
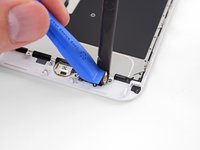
用一个塑料撬片轻轻地分离用于固定 Home 键与 Touch ID 传感器的排线与屏幕的粘合胶。
This did not work for me…. ended up breaking the connector from the home button. Most likely messed up the customer’s iPhone… the adhesive would not pry up with just pick… does iFixit offer a home button replacement?
did not work for me either, also ended up breaking the connector, just use the tweezer to separate it. do not use opening pick!!!!! it’s too thick for it!!
Isopropanol and heat will loosen the adhesive and its possible to gently remove with plastic pick, metal tweezers risk damaging the Home button cable and disabling the Touch facility.
Pretty easy to follow instructions if you have patience and careful hands. If you have clumsy hands you will not succeed in fixing any small electronics. There are some small things you should use to help you succeed at fixing small electronics, like some scotch tape or other clear tape to hold some of the cables in place while you work on small electronics items, also a small heavy bottle or object to propped the iPhones cases against to hold them from falling over so that your hands can be free to perform your tasks. Great job you are doing iFixit personel and I am with you all the way with fighting for our rights to fix our electronics equipment.
wogriffith - 回复
Isopropanol in conjunction with the heat really did the trick here. Heat up first, then use plenty of the alcohol to pry it up carefully using the pick.
Heat dryer on high worked for me.
I heated the tip of a thin knife with a hot air gun and slide it under the flexible cable. When I hit resistance I reheated the knife. Keeping it parallel to the board while doing this. After 4 heatings the knife moved the rest of the way and the cable lifted easily off of the iPhone back. This method left enough glue on the cable that it restuck fine when moved to the new iPhone.
Apple loves to make this the most difficult thing. I've been successful many times, and not so on other repairs. I just finished a repair and everything was in tact, but sadly it didn't work. Took a part and put back. So I turned on the assistive touch home button. They will be getting a new phone soon, so not a big issue except Pride.
-


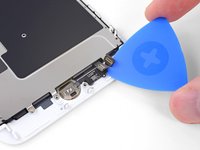

对比你的新更换的部件与原来的部件——你可能需要在安装之前将新的部件去移动剩余的部件或者除去粘合胶。
“‘以逆序来重组你的设备“‘
带上你的电子垃圾到R2 or e-Stewards 的认证回收商。
修理没有遵循预期?检查我们的问题解答社区 来解决问题。
对比你的新更换的部件与原来的部件——你可能需要在安装之前将新的部件去移动剩余的部件或者除去粘合胶。
“‘以逆序来重组你的设备“‘
带上你的电子垃圾到R2 or e-Stewards 的认证回收商。
修理没有遵循预期?检查我们的问题解答社区 来解决问题。
316等其他人完成本指南。


36条评论
Very useful information…
Has anyone found out any info about replacing the Apple iPhone 8 Front glass. Last I checked Apple had made it that if you install a non OEM screen and updates their phone, it will brick there phone. I have not been fixing any iPhone 8’s or iPhone x’s due to this. I So if someone knows if this has been resolved or if this still holds true can you please let me know. Also, Fixing back glass. From what I have seen they use some crazy glue. Does anyone have any methods on a easy way to replace back glass on the iPhone 8’s ? do you still basically have to gut the phone ? what kind of glue is used to glue it back on? Any help with these issues would greatly be appreciated I have been repairing phones for over 8 years + and turning away customers because apple is so dumb with these things upsets me greatly. I loved repairing iPhone up until this point. Help please.
Replacing the screen will not Brick the iPhone, although the 8/8Plus & iPhone X all have an issue with the Ambient Sensor when a new screen is fitted. Although a way around this is to use a EEPROM device to copy the firmware from the original screen. It is also rumored that Apple are fixing the Ambient Sensor issue in iOS 12.
Donald -
Why don't you just throw an oem replica decal over the back glass and call it good. Any more time spent on something that is designed to break & devalue your device into a state beyond reasonable repair efforts, to inevitably promote purchase of a newer model, should be treated with scorn and covered with cheap adhesive decals from China.
Anyone know if the ambient sensor is fixed?
alexaamo91 - 回复
Hi. My iphone 8 plus screen is broken. I purchased it from USA, I’m in Turkey, Istanbul right know. When I took it to the apple store over there, they told me I need a code to replace the screen, and every country has different code. In order for me to replace the screen, I need that code.
Would some one please tell me what to do. I really appreciate it.
Thanks.
Sean Nouhi - 回复
I replaced the screen on an iPhone 8 Plus. When I transfer the home button it does not work in the new screen, but still works in the old, cracked screen. Thoughts?
I’m having same issue and tried numerous aftermarket screens, I had a spare 8Plus here ready to repair (lcd damaged but working) tried it on that separate screen and Touch was fine again so the issue has to be aftermarket screens I’m guessing it’s the quality of the lcd is the issue as all original screens have proven fine but 3 aftermarket screens later and no joy so worth paying a little more for oem quality. The8plus is the only model so far Iv had this issue with as prior models are simple, but so many advertised as “original” it’s hard to pin point decent supplier
I successfully substituted the screen with ifixit kit. However, force touch does not work and the luminosity is way less than the original
Did the replacement yesterday on my own with the iFixit kit and the parts supplied. It was really easy and great that it came with the adhesive and all the parts integrated in the replacement screen. The only downside is that the TrueTone isn’t working anymore nut I knew this before buying the kit.
It took me about 2 hours to complete.
I forgot to disconnect the battery connector now my iphone 8 won’t boot up any idea how to fix this ?
My home button is not recognized with the new screen fitted, so I’m left with putting the broken screen back in and a smaller bank balance :-(
Front camera removal is not even mentioned. That seems like a rather large omission on this replacement. Wonder how many people followed this document to the letter only to find out that the front camera is still on the old screen.
Hi Danny,
Thanks for the note! As stated in the introduction, this guide is written for the replacement part we sell, which comes with the front facing camera, earpiece speaker, and EMI shield already installed. I will amend the instructions to point to a front facing camera guide.
After I completed the repair on my iPhone 8 Plus, there’s some time of back lighting/impact point on the bottom right of screen. Anyone else’s repair have this issue??
thank you Jeff and the ifixit folks… great attention to detail. worked out very nicely in practice
Hi i fixed using this guide, i got to say it is incomplete. You need to remove the metal frame from the original screen as well and also the top of the original screen the camera module and speaker module. And the reminder and the removal of power cable need to be extra careful in choosing the right cable to unplug. I unplug the wrong one and it caused my touch ID not to work. Take note on this pointer.
Hi! This guide is written for our iPhone 8 complete screen, which has the metal frame and camera/speaker module pre-installed. We also have a guide for the bare LCD/digitizer part, which requires transferring the frame and front assembly.
Hello, I replaced the display of my 8 plus using the instructions and your replacement display. Now the phone discharges very quickly and gets warm ?! If only I had kept my broken display. What can i do?
I replaced the front screen on my iPhone 8 Plus with an iFixit kit and when I turn the phone on you can feel the phone vibrating when you click the home button but the screen is black and won’t come on…. any thoughts? I took it back apart 3 times disconnecting and reconnecting the connectors and it never would come on…. I need HELP!!!
Hi Payton,
I would check if the screen backlight was blown out. This commonly happens when you disconnect the screen without disconnecting the battery first. To check, “turn on” the phone as you have been. Shine a bright light directly at the screen, and see if the LCD shows anything. If it does, the LCD is working, but the backlight circuitry is broken.
I have this same issue
i tried the bright light idea, but cannot see anything
This is the second ifixit screen replaced on my iPhone 8 Plus. Unfortunately, this second repair kit was a much lower quality that the first one, which was only one year prior. The screen is much lower quality with really poor contrast. It works, but it makes it look like a cheap knockoff phone now. Also, two bits in the included tool kit were too large to use! They are marked the same size as my previous kit, but they are definitely larger and will not fit into the tri-lobe or philips head screws. I ended up using the bits in my previous tool kit. Overall the quality of the components has definitely gone down hill, which is hugely disappointing.
Hi Mark,
I’m really sorry to hear about your experience with the screen kit. Thanks for bringing this up—we take pride in the quality of our tools and components and seek to rectify any issues that show up. If our customer service team has not reached out, please contact us here.
Performed successful replacement of an iphone 8 plus screen. The blue triangular plastic opening pick was useless for opening the case, even after using a heat gun to soften the adhesive. A razor blade was necessary to separate the screen from the body, then the picks could be used. All other aspects of the repair guide were excellent.
Brilliant instruction. I found the screen replacement really easy to follow. Thanks!
Bought this part fitted it all working fine put a screen protector on, thought all was sorted and noticed it had a horrible screen/lightbleed issues on the right side! So So annoyed with this..
No country code needed, Thats pure BS. I replaced mine… iPhone 8Plus in 25 minutes. The phone has no coded parts except the finger print sensor. If you remove the touch id button according to these instructions you’ll have no problem with this. BTW I have done dozens of screen replacements using parts from iFixit and have NEVER had a problem. If you’re careful and make sure you have the correct model numbers for your phone you’ll get parts that work perfectly. Also big thumbs up on the guide. Excellent instructions. But somebody should write up the part about installing the glue. That’s a tricky bugger. Always remember to leave the fine assembly plastic covers in place on the glue until your ready to assemble. Keeps the glue from sticking to your cables during the final re-assembly phases. The covers are split so they wont be difficult to remove once done.
Hi. Followed the instructions. Now when we switch on we get the apple symbol for a few seconds. Then it goes off and repeats. Any suggestions please? Thanks
I bought a cheap, cheap, cheap replacement screen from somewhere else, and didn’t realize that i also had to switch over my earpiece, sensor, backplate, etc. it was a big surprise but with the help of the other tutorials on this site I was able to complete it! the screen quality is a lot lower than expected, a tad fuzzier, but you i got what i paid for. great info!!
I replaced a broken screen on my daughters iPhone 8 plus and now it will turn on but it only displays a apple logo screen on and off. Please tell me it can be fixed
Courtney H - 回复
I am hoping to find a fix also. I came here based off of 6 plus issues that came up when I searched. But if not the screws being placed in the correct spots then it could be a few things if it’s like the 6 at all...? My niece allowed her friends to rip hers apart now I’m left with the pieces of not knowing how it came apart or names of anything bc I’ve never messed with a replacement before. Although the home button and camera we’re supposed to be the only parts switched over I’m still in a boggle. I hope someone decides to answer! A few people with the 6 said they left it plugged in over night flashing and it worked. Thinkn about tryn but I’m afraid not knowing if the screws are properly placed first! Good Luck
Hi, my iphone 8 plus was run over and both the front and back were obviously heavily damaged. I read that if the back is damaged, you would need to replace the whole chassis and place all of the internal components into the new one. Do you sell the whole chassis? I see the front screen but not the rear.
what do I do about super stripped screws?
Ean Palacios - 回复
I’m sorry, your comment slipped past my radar earlier. For future fixers that might see this and ask the same question, you can check out our stripped screw guide for some detailed advice.
Adam O'Camb -
Do you need a toolkit like the essential toolkit
Adam Palmer - 回复
Hi Adam. Having a tool kit with all of the listed parts above is best. The screw heads are very small and each set of screws needs a very specific type of driver to remove them without stripping any of them.
Kyle Luksa -