-
-
零插入力(ZIF)连接器通常会给初学者带来麻烦。 ZIF连接器用于固定精细的带状电缆,如FFC(扁平柔性电缆)或FPC(柔性印刷电路)电缆。
-
要断开电缆连接,请使用撬棒或指甲的尖端将小的锁片翻起。 然后,您可以安全地拉出电缆。
-
-
-
偶尔,你会发现一条丝带状电缆,你可以直接把它从它的插座拔出,并没有锁舌。
-
这些接头通常出现于较大的电子设备如打印机、投影仪或游戏主机,比如这台 PS3 控制板。
-
若要断开连接,直接将其从插座中拔出。
-
-
-
将你的工具尖端放在接口的边缘下,并将连接器从其插座上直接撬起。
I have an idea,/Request that I'm sure would be worth the effort, and fit right into this subject. how about a step by step guide on fixing the mistake of fudging up the socket yes on the mother board Guilty, right now it's a 500 dollar paper weight!! ! And I'm sure there's a long line of us,right guys, since you guy's are Awesome at it! Where to source the female sockets that's go onto the board and the proper steps and tecniques , would be greatly appreciated, keep up the great work!!
Sorry to hear that! My usual advice would be to take it to a repair shop that performs board-level repairs (a.k.a. microsoldering). Replacing a damaged connector socket typically requires a lot of skill, practice, and tools that likely cost more than the full retail price of your device. So, it’s not exactly DIY-friendly! But if you’re interested, you can find a good introduction to board-level repairs on our YouTube channel.
Is there a specific name for this type of connector? (brand, etc).
Stack-type Board-To-Board connector. JAE is a big manufacturer. FPC (Flexible Printed Circuit), what we commonly know as flex cables usually - is considered a board in this context.
"To reconnect, align the connector carefully over its socket and press down with your fingertip—first on one side, then the other—until it clicks into place."
This is ambiguous because it isn't clear to readers which is the 'side' of the connector referred to. For example, with a long rectangular connector, do you mean one of the short sides, or one of the long sides? I fear I may have got it wrong - after replacing my iPhone XS battery the bottom speaker no longer worked.
I disassembled the phone and disconnected and reconnected the connectors, to no avail, so reassembled the phone and ordered a replacement speaker. After fitting that, the speaker still doesn't work but unfortunately my screen now has a very bright stripe a few millimetres wide down the RHS. I didn't apply any excessive forces while lifting the screen and working on the phone - in fact it was easier to remove than the first time I opened it. The only thing I can think of is I used excessive isopropyl alcohol when cleaning the seal off.
-
-
-
对于小型同轴连接器,像这些U.FL天线电缆接口一样,使用薄的静电敏感设备安全撬刀将连接器从板上直接撬开。
Hello, I am repairing a tablet and the head to my coaxial cable fell off. What do I do?
-
-
-
-
像这样的显示器和摄像头电缆连接器有时会在插座背面有一个小金属夹,将其固定到位。
-
为了分离连接器,将夹子下方使用撬棒的尖端轻轻推入。 然后,将夹子摆动到插座的另一侧,使其平放在电缆上。
-
将夹子和电缆夹在一起,轻轻的向电缆方向拉动,将连接器从插座中取出。
-
-
-
这是Xbox游戏机上常见的另一种类型的带状电缆接口。
-
要卸下它,请使用撬棒或指甲将透明的蓝色标签从接口上提起。
-
接下来,使用撬棒的尖端推开塑料锁定片。
-
沿着电缆的方向将带状电缆从接口中拉出。
-
-
-
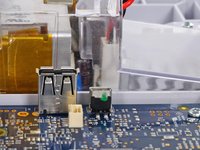
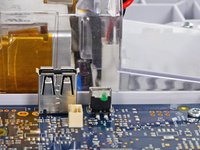
电源线连接器就像这一个有一个小的卡舌将其锁定到位。
-
要将连接器与插座分开,请按住卡舌,然后从连接器径直从插座上向上拔。
-
JST连接器和它样式相近但是没有锁定卡舌。还有一些其他样式也差不多,可能有或没有卡舌,可能有二到三个卡舌,还可能有半打甚至更多的线缆。通常这些可以在相机中的麦克风或扬声器、收音机中的电路板上找到。
Hallo, ich habe genau wie auf dem Bild bei meiner PS3 Slim ein ähnliches Kabel von dem Laufwerk zu trennen versucht. Beim Ziehen ist nicht das Kabel abgerissen, sondern die Anschlusstelle an der Platine hat sich auf einer Seite gelöst. Muss man hier nun das Teil wieder dran löten oder kann man es irgendwie mit Klebern fixieren?
-
-
-
如果您看到由大量单独连接的导线组成的电缆,这些电缆通过一个接口连接,则拉动电缆本身可能是最好的方法。
-
沿着与各个线路相同的方向将电缆从接口上拉出。
Lijkt me dat je hier eerst vlak over het kunststofdeel van het kabelcontact, in het midden waar hij lager is, smalle dunne schroevendraaier steek zodat het kunststof iets omhoog buigt en het borgnokje vrij komt zodat je hem eruit kan trekken!
Terug gewoon insteken.
-
-
在这个步骤中使用的工具:iOpener$17.99
-
有时从插座中拔下连接器是不够的; 需要额外的一两步来松开电缆。 这里我们有一个Lightning端口带状电缆,轻轻地粘在一起。
-
要清除它,请小心地将电缆下方使用撬棒或吉他拨片滑动,然后将其从粘合剂中取出。
-
-
-
你也会遇到不是被设计为可拆解的电线,他们被焊接到位。
-
不要担心 - 烙铁和一些焊锡芯使这些小家伙很快的断开。
-
如果焊接还不是您会的事情,请转到我们的焊接技术指南并学习新技能!
-
-
-
这些接口常用于袖珍计算器,DECT电话和其它具有简单单色7段或低分辨率显示器的设备。它们用于将LCD玻璃上的导电轨道连接到下面电路板上的一组焊盘。 (这些显示器有时会遇到死区或像素行。)
-
螺丝或扭曲的金属片通常固定金属框架,压缩LCD和电路板之间的弹性条。打开这些以分离LCD和弹性条。
-
弹性体条由沿其长度交替的导电层和非导电层组成。 LCD的每个接口都有几个,无需精确对齐。
-
-
-
最终,你一定会遇到你从来没有见过的接口。
-
仔细检查接口,并尝试确定它是如何分开的。
-
如果您仍然遇到问题,请搜索类似设备的指南,以查看是否提供任何线索,或在我们的Answers论坛中寻求帮助。
Hi,
I've just been wrangling with a 25ish year old Kenwood stereo. There were some connectors on it that I couldn't work out - which led me to this guide. The specific connectors aren't shown here. It turns out theybare spring-loaded, and you have to push the upper part (that I initially thought was a plug) down into the board - and this releases the ribbon cable. On the stereo, there are some shorter ones (8-pin), and some longer ones (15pin). On the longer ones, if you look close enough, they helpfully say ‘push' on them.
I've taken some photos of you'd like to add them to this guide?
-


387等其他人完成本指南。


25条评论
Beautiful work. However, my modern LCD flat screen TV set uses the "No-Fuss Ribbon Cable Connectors" and I think they are fairly common in this application.
"Step 2 — No-Fuss Ribbon Cable Connectors
Occasionally, you'll find a ribbon cable that simply pulls out of its socket, with no retaining flap.
<snip>
These kinds of connectors are fairly rare, so check carefully for a way to release the connector before you resort to pulling on the ribbon cable."
This was great! thanks for the detailed pictures. I have a question though on a very specific port used on apple tv 1.
here's the link to my post
It's important to note that ZIF connectors often do require force to insert, for example the digitizer ribbon cable on the Nexus 6, which has a bit of negative tension from being curved. It has to be pushed in using the little raised portion with a fingernail, and held so the line on the cable matches the line on the PCB before closing the retention bracket or else it will not connect properly.
I have a visio T-con board that has two flat ribbon connectors the one to the screen as a flip open latch you can do with your finger nail the other has a thin metal strip that over hangs the end on both sides. And ideas on how this one opens up? Rowland
Great post!
Would be great if Jeff or someone could help me with my question, doesn't look as though that connector type is covered in the the post above. Its listed here - Need help with these Connector latches
TIA,
Norm
good page, but I was looking for the display connectors for ipad air 2. They seem to just push on, but the pressure is so light I am not confident that they are seating correctly. It won’t turn on at any rate though the screen briefly comes up at boot.
Those are pop connectors—see Step 4. Align them carefully, and press them down; you should feel them click into place.
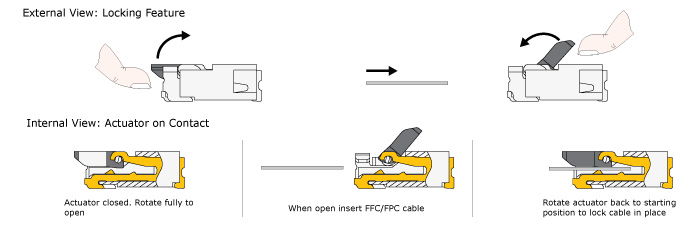
I recently ran into a FFC (Flat Flex Connector) type I didn’t know how to open exactly, and this page only refers to the flip-lock type. Turns out it was a slide-lock connector and the diagrams on the page below were very helpful. I simply used my tweezers to push on the two tabs towards the cable, the actuator moved easily once you knew which way to apply force.
Doing ifixit versions of these diagrams would be VERY helpful.
Slide Lock Diagram: ''https://gct.co/Images/products/ffc-con...
Flip Lock Diagram: ''https://gct.co/Images/products/ffc-con...
Parent Page: ''https://gct.co/ffc-connector''
Googling to find these hints was VERY difficult not knowing the terminology. But this ifixit page was at the top of the stack, update to save the next guy half an hour googling?
(Updating to say you DO mention ‘sliding’ connectors… but the mechanism of the actuator is not very clear and/or the photos didn’t quite get me there, mine was a smaller pin-pitch I think too).
@clickykbd This is a great idea! I’d love to add it to the guide. Do you mind sharing the name of the device you were working on, so we can try to get some photos of that connector in the wild? Or do you have some photos of your own? For copyright reasons, we usually can’t borrow other people’s images or graphics for our guides without permission. Thanks for sharing!
Jeff, It was a Marshsall VLCD70MD-3G on-camera/field monitor. The connector was for the LCD ribbon flexible pcb cable.. I’ve still got it apart as I am trying to source a LCD, so I can try to get some half decent photos in a day or so. I’m pretty sure I’ve run into these before and they came apart with the “just pull” method… but reseating them without mangling the flat-flex was very difficult without knowing the trick if I recall. Thought I would do my homework this time.
Bonjour
Je voudrais retirer un câble nappe écran sur la carte mêre de mon téléviseur LG 47LE5510 il y a dessus un petit levier qui se lève à l’ongle mais le câble semble collé et je n’ose pas forcer. Sur le connecteur est indiqué FS60 et le câble est un EAD60974135.
Pouvez-vous m’aider car je ne voudrais rien casser et ces 2 câbles coûtent cher en piece détachée.
Merci d’avance
Thank you, thank you, thank you. My husband really needed this.
Some ZIF ribbon connectors I’ve found, have the latch on the side of the insertion of the cable, some others on the oposite side. So be sure to pull on the correct side, or you will damage the connector. Another tip is to pull them very gently and when closing it, also with not much pressure, I have spoiled some hinges in the process, what is left to do is replace the whole connector.
Great article, but just one question… WhatWhat happens if you break one of these? Can you suggest a fix for something like the ZIF connector.
Is it pretty much a write off if you snap the latch on some of these connectors?
I have a 3D printer from China, it is an Artillery Sidewinder X1 v4 model . It uses ribbon cables from the power supply to the heated nozzle and the heated print bed. It is my understanding that power is sent along a couple (or more) of the wires to distribute the load, and I get a good deal of heat at the connector site, on the ribbon cable itself. It is enough heat that I believe the connection and/or the ribbon cable itself will fail.
It is a friction fit connection and I imagine it is difficult to keep the connections inline at the connecting point. The printer uses 20 wire and 30 ribbon wire cables as can be seen at: https://www.amazon.com/Artillery-Ribbon-...
My question, and I do understand the value of your time, is – what can I do to better align the connections? Is there some sort of heavier gauge ribbon I can use and, perhaps, do so through some sort of adapter at the connection point?
Anything you can suggest is appreciated.
Hi,
i need the connector in step 10.
Where can i buy this?
Thank Manuel
Merci : très clair et complet. Je vais pouvoir aider un ami à rebrancher le connecteur de son GPS
Where may I purchase these zif ribbon connectors?
URL disabled
Hi Robin! Which URL is disabled? Can you point me to a specific step?
URL disabled on my phone.
How to fix it now
Why can't I ADD min
What if I break the ZIF connector itself (were the ribbon goes), is my tablet ruin?
elainegb27 - 回复
Unless you are good with a soldering iron or hot air station I would suggest taking it to someone that can do it.
deswaite -
“…Be sure to pry up on the hinged flap, not the connector socket….” but we’re not going to provide any further information than this and good luck with that :-)
andyescribe - 回复
That’s what the photos are for—providing a visual example. There are a million different implementations of ZIF connector out there, so it’s not possible to provide specific instructions for each one in a single guide. For that, you need to search for the guide for your specific device. Unfortunately, looking at your post history, it appears you attempted to do that, but the guide you were following (Nexus 6) mislabeled the battery connector as a ZIF connector. I’ve corrected the guide. Sorry for the trouble!
Jeff Suovanen -
You have provide awesome tips which is very helpful. I have issue with FPC that not connecting with Cable
Ralph Vale - 回复
hola he intentado cambiar el cristal de mi apple watch 2 despues de conseguirlo me he dado cuenta que he retirado el cable sin bajar la pestaña o no se que he doblado los pines despues de intentar una y otra vez el conector zip de la derecha ha quedado inservible es posible comprar ese conector en algun lugar o sabrian que nombre de conector debo buscar ya que no viene en ninguna expecificacion gracias
Fran Ansio - 回复
Great tutorial, thanks. Had I not seen it, I would have irreparably damaged my keyboard. Perhaps it lacks a bit more guidance on how to place the cables back. I found that part to be the hardest actually.
Juan Dueñas - 回复