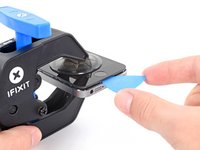
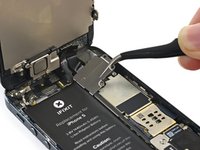
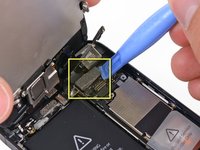
跳转到主内容

此翻译可能不反映源指南的最新更新。 帮助更新翻译查看源指南

iPhone 5 更换电池

你所需要的

视频概述

  1. iPhone 5 更换电池, 为玻璃贴上胶带: 步骤 1 中的图像 1,3 iPhone 5 更换电池, 为玻璃贴上胶带: 步骤 1 中的图像 2,3 iPhone 5 更换电池, 为玻璃贴上胶带: 步骤 1 中的图像 3,3
    • 如果屏幕玻璃破裂,请用胶带粘住玻璃,以防止进一步破裂,并防止在维修过程中对身体造成伤害。

    • 将封箱胶带层叠粘到iPhone屏幕上,确保整个屏幕都被胶带覆盖。

    • 戴上护目镜来保护你的眼睛,使之不会受到弹出的玻璃碎片的伤害。

  2. iPhone 5 更换电池, 拆除五角螺丝: 步骤 2 中的图像 1,1
    • 在你开始之前,把 iPhone 电量降到 25% 以下。满电的锂电池如果不小心戳破会着火或爆炸。

    • 在开始拆卸之前请把你的iPhone关机。

    • 拧开lightning接口两旁的两颗3.6 mm五角螺丝。

  3. iPhone 5 更换电池, 如何使用防止显示屏被分离: 步骤 3 中的图像 1,3 iPhone 5 更换电池, 如何使用防止显示屏被分离: 步骤 3 中的图像 2,3 iPhone 5 更换电池, 如何使用防止显示屏被分离: 步骤 3 中的图像 3,3
    • 在下面的步骤中,你将把显示屏拉出手机。显示屏由一个玻璃屏和一个金属夹扣塑料挡板组成。

    • 无论你使用什么工具,你需要确定你把整个显示屏拉起来了。

    • 如果玻璃开始从塑料分离,如图一所示,在塑料框架和金属手机之间滑动塑料小撬棒,以撬出后机壳的金属夹。

    • 如果你使用分离显示面板重新组装面板,你可能想要在塑料边框和玻璃之间使用一条细细的粘合剂来保持手机关闭。

  4. iPhone 5 更换电池, 反向钳使用指南: 步骤 4 中的图像 1,3 iPhone 5 更换电池, 反向钳使用指南: 步骤 4 中的图像 2,3 iPhone 5 更换电池, 反向钳使用指南: 步骤 4 中的图像 3,3
    • 接下来的两个步骤演示了如何使用反向钳,一个旨在简化打开过程的工具。 如果你不使用 反向钳,请跳过这两个步骤以使用替代方法。

    • 有关如何使用 反向钳的完整说明,请查看本指南

    • 将蓝色手柄拉向铰链以解锁反向钳的手臂。

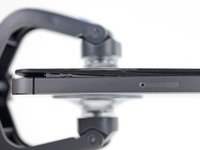
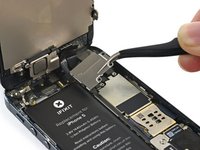
    • 将反向钳手臂滑过 iPhone 的左边缘或右边缘。

    • 将吸盘放在靠近 iPhone 底部边缘的位置——一个在正面,一个在背面。
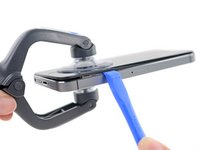
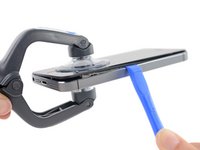
    • 向下推吸盘以将吸力施加到所需区域。

    • 如果发现设备表面太光滑而反向钳无法吸住,请使用包装胶带来创造一个更容易抓握的表面。

  5. iPhone 5 更换电池: 步骤 5 中的图像 1,3 iPhone 5 更换电池: 步骤 5 中的图像 2,3 iPhone 5 更换电池: 步骤 5 中的图像 3,3
    • 将蓝色手柄向前拉,以锁定双臂。

    • 顺时针旋转手柄 360 度,直到吸盘开始拉伸。

    • 确保吸盘 保持相互对齐。如果它们开始滑出对齐位置,请稍微松开吸盘,然后重新对齐支臂。

    • 当反向钳创造出足够大的间隙时,将撬片插入屏幕下方。

    • 如果反向钳没有创造出足够的间隙,则对该区域施加更多的热量,并将手柄旋转四分之一圈。

    • 每次转动不要超过四分之一圈,每圈之间要等一分钟。让反向钳和时间为你工作。

    • 跳过下边两个步骤

  6. iPhone 5 更换电池, 手动打开步骤: 步骤 6 中的图像 1,1
    • 将吸盘按在屏幕上,就在主屏幕按钮上方。

    • 确保吸盘完全在屏幕上,而且吸的够紧!

    • 如果你要打开一部屏幕破裂的 iPhone,可以在正面整齐地粘上几条包装胶带,然后尽可能多地挤出气泡。这将为吸盘提供一个可抓住的表面,并最大限度地减少碎玻璃的扩散。

  7. iPhone 5 更换电池, 开始抬起前面板: 步骤 7 中的图像 1,1
    • 屏幕通过卡扣固定在机身,并且有几条带状电线连接着屏幕和机身。你的目标是打开手机到足够分离电线就可以了。所以在操作时你需要非常缓慢,谨慎地避免损坏电线。

    • 确保吸盘紧紧地吸附在home键附近的前面板组件上

    • 慢慢来,持续用力。屏幕比大多数设备贴粘

    • 使用开机工具,开始将后壳轻轻向下撬,远离屏幕,同时用吸盘向上拉。

    • 有几个卡扣将前面板组件固定在后壳上,因此你可能需要结合使用吸盘和开机工具来抬起前面板组件。

  8. iPhone 5 更换电池, 拆卸前面板卡扣: 步骤 8 中的图像 1,1
    • 继续撬起围绕前面板组件的两侧,沿左、右侧拆卸卡扣。

  9. iPhone 5 更换电池, 抬起手机: 步骤 9 中的图像 1,3 iPhone 5 更换电池, 抬起手机: 步骤 9 中的图像 2,3 iPhone 5 更换电池, 抬起手机: 步骤 9 中的图像 3,3
    • 不要尝试把屏幕完全从机身分离,因为这个时候还有一些带状电线连接着屏幕和机身。

    • 请务必在维修继续前断开电池,如果不这样做的话,有时会导致手机运行太热和/或与触摸敏感问题。

    • 当前面板组件底部和侧面夹扣被撬起后,拉动组件的底部使之远离后壳。

    • 缓慢提升前面板组件跟后壳体成约90度。

  10. iPhone 5 更换电池, 移除电池连接部位螺丝: 步骤 10 中的图像 1,1
    • 拆下将金属电池连接器托架固定到逻辑板上的以下两个螺钉:

    • 一个1.8 mm的菲利普斯螺丝

    • 一个1.6 mm的菲利普斯螺丝

  11. iPhone 5 更换电池, 移除电池支架: 步骤 11 中的图像 1,1
    • 从手机上拆下金属电池连接器支架。

  12. iPhone 5 更换电池, 切断电池连接: 步骤 12 中的图像 1,1
    • 使用一个塑料打开工具,从它的插座上的逻辑板上轻轻撬电池接口。

    • 请小心不要弄掉接口周围的小型元件。

    • 非常小心,只撬起电池接口本身,而不是逻辑板上的插座。如果你撬起逻辑板上的插座或逻辑板本身,你可能完全破坏接口。

  13. iPhone 5 更换电池, 移除前面板组件挡板螺丝: 步骤 13 中的图像 1,1
    • 移除以下螺丝,这些螺丝把前面板组件上的挡板贴片固定到逻辑主板:

    • 两个1.2mm菲利普螺丝

    • 一个1.6mm菲利普螺丝

    • 这个螺丝不能使用有磁力的螺丝刀吸起。在移除的时候请不要弄丢了。确保装回的时候放在正确位置——带磁力的螺丝刀可能会干扰罗盘。

  14. iPhone 5 更换电池, 移除前面板显示排线托架: 步骤 14 中的图像 1,2 iPhone 5 更换电池, 移除前面板显示排线托架: 步骤 14 中的图像 2,2
    • 朝向电池的方向来提起显示屏电缆托架,并将它从iPhone移除

    • 在重组时,夹左钩逻辑板下,对手机的外方放低支架。

  15. iPhone 5 更换电池, 切断显示排线: 步骤 15 中的图像 1,3 iPhone 5 更换电池, 切断显示排线: 步骤 15 中的图像 2,3 iPhone 5 更换电池, 切断显示排线: 步骤 15 中的图像 3,3
    • 在本步骤中,你断开和重连电线时,确保电池是断开的。

    • 使用塑料开启工具或指甲盖把三个前面板组件电线给断开:

    • 前置摄像头和传感器电缆

    • LCD电缆

    • 数字电缆

    • 当组装手机,这个液晶显示器的电缆可能弹出接口。这可能会导致白屏,或开机时黑屏。如果发生这种情况,简单地重新连接你手机的电缆和电源。最佳重启方式是断开你的手机电池并重连

  16. iPhone 5 更换电池, 分离前面板与后壳: 步骤 16 中的图像 1,1
    • 从后盖拆下前面板组件

  17. iPhone 5 更换电池, 提出电池: 步骤 17 中的图像 1,1
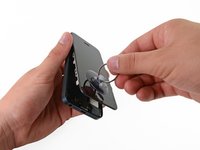
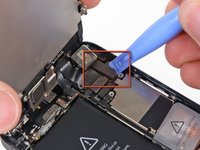
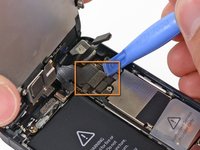
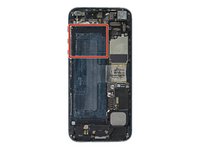
    • 捏住露在外面的透明塑料标签并向右拉,这样电池就会完整地从机身上脱离。

    • 如果你无法顺利地取下电池,可以借助iOpener工具,或者使用吹风机加热iPhone背部对应电池的区域来软化粘合剂。

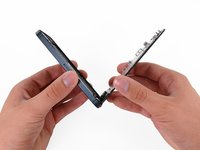
    • 拉胶的塑料标签强度不高,有可能会被扯断。如果你在取下电池前弄断了标签,可以按照以下步骤补救。
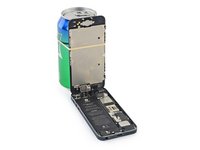
  18. iPhone 5 更换电池, 使用iOpener: 步骤 18 中的图像 1,1
    • 如果透明塑料标签被扯断,但电池仍然粘在机身上,使用iOpener或吹风机从机身背部加热电池对应的区域。

    • 这个操作会软化固定电池的粘合剂,使得电池可以更容易且更安全地从机壳上撬出。

  19. iPhone 5 更换电池, 撬起电池: 步骤 19 中的图像 1,2 iPhone 5 更换电池, 撬起电池: 步骤 19 中的图像 2,2
    • 使用塑料撬棍轻柔地把电池撬起,只撬电池靠近手机边框的那一边。撬另外三边(特别是靠近主板的那一边)可能会导致主板损坏

    • 如果电池仍然无法轻松撬出,再次重复加热步骤再试。

    • 撬起电池时动作要轻缓,沿着电池的一边多点用力,避免电池单点受力导致变形。弯折的电池可能有起火的风险。

    • 不要在电池上端使用撬棍,你可能会弄断音量键排线。

  20. iPhone 5 更换电池, 移除电池: 步骤 20 中的图像 1,1
    • 移除电池。

    • 如果你的更换电池上有一层塑料纸,请在安装之前移除。

    • 在重新组装手机时,确保电池被牢靠地固定在机身后盖上。这是为了防止在装回显示屏组件时造成其他部分的损坏。

    • 重新组装好手机之后,进行一次强制重启。这可以很简单地避免诸多可能的故障。

结论

将新的更换配件件与原始配件进行比较 —— 在​​安装之前,你可能需要转移剩余配件或从新配件上移除粘合剂背衬。

要重新组装你的设备,请按相反顺序执行上述步骤。

将你的电子垃圾带到R2或e-Stewards认证的回收商

维修没有按计划进行?查看我们的社区以获取故障排除帮助。

3775等其他人完成本指南。

由衷感谢以下译者:

en zh

50%

这些译者帮助我们修补全世界! 您也想加入吗?
开始翻译 ›

团队

iFixit iFixit 的会员

Staff

135 名成员

创作了16,475篇指南

363条评论

When I finished installing the battery, I put everything back together the way it should be but I have two small problems.

Problem 1: The top of the screen doesn't sit the way it did before I opened it. It sticks out more at the top than the bottom. I'm not talking much, maybe fractions of a MM extra?

Problem 2: The screen isn't as responsive as before. When I'm typing, it sort of lags and then it catches up really fast, sort of like when they phone is "busy" and then it catches up with what you're typing. However, it's not only during typing but scrolling and when tapping the screen. It is generally overall less responsive.

Any ideas?

jnflego - 回复

If others have this problem like I did too when first changing the batter. Here's the answer not in the steps in the guide:

When reassembling the case after replacing the battery and closing the case you have to do the following. The top of the screen (where the cables to the LCD screen are connected) has to be slid in first, before settling in the rest of the case, so that there is no "bumb" on the top of the case. If you don't slide in the case correctly, you will get screen artefacts (after effects, ghosting) when pressing the screen in normal use. You'll notice this immediately and should notice it by the frame not being even on the top.

Fix: Just reopen the screen top, slide the screen frame top first in place, then close the rest of the case and test. Should be ok.

jaakkohyry -

he cambiado la bateria tal y como lo describen pero cuando pongo la nueva bateria no enciende pongo a cargarlo y me sale la manzanita en la pantalla y se apaga asi pasa vario tiempo encendiendose y apgandose solo paraece la manzanita no se que pueda ser

Mario - 回复

Super easy! I am not used to repair things on the regular but this was a breeze. The video was the perfect companion. Hardest part was removing the screen, then reapplying the cover for the three connections towards the top of the phone. The piece didnt seem to sit right, but jiggling it around a little helped and worked like a charm!

therise03 - 回复

While trying to gingerly open a gap with the suction cup, my entire display assembly released all at once and flew up. I think I must have damaged a trace on the flex connector going to the backlight, since I now have hot spots along the top of the display and it seems half of the what-seem-to-be 8 LEDs are dead. Brightness at full is noticeably lower than a friend's iPhone 5.

alexwhittemore - 回复

添加评论

浏览统计数据:

过去 24 小时: 36

过去 7 天: 260

过去 30 天: 1,218

总计 2,580,231