跳转到主内容

当前版本的文档还未经巡查,您可以查看最新的已查核版本

iPhone 8 Lightning 接口组件更换

你所需要的

  1. iPhone 8 Lightning 接口组件更换, SIM 卡: 步骤 1 中的图像 1,2 iPhone 8 Lightning 接口组件更换, SIM 卡: 步骤 1 中的图像 2,2
    • 将SIM卡弹出工具,钻头或拉直的回形针插入SIM卡槽的小孔中。

    • 按下以弹出卡托。

    • 这可能需要较大的力。不过,请确保卡针已经对正,否则会损伤手机内部结构。

  2. iPhone 8 Lightning 接口组件更换: 步骤 2 中的图像 1,2 iPhone 8 Lightning 接口组件更换: 步骤 2 中的图像 2,2
    • 从 iPhone 中取出SIM 卡托。

    • SIM卡很容易从托盘中掉出来。

    • 重新插入SIM卡时,请确保其相对于卡托方向正确。

    • SIM卡托盘周围的薄橡胶垫圈可提供防水和防尘功能。如果此垫圈损坏或丢失,请更换垫圈或整个SIM卡托以保护 iPhone 的内部组件。

  3. iPhone 8 Lightning 接口组件更换, 卸下五角螺丝: 步骤 3 中的图像 1,1
    • 在你开始之前,请将你的iPhone电池放电至25%以下。 充满电的锂离子电池如果被意外刺破,可能会发生着火和(或)爆炸。

    • 在开始拆卸之前关闭您的iPhone。

    • 卸下iPhone底部的两个3.5毫米五角螺丝。

    • 打开 iPhone 的显示屏会损害其防水密封。在继续执行此步骤之前,请准备好更换密封件,或者如果您在不更换密封件的情况下重新组装 iPhone,请注意避免接触液体。

  4. iPhone 8 Lightning 接口组件更换, 标记你的三角撬片: 步骤 4 中的图像 1,3 iPhone 8 Lightning 接口组件更换, 标记你的三角撬片: 步骤 4 中的图像 2,3 iPhone 8 Lightning 接口组件更换, 标记你的三角撬片: 步骤 4 中的图像 3,3
    • 如果插入太深,三角撬片可能会损坏你的设备。 按照此步骤标记撬片并防止损坏。

    • 从尖端测量 3 毫米,并用永久性记号笔标记三角撬片。

    • 你还可以用不同的尺寸标记三撬片的其他角。

    • 或者,将 将一枚硬币 粘在距撬片尖端 3 毫米处。

  5. iPhone 8 Lightning 接口组件更换, 反向钳使用指南: 步骤 5 中的图像 1,3 iPhone 8 Lightning 接口组件更换, 反向钳使用指南: 步骤 5 中的图像 2,3 iPhone 8 Lightning 接口组件更换, 反向钳使用指南: 步骤 5 中的图像 3,3
    在这个步骤中使用的工具:
    Anti-Clamp
    $24.95
    购买
    • 接下来的三个步骤演示了如何使用反向钳,一个旨在简化打开过程的工具。 如果你不使用 反向钳,请跳过这两个步骤以使用替代方法。

    • 有关如何使用 反向钳的完整说明,请查看本指南

    • 将蓝色手柄拉向铰链以解锁反向钳。

    • 将手机塞进反向钳的两臂之间。

    • 将吸盘放在屏幕上主页按钮的正上方——一个在前面,一个在后面。

    • 向下推吸盘以将吸力施加到所需区域。

    • 如果发现设备表面太光滑而反向钳无法吸住,请使用包装胶带来创造一个更容易抓握的表面。

  6. iPhone 8 Lightning 接口组件更换: 步骤 6 中的图像 1,3 iPhone 8 Lightning 接口组件更换: 步骤 6 中的图像 2,3 iPhone 8 Lightning 接口组件更换: 步骤 6 中的图像 3,3
    • 将蓝色手柄推离铰链以进入打开模式。

    • 顺时针转动手柄,直到你看到吸盘开始伸展。

    • 确保吸盘彼此保持对齐。 如果它们开始滑出不对齐,请稍微松开吸盘并重新对齐手臂。

  7. iPhone 8 Lightning 接口组件更换: 步骤 7 中的图像 1,2 iPhone 8 Lightning 接口组件更换: 步骤 7 中的图像 2,2
    • 加热 iOpener并将其穿过反向钳。

    • 你还可以使用吹风机热风枪或电热板,但过热可能会损坏显示屏和/或内部电池,因此请小心操作。

    • 折叠 iOpener,使其位于 iPhone 的底部边缘。

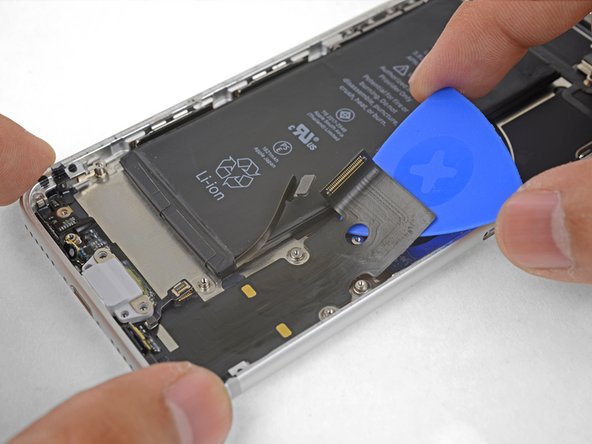
    • 等待一分钟,让粘合剂有机会释放并出现开口间隙。
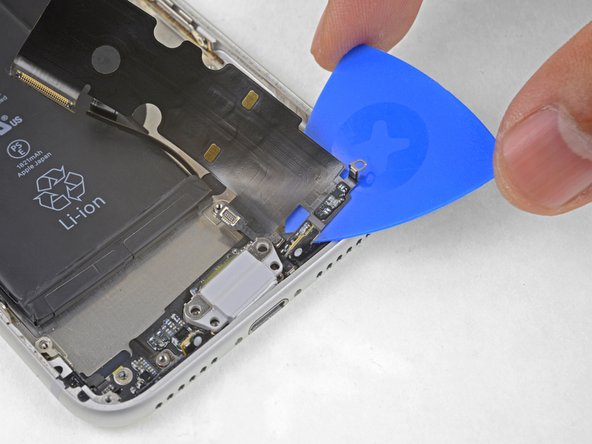
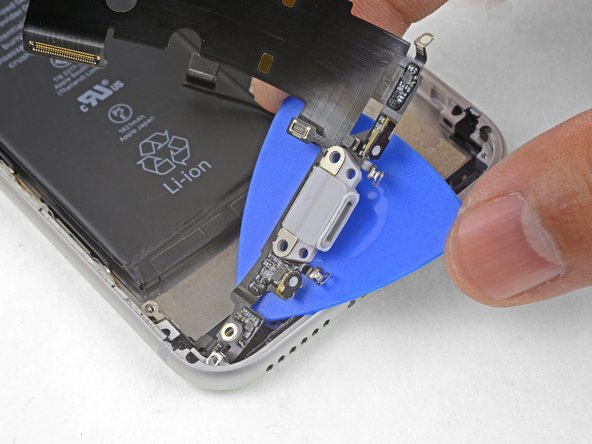
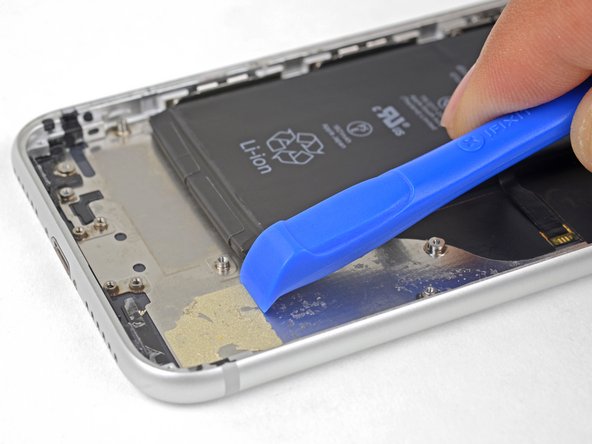
    • 将撬片插入间隙中。

    • 如果反向钳无法形成足够的间隙,请对该区域施加更多热量并将手柄旋转四分之一圈。

    • 一次不要转动超过四分之一圈,并在转动之间等待一分钟。 把工作交给反向钳和时间来完成。

    • 跳过接下来的三个步骤。

  8. iPhone 8 Lightning 接口组件更换, 加热显示屏: 步骤 8 中的图像 1,1
    • 接下来的三个步骤展示了如何使用吸盘分离屏幕。

    • 加热iPhone的下缘将有助于软化固定显示屏的粘合剂,使其更容易打开。

    • 使用吹风机或准备一个iOpener,并将其放到手机的下缘约90秒,以软化显示屏下面的粘合剂。

  9. iPhone 8 Lightning 接口组件更换, 分离屏幕: 步骤 9 中的图像 1,2 iPhone 8 Lightning 接口组件更换, 分离屏幕: 步骤 9 中的图像 2,2
    • 将吸盘放在前面板的下半部分,刚好放在home按键的上方。

    • 确保吸盘不会与home按键重叠,因为这将导致吸盘和前面板玻璃之间不能形成密封。

  10. iPhone 8 Lightning 接口组件更换: 步骤 10 中的图像 1,3 iPhone 8 Lightning 接口组件更换: 步骤 10 中的图像 2,3 iPhone 8 Lightning 接口组件更换: 步骤 10 中的图像 3,3
    • 用力、恒定的压力向上拉吸盘,在屏幕和框架之间形成微小的间隙。

    • 将撬片插入间隙中。

    • 将屏幕固定到位的防水粘合剂非常牢固; 创造这个初始间隙需要很大的力量。 如果你很难打开间隙,请施加更多热量,然后轻轻地上下摇动屏幕以削弱粘合剂,直到形成足够的间隙以插入工具。

  11. iPhone 8 Lightning 接口组件更换: 步骤 11 中的图像 1,3 iPhone 8 Lightning 接口组件更换: 步骤 11 中的图像 2,3 iPhone 8 Lightning 接口组件更换: 步骤 11 中的图像 3,3
    • 用拨片划动开口,从手机的下边缘开始一直到手机的左边缘,然后向音量控制按钮和静音开关划动,划开固定显示屏的粘合剂。

    • 停在显示屏左上角附近。

    • 不要试图将显示屏的顶部边缘从后壳上撬开,因为它可能会破坏显示屏上缘内用来固定显示屏和后壳的塑料插槽。

  12. iPhone 8 Lightning 接口组件更换, 注意事项: 步骤 12 中的图像 1,1
    • iPhone 的右边缘有易损排线。 请勿将撬片尖端插入此处,因为可能会损坏排线。

  13. iPhone 8 Lightning 接口组件更换: 步骤 13 中的图像 1,3 iPhone 8 Lightning 接口组件更换: 步骤 13 中的图像 2,3 iPhone 8 Lightning 接口组件更换: 步骤 13 中的图像 3,3
    • 将您的工具重新插入到iPhone的右下角,并将其划到手机右上角,以划开粘合剂。

    • 请勿将撬片尖端插入超过 3 毫米,否则可能会损坏显示屏排线。

  14. iPhone 8 Lightning 接口组件更换: 步骤 14 中的图像 1,2 iPhone 8 Lightning 接口组件更换: 步骤 14 中的图像 2,2
    • 轻轻拉起吸盘,抬起显示屏底部边缘。

    • 请勿将显示屏抬高超过15º,否则会导致显示屏右侧的排线变形或撕裂。

    • 拉起吸盘上的小凸起,将吸盘从前面板上取下。

  15. iPhone 8 Lightning 接口组件更换: 步骤 15 中的图像 1,3 iPhone 8 Lightning 接口组件更换: 步骤 15 中的图像 2,3 iPhone 8 Lightning 接口组件更换: 步骤 15 中的图像 3,3
    • 从显示屏左上角下的开口部分开始,将工具沿手机的顶部边缘划动,划开最后一处粘合剂。

  16. iPhone 8 Lightning 接口组件更换: 步骤 16 中的图像 1,2 iPhone 8 Lightning 接口组件更换: 步骤 16 中的图像 2,2
    • 稍微向下滑动显示屏部件(远离手机的顶部边缘),将显示屏下的塑料插槽与后壳脱离。

  17. iPhone 8 Lightning 接口组件更换: 步骤 17 中的图像 1,3 iPhone 8 Lightning 接口组件更换: 步骤 17 中的图像 2,3 iPhone 8 Lightning 接口组件更换: 步骤 17 中的图像 3,3
    • 像翻书一样将显示屏轻轻的从手机的左侧翻开。

    • 先不要试图将显示屏与手机完全分离,因为显示屏脆弱的排线仍连接在手机的主板上。

    • 用其他物品支撑显示屏以保持其倾斜,以便您进行下一步的维修。

  18. iPhone 8 Lightning 接口组件更换, 断连电池: 步骤 18 中的图像 1,2 iPhone 8 Lightning 接口组件更换, 断连电池: 步骤 18 中的图像 2,2
    在这个步骤中使用的工具:
    Magnetic Project Mat
    $19.95
    购买
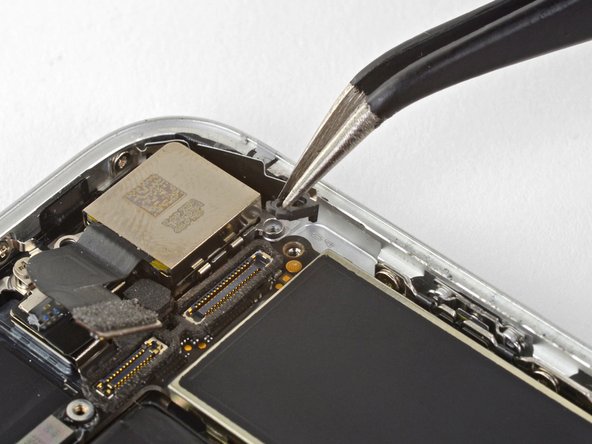
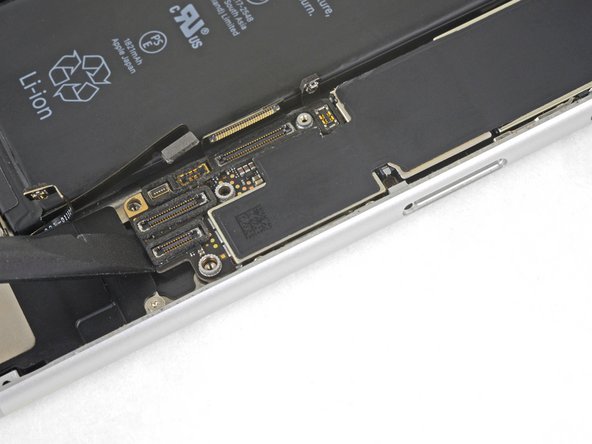
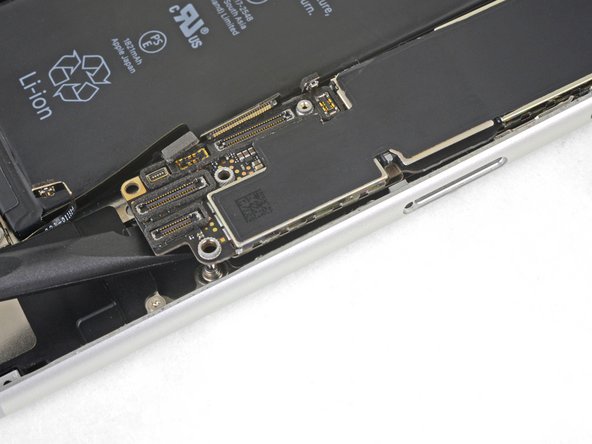
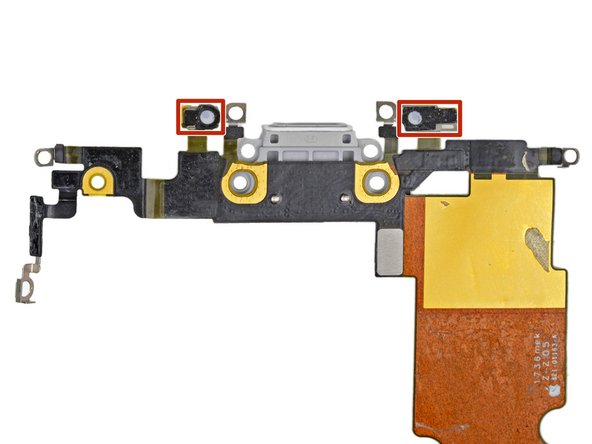
    • 卸下将显示屏电路支架固定在电路板上如下的四个十字螺丝:

    • 两个1.3毫米的螺丝

    • 两个2.8毫米的螺丝

    • 在本指南中,请仔细关注您的螺丝,以便在重新组装时,每个螺丝都能回到原来的位置。在错误的地方安装螺丝可能会造成永久性损坏。

    • 卸下支架。

  19. iPhone 8 Lightning 接口组件更换: 步骤 19 中的图像 1,2 iPhone 8 Lightning 接口组件更换: 步骤 19 中的图像 2,2
    • 使用撬棒的尖端将电池连接线口从主板上的插槽中撬出。

    • 将电池连接线稍稍向外弯曲以远离主板,以防止其在维修过程中意外接触插槽使手机通电。

  20. iPhone 8 Lightning 接口组件更换, 断开显示排线: 步骤 20 中的图像 1,2 iPhone 8 Lightning 接口组件更换, 断开显示排线: 步骤 20 中的图像 2,2
    • 使用撬棒的尖端轻轻将屏幕下部的第一个排线插头撬起。

    • 想要重新连接这种按压型插头,先将插头的一侧对准位置轻轻按压到位,然后在另一侧重复操作。切忌从中间按压插头。如果插头没有对准位置就对其进行按压的话,很可能会对插头插座造成永久性的损坏。

  21. iPhone 8 Lightning 接口组件更换: 步骤 21 中的图像 1,2 iPhone 8 Lightning 接口组件更换: 步骤 21 中的图像 2,2
    • 使用撬棒的尖端将屏幕下方的第二个排线插座撬开。

  22. iPhone 8 Lightning 接口组件更换: 步骤 22 中的图像 1,2 iPhone 8 Lightning 接口组件更换: 步骤 22 中的图像 2,2
    • 将手机上部,保护前面板传感器组排线的支架上的三个1.3mm的十字螺丝移除。

    • 移除支架。

  23. iPhone 8 Lightning 接口组件更换: 步骤 23 中的图像 1,2 iPhone 8 Lightning 接口组件更换: 步骤 23 中的图像 2,2
    • 使用撬棒的尖端将前面板传感器组的排线插头撬开。

  24. iPhone 8 Lightning 接口组件更换, 拆下屏幕总成: 步骤 24 中的图像 1,1
  25. iPhone 8 Lightning 接口组件更换, 拆卸Wi-Fi分集天线: 步骤 25 中的图像 1,1
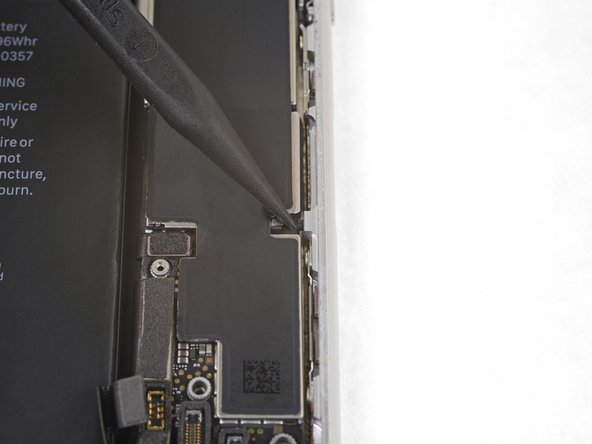
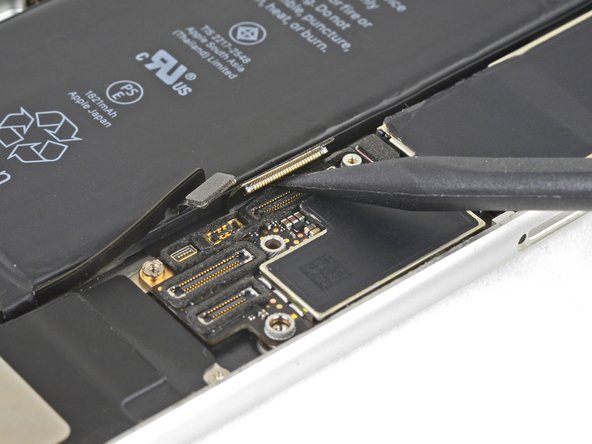
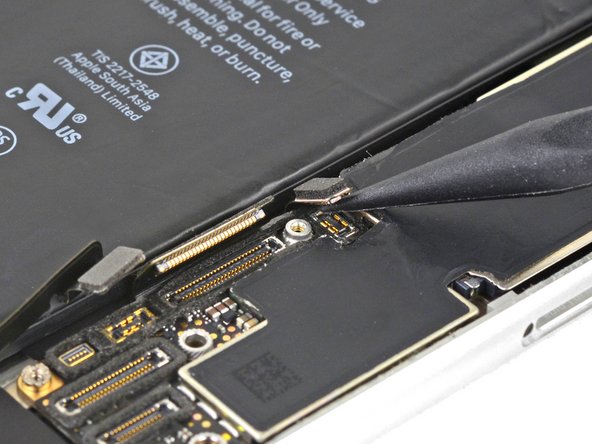
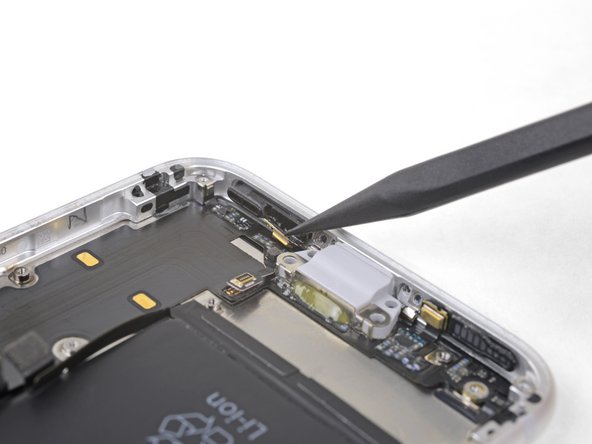
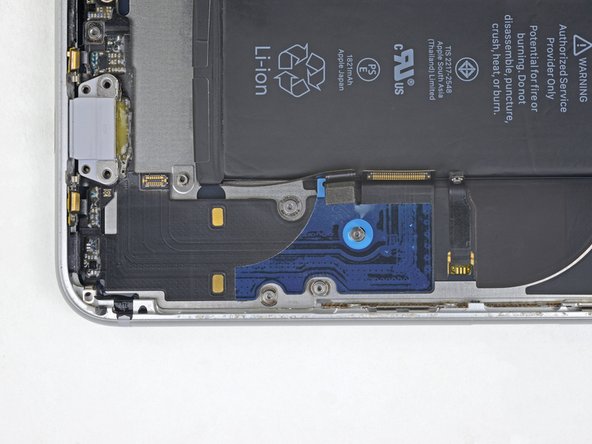
    • 拧下用于固定Taptic Engine旁边支架的三颗螺丝钉:

    • 一个 1.3毫米的Y000型螺丝钉。

    • 一个 2.7毫米的十字型螺丝钉。

    • 一个 2.9毫米的十字型螺丝钉。

  26. iPhone 8 Lightning 接口组件更换: 步骤 26 中的图像 1,1
    • 将盖板(支架)取出。

  27. iPhone 8 Lightning 接口组件更换: 步骤 27 中的图像 1,3 iPhone 8 Lightning 接口组件更换: 步骤 27 中的图像 2,3 iPhone 8 Lightning 接口组件更换: 步骤 27 中的图像 3,3
    • 用三角撬片将天线柔性电缆和扬声器顶部之间的缝隙轻轻地分离出来。

    • 柔性电缆的这部分会轻轻地粘附在适当位置。 如有必要,使用 iOpener 或吹风机中加一点热量来软化粘胶。 这样可以更轻松安全地分离柔性电缆。

  28. iPhone 8 Lightning 接口组件更换: 步骤 28 中的图像 1,2 iPhone 8 Lightning 接口组件更换: 步骤 28 中的图像 2,2
    • 使用撬棒的尖端撬起并断开分集式天线的柔性电缆与主板的接口。

  29. iPhone 8 Lightning 接口组件更换: 步骤 29 中的图像 1,3 iPhone 8 Lightning 接口组件更换: 步骤 29 中的图像 2,3 iPhone 8 Lightning 接口组件更换: 步骤 29 中的图像 3,3
    • 使用撬片在在天线柔性电缆下滑动,支架保持不动。

    • 使用撬棒的尖端撬起并断开天线的排线与其插座的连接,同时使用开口拨片压住插座不被破坏

    • 重新连接此电线 可能会比较需要技巧。使用镊子夹住柔性电缆,这样接口就和支架对齐了。然后,使用撬棒轻轻地按压,直到夹扣合上。

  30. iPhone 8 Lightning 接口组件更换: 步骤 30 中的图像 1,1
    • 移除 Wi-Fi 天线。

  31. iPhone 8 Lightning 接口组件更换, 取下线性马达: 步骤 31 中的图像 1,1
    • 拧下用于固定马达的两个螺钉:

    • 一个 2.1十字螺丝钉

    • 一个 2.1毫米的支座螺丝钉

    • 使用iPhone专用支架螺丝批头和[[关联产品丢失或禁用: IF145-326]|和螺丝刀可以更轻松地拆除支座螺丝钉。

    • 特殊情况下,小型平头(一字)螺丝刀可以完成这项工作——但要特别小心,以确保不会损坏其周围的部件。

  32. iPhone 8 Lightning 接口组件更换: 步骤 32 中的图像 1,2 iPhone 8 Lightning 接口组件更换: 步骤 32 中的图像 2,2
    • 使用撬棒的尖端往上轻轻撬开天线底座并拔下来。

  33. iPhone 8 Lightning 接口组件更换: 步骤 33 中的图像 1,2 iPhone 8 Lightning 接口组件更换: 步骤 33 中的图像 2,2
    • 使用撬棒的尖端轻轻撬起并断开Taptic Engine的连接口。

  34. iPhone 8 Lightning 接口组件更换: 步骤 34 中的图像 1,1
    • 将Taptic Engine移出。

  35. iPhone 8 Lightning 接口组件更换, 移除气压计: 步骤 35 中的图像 1,1
    • 将固结气压平衡计和后盖的两个螺丝取下:

    • 一个2mm十字螺丝

    • 一个1.8mm十字螺丝

  36. iPhone 8 Lightning 接口组件更换: 步骤 36 中的图像 1,2 iPhone 8 Lightning 接口组件更换: 步骤 36 中的图像 2,2
    • 轻柔地向着电池方向拨动气压平衡计,以分离平衡计和iPhone底边连接的粘合胶。

  37. iPhone 8 Lightning 接口组件更换: 步骤 37 中的图像 1,1
    • 取下气压平衡计。

  38. iPhone 8 Lightning 接口组件更换, 移除主板: 步骤 38 中的图像 1,2 iPhone 8 Lightning 接口组件更换, 移除主板: 步骤 38 中的图像 2,2
    • 使用撬棒扁平的一端从插座中直接撬起相机电缆接口,以断开相机电缆接口的连接。

  39. 这个步骤还没有翻译 帮忙翻译一下

    iPhone 8 Lightning 接口组件更换: 步骤 39 中的图像 1,1
    在这个步骤中使用的工具:
    Standoff Screwdriver for iPhones
    $5.49
    购买
    • Remove the two screws securing the rear-facing camera bracket:

    • One 3.0 mm standoff screw

    • One 3.1 mm Phillips screw

    • Standoff screws are best removed using a standoff screwdriver or bit.

    • In a pinch, a small flathead screwdriver will do the job—but use extra caution to ensure it doesn't slip and damage surrounding components.

  40. 这个步骤还没有翻译 帮忙翻译一下

    iPhone 8 Lightning 接口组件更换: 步骤 40 中的图像 1,1
    • Remove the rear-facing camera bracket.

  41. 这个步骤还没有翻译 帮忙翻译一下

    iPhone 8 Lightning 接口组件更换: 步骤 41 中的图像 1,2 iPhone 8 Lightning 接口组件更换: 步骤 41 中的图像 2,2
    • Use the point of a spudger to disconnect the flash connector from its socket by prying it straight up.

  42. 这个步骤还没有翻译 帮忙翻译一下

    iPhone 8 Lightning 接口组件更换: 步骤 42 中的图像 1,1
    • Remove the two screws securing the upper cable bracket:

    • One 2.9 mm Phillips screw

    • One 1.3 mm Phillips screw

  43. 这个步骤还没有翻译 帮忙翻译一下

    iPhone 8 Lightning 接口组件更换: 步骤 43 中的图像 1,1
    • Remove the upper cable bracket.

  44. 这个步骤还没有翻译 帮忙翻译一下

    iPhone 8 Lightning 接口组件更换: 步骤 44 中的图像 1,2 iPhone 8 Lightning 接口组件更换: 步骤 44 中的图像 2,2
    • Use the flat end of a spudger to pry the upper cable connector up from its socket.

  45. 这个步骤还没有翻译 帮忙翻译一下

    iPhone 8 Lightning 接口组件更换: 步骤 45 中的图像 1,1
    • Remove the three Phillips 1.3 mm screws securing the top left antenna component.

  46. 这个步骤还没有翻译 帮忙翻译一下

    iPhone 8 Lightning 接口组件更换: 步骤 46 中的图像 1,1
    • Remove the 1.4 mm Phillips screw securing the antenna component to the top of edge of the case.

  47. 这个步骤还没有翻译 帮忙翻译一下

    iPhone 8 Lightning 接口组件更换: 步骤 47 中的图像 1,1
    • Remove the antenna component.

  48. 这个步骤还没有翻译 帮忙翻译一下

    iPhone 8 Lightning 接口组件更换: 步骤 48 中的图像 1,1
    • Remove the two Phillips screws securing the grounding clip at the top left edge of the logic board:

    • One 1.5 mm Phillips screw

    • One 2.6 mm Phillips screw

  49. 这个步骤还没有翻译 帮忙翻译一下

    iPhone 8 Lightning 接口组件更换: 步骤 49 中的图像 1,1
    • Remove the grounding clip.

  50. 这个步骤还没有翻译 帮忙翻译一下

    iPhone 8 Lightning 接口组件更换: 步骤 50 中的图像 1,1
    • Remove the three screws securing the motherboard:

    • One 1.8 mm Phillips screw

    • One 2.5 mm standoff screw

    • One 2.2 mm standoff screw

  51. 这个步骤还没有翻译 帮忙翻译一下

    iPhone 8 Lightning 接口组件更换: 步骤 51 中的图像 1,2 iPhone 8 Lightning 接口组件更换: 步骤 51 中的图像 2,2
    • Use tweezers to gently bend the logic board grounding bracket out of the way.

  52. 这个步骤还没有翻译 帮忙翻译一下

    iPhone 8 Lightning 接口组件更换: 步骤 52 中的图像 1,2 iPhone 8 Lightning 接口组件更换: 步骤 52 中的图像 2,2
    • Use the point of a spudger to move the SIM card eject plunger out of the logic board's way.

  53. iPhone 8 Lightning 接口组件更换, 断开Lighting接口: 步骤 53 中的图像 1,2 iPhone 8 Lightning 接口组件更换, 断开Lighting接口: 步骤 53 中的图像 2,2
    • 使用撬棒的尖端撬起并断开 Lightning 接口电缆与主板的连接。

  54. iPhone 8 Lightning 接口组件更换, 断开无线充电线圈: 步骤 54 中的图像 1,2 iPhone 8 Lightning 接口组件更换, 断开无线充电线圈: 步骤 54 中的图像 2,2
    • 使用撬棒的尖端撬起并断开无线充电线圈接口。

  55. iPhone 8 Lightning 接口组件更换, 移除主板: 步骤 55 中的图像 1,2 iPhone 8 Lightning 接口组件更换, 移除主板: 步骤 55 中的图像 2,2
    • 使用撬棒的扁平端轻轻向上提起主板的电池接口。

    • 小心不要拉扯任何电缆。如果感觉有阻力,请检查所有电缆,接口和组件是否都没有电路板。

  56. iPhone 8 Lightning 接口组件更换: 步骤 56 中的图像 1,3 iPhone 8 Lightning 接口组件更换: 步骤 56 中的图像 2,3 iPhone 8 Lightning 接口组件更换: 步骤 56 中的图像 3,3
    • 抓住边缘,将电池接口附近的主板抬起并将其取下。

    • 小心不要让任何电缆上缠住主板。

  57. iPhone 8 Lightning 接口组件更换, 移除扬声器: 步骤 57 中的图像 1,1
    • 移除把扬声器固定到后壳的两颗螺丝。

    • 一颗 1.5 mm 菲利普斯十字螺丝

    • 一颗 2.1 mm 菲利普斯十字螺丝

  58. iPhone 8 Lightning 接口组件更换: 步骤 58 中的图像 1,1
    • 移除扬声器。

  59. iPhone 8 Lightning 接口组件更换, 移除Lightning接口: 步骤 59 中的图像 1,1
    • 移除三颗固定 Lightning 接口电缆的螺丝:

    • 一颗 1.3 mm 菲利普斯十字螺丝

    • 两颗 2.2 mm 菲利普斯十字螺丝

  60. iPhone 8 Lightning 接口组件更换: 步骤 60 中的图像 1,1
    • 卸下将 Lightning 接口固定到手机底部边缘的两颗 1.4 mm 菲利普斯十字螺钉。

  61. iPhone 8 Lightning 接口组件更换: 步骤 61 中的图像 1,2 iPhone 8 Lightning 接口组件更换: 步骤 61 中的图像 2,2
    • 使用撬棒的尖端轻轻撬开主板侧的麦克风,使其不受粘合剂固定。

    • 不要试图完全取下麦克风;只需将粘合剂分开,如图所示。

  62. iPhone 8 Lightning 接口组件更换: 步骤 62 中的图像 1,2 iPhone 8 Lightning 接口组件更换: 步骤 62 中的图像 2,2
    • 使用撬棒的尖端轻轻撬开电池侧麦克风,使其不受粘合剂固定到位。

    • 不要试图完全取下麦克风; 只需将粘合剂分开,如图所示。

  63. iPhone 8 Lightning 接口组件更换: 步骤 63 中的图像 1,1
    • 加热的iOpener 放置到手机底部,如图所示。这将有助于软化柔性电缆粘合剂。

  64. iPhone 8 Lightning 接口组件更换: 步骤 64 中的图像 1,3 iPhone 8 Lightning 接口组件更换: 步骤 64 中的图像 2,3 iPhone 8 Lightning 接口组件更换: 步骤 64 中的图像 3,3
    • 在 Lightning 接口组件下方的柔性电缆顶部滑动三角撬片,然后开始将电缆与后壳分开。

    • 将三角撬片轻轻滑向 iPhone 的外边缘(远离电池)。

    • 部分无线充电线圈直接位于Lightning接口柔性电缆的这一部分下方。过度的撬动可能会损坏线圈。

    • 如有需要,请反复使用吹风机或 iOpener重新加热 Lightning 接扣组件柔性电缆后面的区域,以便更容易分离。

  65. iPhone 8 Lightning 接口组件更换: 步骤 65 中的图像 1,3 iPhone 8 Lightning 接口组件更换: 步骤 65 中的图像 2,3 iPhone 8 Lightning 接口组件更换: 步骤 65 中的图像 3,3
    • 继续分离柔性电缆的上部,小心不要损坏沿途的任何其它组件。

    • 保持电池接口轻轻折叠,以免损坏电池接口。

    • 小心不要损坏电池本身。被刺破的电池可能会泄漏危险化学品和/或着火。

    • 一旦通过电池的下边缘,就停止滑动。

  66. iPhone 8 Lightning 接口组件更换: 步骤 66 中的图像 1,2 iPhone 8 Lightning 接口组件更换: 步骤 66 中的图像 2,2
    • 从手机的角落开始,将三角撬片在电缆下方滑向 Lightning 接口。

    • 当三角撬片到达 Lightning 接口时停止滑动。

  67. iPhone 8 Lightning 接口组件更换: 步骤 67 中的图像 1,2 iPhone 8 Lightning 接口组件更换: 步骤 67 中的图像 2,2
    • 轻轻将 Lightning 接口从后壳上的孔中拉出。

  68. iPhone 8 Lightning 接口组件更换: 步骤 68 中的图像 1,2 iPhone 8 Lightning 接口组件更换: 步骤 68 中的图像 2,2
    • 滑动 Lightning 接口下方的三角撬片,进一步将组件与后壳分开。

    • 继续滑动三角撬片,直到 Lightning 接口组件不再粘附在后壳底部。

  69. iPhone 8 Lightning 接口组件更换: 步骤 69 中的图像 1,2 iPhone 8 Lightning 接口组件更换: 步骤 69 中的图像 2,2
    • 在机箱左边缘和 Lightning 组件的剩余粘附部分之间滑动。

  70. iPhone 8 Lightning 接口组件更换: 步骤 70 中的图像 1,3 iPhone 8 Lightning 接口组件更换: 步骤 70 中的图像 2,3 iPhone 8 Lightning 接口组件更换: 步骤 70 中的图像 3,3
    • 移除 Lightning 接口组件。

    • 在安装或更换 Lightning 接口组件之前:

    • 使用塑料工具清理后壳中的任何残留物。你可以使用一些高浓度的异丙醇来帮助清洁表面。

    • 在移除粘性背衬之前,通过将柔性电缆中的孔与螺丝柱对齐,确保 Lightning 接口组件正确定位。如果电缆未对准,你将无法将其重新连接到主板。

  71. iPhone 8 Lightning 接口组件更换: 步骤 71 中的图像 1,3 iPhone 8 Lightning 接口组件更换: 步骤 71 中的图像 2,3 iPhone 8 Lightning 接口组件更换: 步骤 71 中的图像 3,3
    • Lightning接口底部的橡胶垫圈可保护你的iPhone 免受液体和灰尘侵入。如果要安装新的 Lightning 接口组件,则可能需要小心地将垫圈移除并转移到新部件。

    • 每个麦克风底部的小胶粘贴片也可以保护你的 iPhone 免受液体和灰尘侵入。为获得最佳效果,请在安装 Lightning 接口组件之前更换两个粘性贴片。

    • 检查新部件是否配有天线转换器电缆。如果没有,请使用撬棒的尖端撬起并将电缆从旧的 Lightning 组件转移到新的 Lightning 组件。

结论

将新的更换部件与原始部件进行比较 —— 在安装之前,你可能需要拆掉剩余部件或从新部件上撕下粘合剂背衬。

请按逆序重组你的设备。

将你的电子废料带到R2 or e-Stewards 认证的回收商.

维修不像计划中一样进行?查阅iPhone 8 问题解答论坛 来排查错误。

109等其他人完成本指南。

由衷感谢以下译者:

en zh

100%

这些译者帮助我们修补全世界! 您也想加入吗?
开始翻译 ›

Arthur Shi

于01/03/18注册

253,248 声望

创作了526篇指南

团队

iFixit iFixit 的会员

Staff

135 名成员

创作了17,141篇指南

29条评论

I love how you mention the “antenna converter cable” twice but never show what the &&^& that part even looks like??

I only hate Humans. - 回复

Sorry about that! It’s actually shown in the 3rd image in the last step. I cropped the photo so that it’s zoomed in more to show it.

Arthur Shi -

I would HIGHLY recommend not attempting this fix. I have done a variety of repairs on iPhones (screens, batteries, etc.) and decided to try this to address a broken microphone. I could make regular phone calls but couldn’t use speakerphone or FaceTime. After replacing the lightening charger using the instructions and the iFixit parts, I still can’t use the speakerphone or FaceTime function. To make matters worse, my phone won’t charge through the lightening connector, won’t wirelessly charge, and people can’t hear me even when I make a regular phone call anymore. In other words, I started with one fairly minor problem and, due to this repair, have a whole bunch of new (much more significant) issues. Don’t make the same mistake I did.

Aaron Nelson - 回复

Don’t know about the charging issues, but the reason replacing the microphone didn’t help is because you replaced the wrong microphone.

iPhone 8 has 3 mics.

- One for regular phone calls - which is the one you replaced

- One for the front-facing camera - which is used for the speakerphone and FaceTime and is located near the earpiece

- One for the back-facing camera

Nick Shtangey -

Excelente guía..!!

Jorge Lonjedo - 回复

添加评论

浏览统计数据:

过去 24 小时: 61

过去 7 天: 448

过去 30 天: 2,331

总计 185,377