简介
如果您的 iPhone 11 屏幕破裂、对触摸没有响应或开机时不显示图片,请使用本指南使用新的屏幕组件让您的 iPhone 重新工作。
本指南是针对预装了 金属 LCD 屏蔽板的更换屏幕组件编写的。 如果您的新屏幕没有 包括该板,请按照 本指南 完成修复。
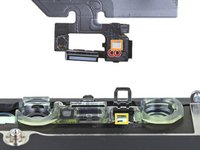
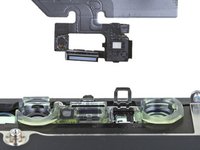
固定在屏幕背面的组合耳机扬声器 + 传感器组件在出厂时已与您的个人 iPhone 配对,因此您必须按照以下说明小心地将其从旧屏幕转移到新屏幕。 它包含泛光照明器,这是生物识别 Face ID 安全功能的一部分。 如果损坏或更换,Face ID 将无法工作,因此在此过程中要格外小心,不要损坏任何这些组件。 如果损坏,只有苹果“授权”的技术人员才能恢复Face ID功能。
注意:更换屏幕后,原彩显示功能将无法使用,即使使用原装 Apple 屏幕也是如此。
你所需要的
-
-
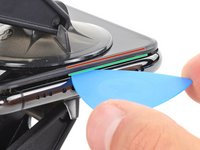
将透明包装胶带粘到破裂的iPhone屏幕上,直到整个屏幕都被覆盖。
-
如果在接下来的几个步骤中你不能让吸盘粘在破裂屏幕上,可以将一条坚固的胶条(比如胶带)折叠起来粘到破裂屏幕中,然后用它来拉起屏幕。
-
-
在这个步骤中使用的工具:Clampy - Anti-Clamp$24.95
-
向铰链方向拉动蓝色手柄,以脱离打开模式。
-
将吸盘放在iPhone底部边缘附近,一个放在前部,一个在后部。
-
按下吸盘,以确保将吸力施加到所需区域。
-
-
-
-
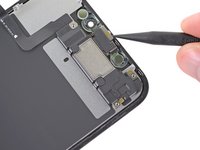
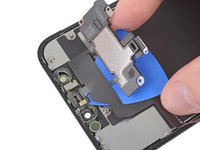
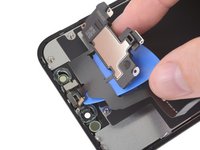
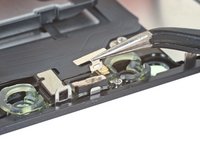
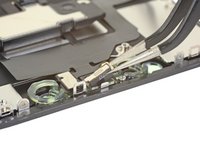
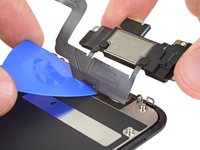
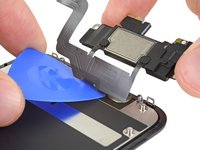
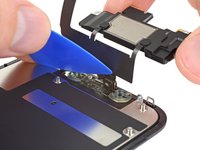
使用开口撬片小心地在麦克风下方的柔性电缆下边缘滑动。
-
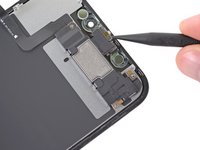
轻轻扭动以分离麦克风,同时注意不要拉紧或损坏柔性电缆。
-
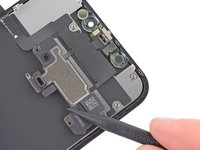
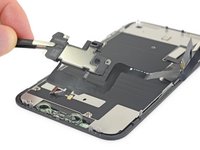
如果需要,使用撬棒的点完成麦克风与前面板凹槽的分离。如果麦克风仍然难以分离,请加热。
-


要重新组装您的设备,请按相反顺序执行上述步骤。
将您的电子废物带到 R2 或 e-Stewards 认证回收商。
修复没有按计划进行? 尝试一些基本的 故障排除,或搜索我们的 iPhone 11 Answers 社区 寻求帮助。
205等其他人完成本指南。


17指南评论
Zu Schritt 13:
Was kann ich tun wenn die Metallplatte sich nicht aus dem Gehäuse löst?
Jakob Hahn - 回复
Versuchen Sie, das Telefon beim zweiten Mal dort erneut aufzuwärmen, wo es in der Anleitung angegeben ist. Vielleicht versuchen Sie auch, Ihren iOpener für längere Zeit in der Mikrowelle zu erhitzen/zu erhitzen. Wenn das nicht funktioniert, überprüfen Sie, ob keine weiteren Schrauben entfernt werden müssen. Und das Letzte, was Sie versuchen könnten, wäre, ein paar andere Hebelwerkzeuge zu verwenden und/oder zu versuchen, es in einer anderen Richtung aus dem Gehäuse zu bekommen.
During reassembly, is there a step in which I need to apply adhesive? (asking since you find adhesive as you disassemble)
Most often you will re-apply the adhesive to the new LCD assembly itself. Note that the part you will need is designed to provide waterproofing to the device. If you put the adhesive + waterproof seal onto the new LCD incorrectly then the device will not be waterproof. Note: I'm no qualified professional, and I'm only a 9th grader but I have lots of experience with this particular repair and I have almost mastered it.( I have fixed maybe 7 or 8 iPhone 11s alone) And in my experience, applying the new adhesive + seal to the new LCD assembly has always worked out great and resulted in a happy customer and good feedback.
I had the same problem, I had ordered a display plus adhesive here at iFixit shop, but there were no instruction how to attach it. I looked at manuals of other adhesives and found a proper way, that worked for me: Before reattaching the display cables I attached the adhesive on the phone, not on the display. At first you have to remove all old adhesive properly, if you have isopropanol you can use it to clean the frame. Then you remove the protective sheet (the side with the tab) from the new adhersive, place it carefully on the phone and press it with a spudger all around the frame. The protective sheet on this side is made of different parts so you can remove them on parts where you have to work on. Then you can attach the display cables and the battery cable and test if it works. If all works fine you can remove the last protective sheets and go on to attach the whole display unit.
SiRo -