简介
Use this guide to replace the home button assembly in your iPad 8 Wi-Fi.
Note: this guide is for the Wi-Fi version only. For the LTE version, click here.
The home button’s Touch ID sensor is paired to the logic board. Replacing the home button will result in the loss of Touch ID functionality.
For your safety, discharge the battery below 25% before disassembling your iPad. This reduces the risk of fire if the battery is accidentally damaged during the repair. If your battery is swollen, take appropriate precautions.
Be very careful when you isolate the battery using a battery blocker. The battery contacts are easily bent or broken, resulting in irreversible damage. If you choose to complete the guide without isolating the battery, avoid using metal tools except when completely necessary (like when removing screws) to prevent shorting the battery and damaging sensitive circuit components.
Some photos in this guide are from a different model and may contain slight visual discrepancies, but they won't affect the guide procedure.
你所需要的
-
-
Heat an iOpener and apply it to the left edge of the device for two minutes.
-
-
-
While you're waiting for the adhesive to loosen, note the following areas that are sensitive to prying:
-
Front camera
-
Antennas
-
Display cables
-
-
在这个步骤中使用的工具:Clampy - Anti-Clamp$24.95
-
Pull the blue handle backwards to unlock the Anti-Clamp's arms.
-
Place an object under your iPad so it rests level between the suction cups.
-
Position the suction cups near the middle of the left edge—one on the top, and one on the bottom.
-
Hold the bottom of the Anti-Clamp steady and firmly press down on the top cup to apply suction.
-
-
-
Wait one minute to give the adhesive a chance to release and present an opening gap.
-
If your screen isn't getting hot enough, you can use a hair dryer to heat along the left edge of the iPad.
-
Insert an opening pick under the digitizer when the Anti-Clamp creates a large enough gap.
-
Skip the next step.
-
-
-
Once the screen is warm to touch, apply a suction handle to the left edge of the screen and as close to the edge as possible.
-
Lift the screen with the suction handle to create a small gap between the digitizer and the frame.
-
Insert an opening pick into the gap between the digitizer and the frame.
I had a screen that was lightly cracked, and when I pulled up on the glass it cracked even further and made a mess of my removal. So, I would recommend taping cracks even if you can get suction so that you don’t induce even more cracks.
I actually had a really badly cracked digitizer. Using the suction cup did nothing but shatter the digitizer more. I intentionally drove a flat head screw driver into the digitizer to reveal the recess in the body where they are showing the opening-pick. Working around the edge, the glass shattered. You still need to be careful at all of spots noted in step 2.
Do not go under the digitizer more than the 1 mm along the sides or 3-4 mm at the corners as shown in step 29 using the flat grey ring around the edge for a reference. Direct all of your tool force into the body to prevent slipping into critical parts.
The antennas at either side of the home button were the trickiest part as they were thin and slightly attached to the digitizer. I would recommend using a plastic tool for these parts if you are having to 'scrape' the glass off of the tabs of the antenna.
-
-
-
Insert a second opening pick into the gap you just created.
-
Slide the pick toward the bottom-left corner of the device to separate the adhesive.
-
Leave the pick in the bottom-left corner to prevent the adhesive from re-sealing.
-
-
-
Heat an iOpener and apply it to the top edge of the device for two minutes.
-
-
-
Rotate the pick around the top-left corner of the device to separate the adhesive.
-
-
-
Slide the opening pick along the top edge of the device, stopping just before you reach the front camera.
-
-
-
Heat an iOpener and apply it to the right edge of the device for two minutes.
-
-
-
Rotate the pick around the top-right corner of the device to separate the adhesive.
-
-
-
Insert a new opening pick and slide it to the middle of the iPad's right edge.
There are sensitive display/digitizer cables no less than five inches from the bottom edge of the iPad. Insert the pick further down than this, or deeper than 1mm beyond this point and you risk irreparably damaging these cables.
Three inches is much too far down this side of the iPad to use picks.
-
-
-
-
Heat an iOpener and apply it to the bottom edge of the device for two minutes.
-
-
-
Slide the bottom-left pick to the bottom-left corner to separate the adhesive.
-
Leave the pick in the bottom-left corner before moving to the next step.
-
-
-
Insert a new opening pick into the gap you just created on the bottom edge of the iPad.
-
Slide the pick over the antenna, stopping just before the home button.
-
Leave the pick to the left of the home button before continuing.
-
-
-
Heat an iOpener and apply it to the right edge of the device for two minutes.
-
-
-
While supporting the digitizer, slide an opening pick between the two display cables to separate the last of the adhesive.
-
-
-
Once all of the adhesive has been separated, open the digitizer like a book and rest it parallel to the iPad.
While reassembling, REALLY make sure the display cables and the home button cable won't be folded / bent while closing the digitizer. I'm not exactly sure what I did, but I broke the home button and touch ID since I bent the home button cable to the point that it broke. These ribbon cables are SUPER fragile.
-
-
在这个步骤中使用的工具:Magnetic Project Mat$19.95
-
Use a Phillips screwdriver to remove the four 4.3 mm-long screws securing the LCD to the frame.
-
Remove any tape obscuring the LCD screws.
I found that the oils from my skin got on the LCD and were hard to get off. Care and/or gloves might be recommended when handling the LCD screen.
-
-
-
Use the flat end of a spudger to pry the LCD out of its recess just enough to grab it with your fingers.
-
Flip the LCD like a page in a book, lifting near the camera and turning it over the home button end of the frame.
-
Lay the LCD on a clean, soft, lint-free surface to allow access to the display cables.
The screw holes on the 4 corners of the LCD may have some adhesive under them preventing you from easily lifting the LCD up without damaging it. I advise, one you have taken the screws out drop some IPA on each corner leave it for 2 minutes, then very gently and slowly whilst moving the LCD from side to side slightly and slowly raise each corner. The secret here is patience.
-
-
-
Use a Phillips screwdriver to remove the 2.3 mm-long screw securing the battery connector to the logic board.
does anyone know where to get replacement screws? i accidentally lost this one, and there's some missing in my iphone 8 that i had repaired years ago (had to get a new screen again, replaced it myself this time but noticed like 5 or more screws missing)
-
-
-
Slide the battery blocker underneath the logic board's battery connector at a 35 degree angle.
-
Leave the battery blocker in place as you work.
-
-
-
Use a Phillips screwdriver to remove the three 1.4 mm-long screws securing the display cable bracket.
-
-
在这个步骤中使用的工具:Tweezers$4.99
-
Use tweezers, or your fingers, to remove the display cable bracket.
-
-
-
Use the flat end of a spudger to pry up and disconnect the LCD cable press connector.
-
-
-
Remove the LCD completely and rest it face down on a clean, soft, lint-free surface.
-
-
在这个步骤中使用的工具:Tweezers$4.99
-
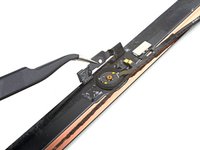
Use a pair of tweezers to peel off the tape covering the home button cable ZIF connector.
-
-
-
Use a spudger, an opening tool, or your fingernail to flip up the small, hinged locking flap on the home button cable ZIF connector.
-
-
-
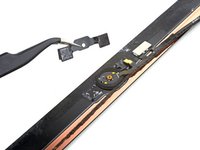
Use the flat end of a spudger to pry up and disconnect the two digitizer cable press connectors.
-
-
-
Use the flat end of a spudger to pry up the vibration isolator near the bottom-right corner of the device.
-
Remove the vibration isolator.
-
-
在这个步骤中使用的工具:Polyimide Tape$9.99
-
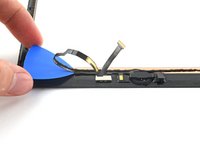
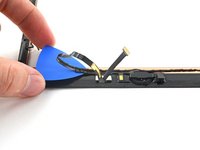
Remove the front panel assembly.
-
If you experience "ghost" or "phantom" touch input issues with your new display, this can be resolved by adding a layer of very thin insulating tape, such as Kapton (polyimide) tape, to the highlighted areas on the back of the panel. iFixit replacement digitizers come with the proper insulation and should not require the addition of any tape.
-
-
-
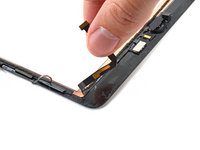
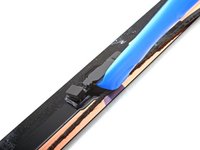
Use your fingers to peel the home button cable off of the back of the front panel.
-
-
-
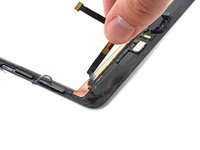
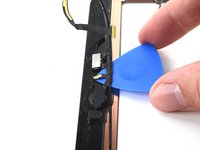
Slide an opening pick underneath the home button cable to separate it from the front panel.
-
Continue sliding the opening pick until you reach the home button bracket.
When re-applying, there is a tiny metal pad on top of the home button cable on the left side of the bracket, it's not displayed anywhere here but belongs on top of the home button cable after the housing is re-attached. It's included in the ifixit digitizer kit but not clear where it belongs in these steps.
-
-
-
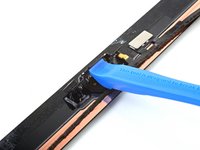
Heat an iOpener and apply it to the home button bracket for thirty seconds.
-
-
-
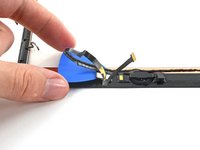
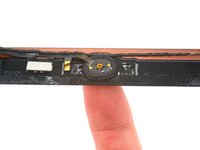
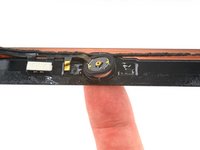
Use your finger to push the home button through the front of the front panel to separate the adhesive holding it in place.
-
-
-
Remove the home button assembly.
While doing this, i ended up forgetting to take off the spacer ring as my new digitizer already had one so my home button would work but pressing around it would activate it, and it wouldn't click. readjusting the button and taking that off fixed the problem for me
-


To reassemble your device, follow these instructions in reverse order.
Take your e-waste to an R2 or e-Stewards certified recycler.
Repair didn’t go as planned? Try some basic troubleshooting, or ask our iPad 8 Answers community for help.
To reassemble your device, follow these instructions in reverse order.
Take your e-waste to an R2 or e-Stewards certified recycler.
Repair didn’t go as planned? Try some basic troubleshooting, or ask our iPad 8 Answers community for help.

