本指南有最近更改,您可查看未经巡查的最新版本。

2020年末13寸 MacBook Air 电池更换

简介
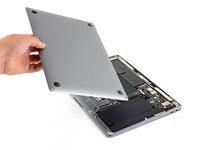
转到步骤 1使用本指南可以安全地从2020年末的MacBook Air(M1)上卸下和更换电池。
““为了最大程度地减少损坏的风险,请在启动此过程之前打开MacBook并让电池完全放电。”如果意外刺穿,充电的锂离子电池可能非常危险。 如果电池膨胀,请采取额外的预防措施。
此过程涉及卸下两个扬声器。你将需要新的粘合剂来正确地重新安装扬声器,以避免过度的振动或嘎嘎作响。
你所需要的
修复工具包
本套装包含完成指南所需的所有零件和工具。

配件


工具


查看更多...
-
-
如果你的MacBook运行的是Big Sur v11.1或更高版本,则禁用自动重启可能不起作用。你可以正常进行,但是请确保在进入电池后立即断开电池连接。
-
使用P5驱动器卸下以下螺丝:
-
两颗7.9毫米螺丝
-
两颗7.3毫米螺丝
-
六颗2.6毫米螺丝
-
-
-
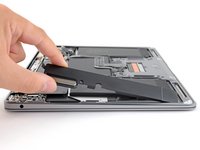
在显示屏和底壳之间插入手指,然后向上拉以弹出底壳。
-
拆下底壳。
-
将其安装到位,然后用力按以接合下面的两个隐藏夹。你应该感觉到并听到它们卡入到位。
-
-
-
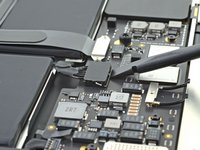
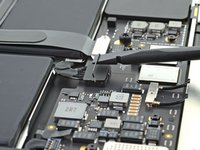
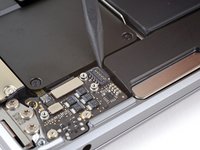
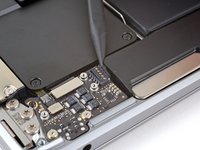
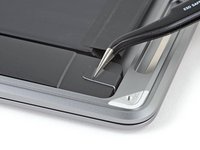
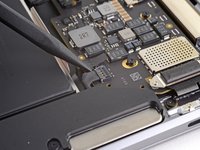
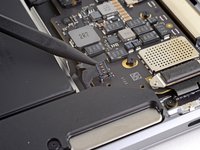
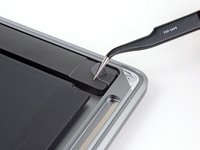
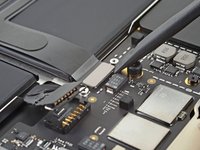
用撬棒的平端撬起并松开电池接口上的金属锁定臂。
-
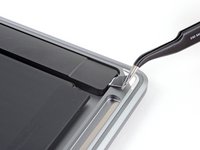
垂直向上提起金属锁定臂,以将电池接口从主板上的插槽中拔出。
-
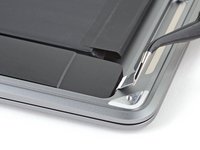
如有必要,先将连接器的后部、线路一侧推入插槽,然后再将连接器的前部摇入位。
If having difficulty in flipping the bar up, place the machine vertical and not that there is a small “locking nib” that the bar has to clear. You may have to give the bar honest persuasion to clear the nib.
The bar can lock backwards making it very hard to even see let alone move. Great care is needed to shift it. I had to use two thumbnails, one on each side, then once flipped forward it takes more push than I expected to clip it in place. Ensure the plug is fully seated first !
As others commented, it can be hard to click the battery connector back into place. First make sure the bar is not underneath the connector. Then, turning the computer so the connector pins are facing you (LCD hinge end closer to you) can also make it easier to position the connector on top and then click it into place.
Some replacement batteries have a retainer bar that differs from OEM batteries. I had to swap the retainer bar to properly secure it under the "locking nib" to ensure it didn't release on its own (before it could freely swing).
-
-
-
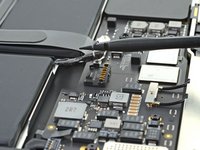
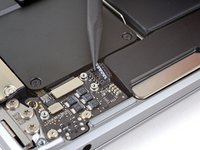
将撬棒的尖端滑到右扬声器电缆的下面,并笔直向上撬起,以将其与音频板断开连接。
Be careful. I replaced the battery twice (first one was 3rd party crappy one). The second time, I pulled the socket off. The directions should say that there is a socket sodered onto the board and the connector has to come out of the socket. The three images did not help me see what to do
-
-
-
-
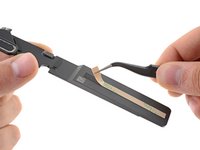
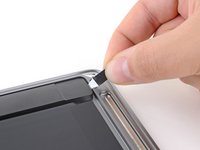
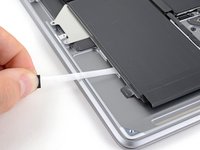
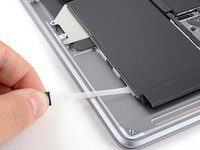
抓住胶带的拉条,然后将其从扬声器下方缓慢拉出。
-
拉起胶带直到它从扬声器下方松开。
-
向扬声器加热,以软化下方的粘合剂。
-
小心地将撬棒或撬棒滑到扬声器下方,以分离胶粘剂。
Pulling the adhesive is a delicate balance between strength and speed. It is important to pull as slowly as possible, with a decent force but not to break it. You can also pull a bit and then relax and wait for the adhesive to pull itself out from under the speaker. Then repeat the short pull and wait.
Even with the above, my adhesives broke each time. A hairdryer can help warm the speaker (and the adhesive under it), but don’t warm the battery next to it too much. Once hot, slowly move the spudger under the speaker and loosen it gradually. It will eventually come off in one piece.
-
-
-
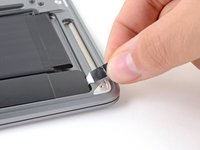
使用T3梅花槽螺丝刀卸下将电池托盘固定在外壳上的两颗2.6毫米螺丝。
I think I lost these two battery tray screws somehow, but they don't seem super critical. Any way to get replacements?
-
-
在这个步骤中使用的工具:Tweezers$4.99
-
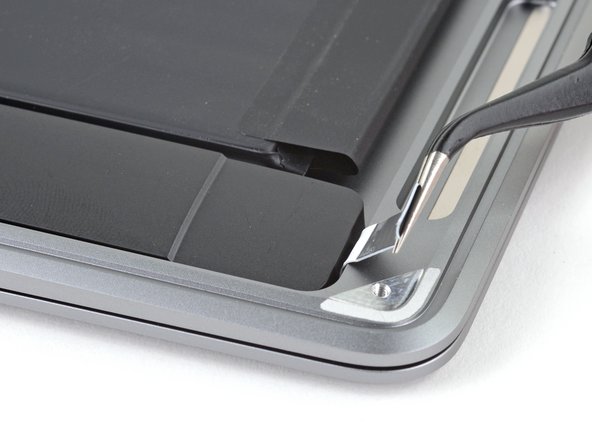
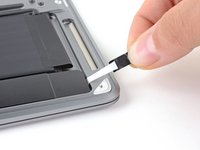
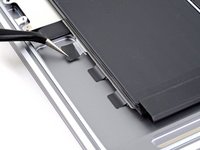
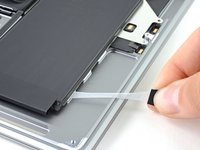
在MacBook的左侧,使用 镊子将电池可拉伸释放粘合条上的三个黑色拉环剥离,直到你可以用手指抓住它们为止。
-
-
-
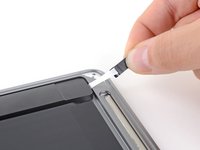
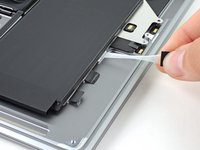
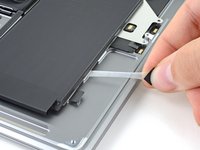
抓住胶带的拉条,然后将其从电池下方缓慢拉出。
-
拉动小拉条直到它从电池下面松开。
-
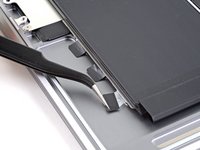
对电池左侧剩余的两条胶带重复上述操作。
What happens if you don't put this tape back the way it was? Can it cause the battery to have any sort of issue?
I dont know but Im doing the same thing. On mine its in there pretty good without any tape. The two screws are holding it in place so as long as its not flapping around I cant see an issue. Its a used battery so I dont want to tape it back in.
Can I replace the strips under the battery with the same suggested adhesive tape (Tesa 61395) as the speakers?
-
-
-
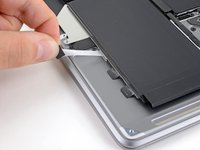
移除电池组件。
-
将其充电至100%,并继续充电至少2小时。
-
拔下电源插头并正常使用以耗尽电池电量。
-
当你看到电池电量不足警告时,请保存你的工作,并保持笔记本计算机处于打开状态,直到由于电池电量不足而进入睡眠状态。
-
至少等待5个小时,然后将笔记本电脑不间断充电至100%。
On boot after reinstallation, the fans go crazy during the Apple logo/progress bar, and the bar is very slow. Machine unuseable. I've reset SMC to no avail. Any other ideas?
Solved my own problem: I didn't have the battery connector pushed in far enough. Its edge really sits flush with the containing latch, though it isn't really obvious from the way it connects.
matt -
Matt, glad to hear you got it sorted! Thanks for giving an update on your comment—connectors can be tricky! Hopefully it helps other users that have the same problem in the future. Happy fixing!
-


将新的替换零件与原始零件进行比较——在安装之前,你可能需要转移剩余的组件或从新零件上取下粘性衬板。
要重新组装设备,请按逆序执行上述步骤。
完成维修后,您的笔记本电脑在连接电源之前可能无法重新开机。
将您的电子垃圾带到R2或e-Stewards认证回收商。
维修没有按计划进行吗?请查看我们的论坛,以获取疑难解答帮助。
将新的替换零件与原始零件进行比较——在安装之前,你可能需要转移剩余的组件或从新零件上取下粘性衬板。
要重新组装设备,请按逆序执行上述步骤。
完成维修后,您的笔记本电脑在连接电源之前可能无法重新开机。
将您的电子垃圾带到R2或e-Stewards认证回收商。
维修没有按计划进行吗?请查看我们的论坛,以获取疑难解答帮助。
69等其他人完成本指南。


27条评论
You’ve gotta be kidding me…
dotmiracle - 回复
Hard to believe, but true.. this is an improvement from a couple generations ago, when you had to disassemble the entire computer or futz about with isopropyl alcohol and credit cards (or dental floss) to remove swollen but still glued in batteries. If this has you feeling overwhelmed, go look at the 74-step guide for the 2015 15” MacBook Pro Battery Replacement.
I concur with that. Made the fix for a Macbook Pro 13" 2014 some times ago and it looks really more difficult and stressing, especially with potentially destructive steps. I felt a bit lucky that it worked fine after that and since then...
Ok I have the battery out but where do you buy replacement adhesive strips? Everywhere I look they say they are for iphones or generic lcd repair. I had to take the battery out for other reasons and want to put the same battery back in.
Stephen, the linked adhesive is a generic solution & should work just fine. Apple-specific adhesives are sometimes hard to source. You could also cut and adapt stretch-release adhesive strips to fit. Best of luck on your repair!
Might as well go to apple themselves and get the battery replaced for 129...
What is the price of a replacement with the battery included?
Does anyone know for sure if the Macbook Air M1 will turn on with the battery disconnected, only with the power connected? Not sure if my motherboard is broken or only battery.
I have the same question. My macbook air won't turn on even with battery disconnected and power connected. would love an answer
Kiradon -
Does the battery capacity show 100% after replacing the battery in System Preferences?
I had Air 2015 and changing battery was as simple as possible. No unscrewing speakers, no adhesive strips removing. Just FIVE easy steps.
дякую! ця інструкція врятувала мені бюджет.
Great guide! Completed in about an hour. The Fix Kit DOES include at card adhesion/tape so there is no need to purchase that separately.
What if you don't use the adhesives when you reassemble?
Would it really be much of an issue?
Had two new MBA 2020 to replace the batteries (leftover machines from an insane phone company discount, still in their original sealed boxes), the 1st was done in 65 min. the 2nd in 30 min.) - thank you very much for this guide !
Bonjour @daniel57 orientez-vous à l'adhésif présent d'origine dans votre MacBook. Si vous n'y avez plus accès, pouvez-vous me dire quelle pièce vous souhaitez recoller s'il vous plaît ?
Bjr Claire,
merci pour votre retour, je change la batterie et il y a plusieurs pièces qui nécessitent du double face.
je vais prendre du 10 mm et le retailler au besoin.
cordialement,
Daniel
@daniel57 Avec plaisir et bonne réparation à vous :)
Vielen Dank, hat sehr gut funktioniert. Etwa eine reichliche halbe Stunde brauchte ich.
ONLY 24 steps! ON a slightly older Macbook Pro it's over 60 and the battery is glued down.
Apple clearly hates its own technicians. Why this should take more than 5 minutes is beyond me.
30 minutes? More like 3+ hours. I am sure if you have everything set up perfectly, have done this a dozen times, and rush at a risk of damaging jeweler sized parts, you could do it within an hour. But if you want to be sure everything is done correctly, slow steady and leisurely is the right way to go.
I did the job today, took about an hour, all good. The battery shows 100% max capacity and Battery Condition "Normal" after replacement.
I highly recommend making a little paper template to organize your screws as they come out so you don't lose them!
ESD safe mat, plugged into ground, with a wrist strap, also grounded, are the best best to protect the logic board.
Robin Ray - 回复
Re-Assembly Tip: Before putting the screws back in, snap the lower case on and test to make sure the MacBook powers up. When I first re-assembled, I became very nervous I did something wrong because it would not power on. It turns out I just needed to plug the laptop into a power source for it to power up (despite having a good charge before disassembly). It was the perfect way to test the new USB-C ports!
Austin - 回复
Big points to this one, especially for mentioning needing to plug the laptop in. The bottom case needs to be screwed in and laptop needs to be plugged in before it will boot.
Bayden Yazalina -
Wiha 4PL driver for these screws.
Greg Worrel - 回复
Printing out all the images from this Ifixit guide prior to starting and using duct tape help me keep track of screws.
raju midjdeya - 回复
This Guide has a high chance of not working if an aftermarket display is used as MAC serialization was introduced post ~2023. Likely you will need an original MAC screen replacement and to serialize the display for it to work.
Tron Computers - 回复