跳转到主内容

此翻译可能不反映源指南的最新更新。 帮助更新翻译查看源指南

三星 Galaxy S8+电池更换

你所需要的

  1. 三星 Galaxy S8+电池更换, 背板: 步骤 1 中的图像 1,1
    • 打开你的手机将会破坏防水性能。在开始前准备好替换的防水胶条。如果不替换防水胶条的话请避免手机暴露在水里。

    • 准备好你的iOpener 并沿着设备的左侧边缘加热两分钟。这一步的目的是软化固定背板的胶条。

    • 你可能需要加热iOpener并多次加热设备直到她足够热。请遵循iOpener的说明以避免过热。

    • 你也可以使用热风枪、吹风机或者加热盘来加热你的设备,但是谨防设备过热——OLED显示屏和内置电池都会因为过热损坏。

  2. 三星 Galaxy S8+电池更换: 步骤 2 中的图像 1,2 三星 Galaxy S8+电池更换: 步骤 2 中的图像 2,2
    • 在这一步中,你将要切开固定背板的胶条。

    • 第一张图片已被拿下的背板,显示背板了胶条的分布。

    • 如果从手机外部看去,胶条分布如图所示:

    • 胶条很厚的地方

    • 胶条很薄的地方

    • 注意避开此区域,其下有指纹传感器连接线。

  3. 三星 Galaxy S8+电池更换: 步骤 3 中的图像 1,2 三星 Galaxy S8+电池更换: 步骤 3 中的图像 2,2
    • 将一个吸盘固定在背板上,尽可能靠近你加热过的那个边缘。

    • 吸盘不是很喜欢弯曲的玻璃,所以不要靠边缘过近。

    • 吸盘无法吸住破碎的玻璃,尝试使用强力胶带(图片链接),或者将吸盘用强力胶固定在背板上来保证以下步骤的顺利。

    • 用吸盘抬起背板的左边,直到背板和中框之间有一条缝隙。

    • 这可能需要大力出奇迹,但是你只要将缝开到你的工具能插入就够了。

    • 如果还是有一些问题,试着再加热来软化胶条。因为胶条很快就会凉下来,所以通常需要大量反复加热。

    • 如果你用的是iOpener,请遵循说明来避免她过热,否则有爆炸的可能性。

  4. 三星 Galaxy S8+电池更换: 步骤 4 中的图像 1,2 三星 Galaxy S8+电池更换: 步骤 4 中的图像 2,2
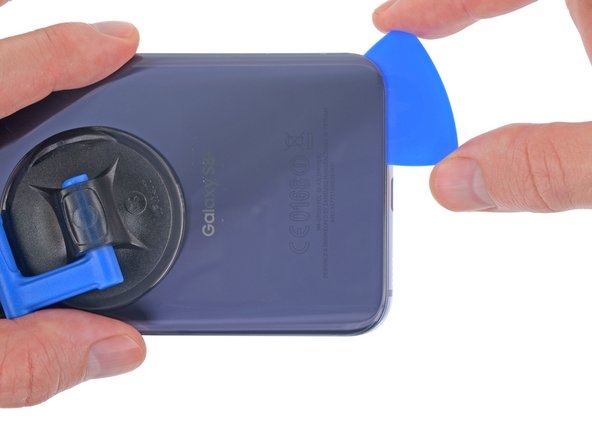
    • 将一个塑料撬片插入缝隙中。

    • 如果用力过猛或者使用金属工具,背板玻璃很容易就会破。

    • (可选)一旦插入了撬片,你可以再缝隙里滴上几滴异丙醇来帮助软化胶条。

  5. 三星 Galaxy S8+电池更换: 步骤 5 中的图像 1,3 三星 Galaxy S8+电池更换: 步骤 5 中的图像 2,3 三星 Galaxy S8+电池更换: 步骤 5 中的图像 3,3
    • 沿着边缘前后移动你的翘片来切开固定背板的胶条。

    • 在这之后,让撬片留在那儿并插入另一个撬片进行下面的步骤是很有益的,留下的撬片可以帮助避免已经分开的胶重新粘合。

  6. 三星 Galaxy S8+电池更换: 步骤 6 中的图像 1,2 三星 Galaxy S8+电池更换: 步骤 6 中的图像 2,2
    • 接着沿着底边切开胶条。

    • 你可能需要重新加热背板开避免胶条变冷变硬。

    • 底边的胶很多,你需要将撬片插入得更深来完全切开她们。

    • 同样的,把撬片留在这并再插入一个新的会有所帮助。

  7. 三星 Galaxy S8+电池更换: 步骤 7 中的图像 1,3 三星 Galaxy S8+电池更换: 步骤 7 中的图像 2,3 三星 Galaxy S8+电池更换: 步骤 7 中的图像 3,3
    • 沿着顶边和右边切开剩下的胶条。

    • 如果你在这一步将撬片插入过深,你可能会损坏指纹传感器排线。请小心并使用第二步中的图作为参考。

  8. 三星 Galaxy S8+电池更换: 步骤 8 中的图像 1,2 三星 Galaxy S8+电池更换: 步骤 8 中的图像 2,2
    • 不要现在就试图完全移除背板!

    • 慢慢地从左边掀起背板。

  9. 三星 Galaxy S8+电池更换: 步骤 9 中的图像 1,2 三星 Galaxy S8+电池更换: 步骤 9 中的图像 2,2
    • 使用撬棒的尖头抬起连接处并断开指纹传感器排线。

  10. 三星 Galaxy S8+电池更换: 步骤 10 中的图像 1,3 三星 Galaxy S8+电池更换: 步骤 10 中的图像 2,3 三星 Galaxy S8+电池更换: 步骤 10 中的图像 3,3
    • 在重新组装的过程中,为了能连接指纹传感器,首先将背板调整至能让传感器排线完美够得到接口的姿态。

    • 接着,使用撬棒平头一端缓缓按下连接器。

    • 如果你的手足够苗条,你或许能够用手指固定连接器。小心不要用力拉扯排线。

    • 这一步需要一些耐心和技巧,不要着急或者试图用力让连接器归位。

  11. 三星 Galaxy S8+电池更换: 步骤 11 中的图像 1,3 三星 Galaxy S8+电池更换: 步骤 11 中的图像 2,3 三星 Galaxy S8+电池更换: 步骤 11 中的图像 3,3
    • 您已经成功移除了背板。

    • 重新组装背板:

    • 首先使用镊子移除背板和手机背面所有的残胶。

    • 接着,使用至少90%异丙醇和不起毛布清洁粘胶的位置。请朝一个擦拭,不要往回或者转圈。这回帮助你准备好重新上胶的表面。

    • 使用与背板匹配的预切胶条。如果买不到的话,请使用高粘性的双面胶,比如Tesa 61395. 注意使用双面胶将会留下缝隙,并且影响防水性能。

    • 在装回背板后,施加一个稳定的强大的压力几分钟来帮助胶粘牢。比如说把你的手机压在几本厚重的百科全书下面。

    • 如果你很着急,你可以不更换胶条而冲洗装上背板。移除会使背板无法平整装回的大块胶条。在装上去之后,加热背板并且施加一定的压力来固定她。尽管这样的胶条不再防水,但是固定住背板还是足够了。

  12. 三星 Galaxy S8+电池更换, 断开三星 盖乐世 S8 Plus的电池: 步骤 12 中的图像 1,2 三星 Galaxy S8+电池更换, 断开三星 盖乐世 S8 Plus的电池: 步骤 12 中的图像 2,2
    • 移除固定无线充电+nfc模组的11个3.7毫米十字螺丝

    • 如果有哪个螺丝在完全拧松后还是很难卸下,用镊子拉出来。

  13. 三星 Galaxy S8+电池更换: 步骤 13 中的图像 1,2 三星 Galaxy S8+电池更换: 步骤 13 中的图像 2,2
    • 固定无线充电+nfc模组的还有几个小塑料卡扣。

    • 使用撬棒在标记出来的位置小心地向上撬起塑料片来释放卡扣。

  14. 三星 Galaxy S8+电池更换: 步骤 14 中的图像 1,3 三星 Galaxy S8+电池更换: 步骤 14 中的图像 2,3 三星 Galaxy S8+电池更换: 步骤 14 中的图像 3,3
    • 移除无线充电+nfc模组。

    • 在重新安装的时候,首先将模块的上部小心的安装进手机框架,接着温柔地将剩下的部分归位。

  15. 三星 Galaxy S8+电池更换: 步骤 15 中的图像 1,2 三星 Galaxy S8+电池更换: 步骤 15 中的图像 2,2
    • 使用撬棒来断开电池连接器的链接。

  16. 三星 Galaxy S8+电池更换, 电池: 步骤 16 中的图像 1,2 三星 Galaxy S8+电池更换, 电池: 步骤 16 中的图像 2,2
    • 电池牢固地粘在手机里。

    • 如果可用,在电池的每个角落下方涂抹一些异丙醇,使其渗透几分钟,以帮助削弱粘合剂。

    • 或者准备iOpener,然后将其直接放置在电池上,来软化粘合剂。如果需要,请重复加热和放置iOpener

  17. 三星 Galaxy S8+电池更换: 步骤 17 中的图像 1,2 三星 Galaxy S8+电池更换: 步骤 17 中的图像 2,2
    • 沿电池外缘插入几个三角撬片。

    • 施加稳定均匀的压力,缓慢地将电池拉出电话并从手机中取出。

    • 尽量保证在过程中不要让电池变形。如果软包锂电池破损,它可能会泄露有毒化学物质、着火,甚至爆炸。不要使用蛮力或者使用金属工具来撬开电池。

  18. 三星 Galaxy S8+电池更换: 步骤 18 中的图像 1,1
    • 移除电池。

    • 在电池移除之后切勿再次使用,这么做非常危险。请直接用新电池替换。

    • 如果需要安装新的电池:

    • 从手机上清除掉所有残余的胶水,并使用异丙醇和一块无纺布擦净粘胶区域。

    • 使用预先切割好的粘合剂或双面胶带固定新电池。为了保证电池放在正确位置,请直接把粘胶置于手机上而不是电池上。粘合剂应围绕电池的周边,但不应位于中心的矩形切口(实际上是显示屏的背面)。

    • 把电池在正确的位置按住5-10秒钟。

结论

请按逆序重组你的设备。

完成本指南后,校准你新安装的电池

49等其他人完成本指南。

由衷感谢以下译者:

en zh

57%

Yuting Zhao正在帮助我们修复这个世界! 您也想加入吗?
开始翻译 ›

Jeff Suovanen

于08/06/13注册

427,129 声望

创作了259篇指南

团队

iFixit iFixit 的会员

Staff

136 名成员

创作了16,578篇指南

14条评论

this Iso + Heat method makes tough adhesive a thing of the past! just be patient. like the guide says, 2 mins to allow iso to penetrate

I applied the alcohol using a small paint brush, dipped into my iso jar, and “painted” along the battery edges.

roughly 30 seconds with heat gun on the front glass, boom, a freed battery

Andrew - 回复

Just received this kit and I see it comes with the big adhesive, but it also has a smaller blue adhesive and a rectangle thing(that I think goes behind the battery?) that has a small one with it. Where do these things go?

Nick Pf - 回复

Check out their guide they have up now for the replacement of this adhesive. Specifically, take a look at the pictures in step 10 to see where the little pieces are supposed to go.

Scott -

Highly recommend against doing this. Even going carefully and reheating, 2 of the corners cracked when moving the pick through. So much for taking perfect care of the phone for 2 years =o(

Nick Pf - 回复

Ditto. I ended up cracking my glass using the iOpener method as well. After no ordering and replacing the rear glass as well now, I am resorting to only using isopropyl alcohol from now on. No matter how hot I got the iOpener, how long I let it heat soak the adhesive, or how many times i reheated the iOpener and reapplied it, I never got any of this adhesive to come off without a risky struggle. And upon ordering all the adhesive kits, I still was shipped missing pieces of adhesive (camera, fingerprint reader, specific support adhesive, etc.). Very frustrating and time consuming process; far more than what these guides say it takes.

Scott -

添加评论

浏览统计数据:

过去 24 小时: 15

过去 7 天: 132

过去 30 天: 545

总计 84,580