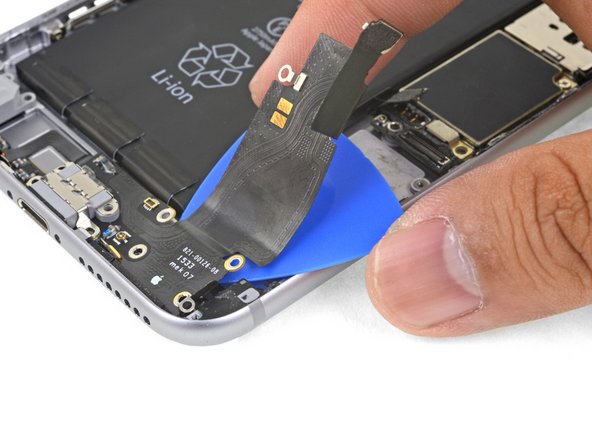
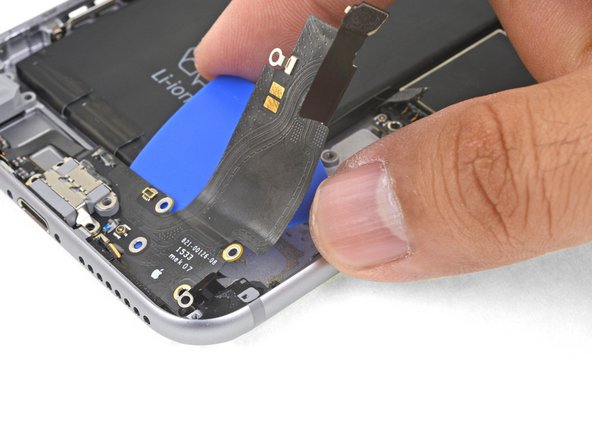
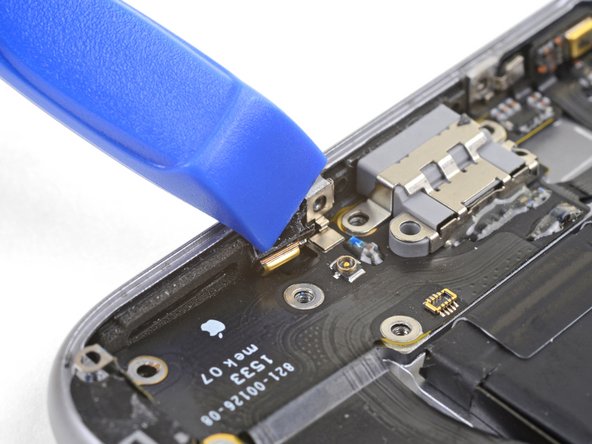
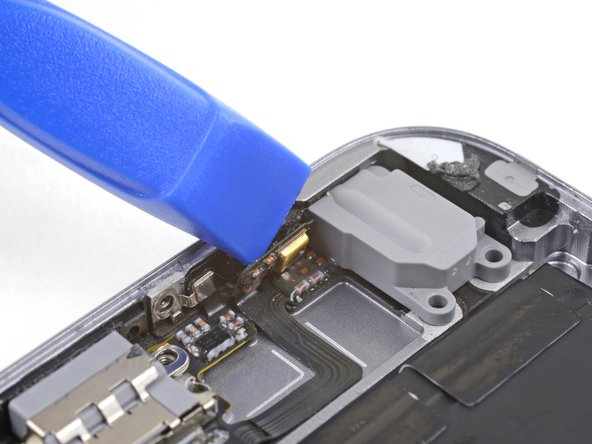
跳转到主内容

iPhone 6s Plus Lightning 接口和耳机插口

你所需要的

  1. iPhone 6s Plus Lightning 接口和耳机插口, SIM 卡托: 步骤 1 中的图像 1,2 iPhone 6s Plus Lightning 接口和耳机插口, SIM 卡托: 步骤 1 中的图像 2,2
    • 使用SIM卡取卡针或是回纹针插入SIM卡退卡孔中。

    • 用力的向里面按压, 使卡托弹出。

  2. iPhone 6s Plus Lightning 接口和耳机插口: 步骤 2 中的图像 1,1
    • 从iPhone卸下SIM卡托。

    • 当你要将SIM卡装回时, 请注意卡托与SIM卡方向。

  3. iPhone 6s Plus Lightning 接口和耳机插口, 五角螺丝: 步骤 3 中的图像 1,1
    • 在拆卸你的 iPhone 之前,将电池放电到电量低于 25%。如果您意外刺破一块充满电的锂离子电池,其可能会起火甚至爆炸。

    • 在你开始拆卸之前,将 iPhone 关机。

    • 拧出 Lightning 接口两侧的 2 颗 3.4 mm 五角(梅花形)螺丝。

  4. iPhone 6s Plus Lightning 接口和耳机插口, 使用反向钳的流程: 步骤 4 中的图像 1,3 iPhone 6s Plus Lightning 接口和耳机插口, 使用反向钳的流程: 步骤 4 中的图像 2,3 iPhone 6s Plus Lightning 接口和耳机插口, 使用反向钳的流程: 步骤 4 中的图像 3,3
    • 接下来的三个步骤会用到反向钳,我们设计的一个让分离屏幕更方便的工具。如果你没有反向钳,跳过下面的3个步骤来寻找其他的方法。

    • 完整的反向钳的使用指导, 请参阅此说明

    • 将蓝色的手柄朝铰链的方向拉,以解除反向钳的分离模式。

    • 将支撑臂滑过 iPhone 的左边缘或右边缘。

    • 将两个吸盘放到Home键上方的屏幕——一个在前,一个在后(屏幕朝向自己的地方为前)。

    • 将上方吸盘向下压以施加吸力到目标位置。

    • 如果发现反向钳压在设备上的表面太滑或者不稳,可使用胶带来创造一个抓力更强的表面。

  5. iPhone 6s Plus Lightning 接口和耳机插口: 步骤 5 中的图像 1,3 iPhone 6s Plus Lightning 接口和耳机插口: 步骤 5 中的图像 2,3 iPhone 6s Plus Lightning 接口和耳机插口: 步骤 5 中的图像 3,3
    • 向前拉蓝色手柄以锁定手臂。

    • 顺时针旋转手柄 360 度或直到吸盘开始拉伸。

    • 确保吸盘彼此保持对齐。如果它们开始滑出不对齐,请稍微松开吸盘并重新对齐手臂。

    • 当防夹产生足够大的间隙时,在屏幕下方插入三角撬片。

    • 如果反向钳无法形成足够的间隙,请将手柄旋转四分之一圈。

    • 不要一次旋转超过半圈,然后每两次之间要等一分钟。让反向钳和时间帮你完成剩下的工作。

    • 跳过接下来的三个流程。

  6. iPhone 6s Plus Lightning 接口和耳机插口, 拆卸步骤大全: 步骤 6 中的图像 1,1
    • 可以选择使用iOpener或吹风机对iPhone的下边缘进行大约一分钟的温和加热。

    • 加热可软化固定显示屏的粘合剂,使其更容易打开。

  7. iPhone 6s Plus Lightning 接口和耳机插口: 步骤 7 中的图像 1,1
    • 6s Plus屏幕四个边缘周围有黏胶固定, 若你选择要更换黏胶的话, 在你拆解之前, 最好是先准备好新的黏胶。若你本身不想更换新黏胶也行, 因为在功能上, 跟使用原有的黏胶没有太大差别 。

    • 将吸盘置于屏幕左下角, 进行拆解。

    • 如果您的显示器严重开裂,用一层透明胶带覆盖其表面可以会让吸盘吸住。另外,也可以使用非常结实的胶带来代替吸盘。如果所有其他方法都失败了,您也可以将吸盘粘在破碎的屏幕上。

  8. iPhone 6s Plus Lightning 接口和耳机插口: 步骤 8 中的图像 1,2 iPhone 6s Plus Lightning 接口和耳机插口: 步骤 8 中的图像 2,2
    • 使用巧劲拉动吸盘, 直到屏幕与后盖中间出现缝隙为止。

    • 注意, 若拉太大力会造成屏幕损坏。只要打开到让显示屏与后盖有个小缝隙即可。

  9. iPhone 6s Plus Lightning 接口和耳机插口: 步骤 9 中的图像 1,3 iPhone 6s Plus Lightning 接口和耳机插口: 步骤 9 中的图像 2,3 iPhone 6s Plus Lightning 接口和耳机插口: 步骤 9 中的图像 3,3
    • 在屏幕下有个槽口, 位置正好在耳机插槽上方。这里是撬开的最佳位置。

    • 当吸盘还吸附着屏幕的同时, 将撬棒平面那头插进屏幕与后盖的缝隙, 也就是耳机插槽上方位置。

  10. iPhone 6s Plus Lightning 接口和耳机插口: 步骤 10 中的图像 1,2 iPhone 6s Plus Lightning 接口和耳机插口: 步骤 10 中的图像 2,2
    • 用撬棒将缝隙左右边撑开, 使屏幕从机身上分离。

  11. iPhone 6s Plus Lightning 接口和耳机插口: 步骤 11 中的图像 1,3 iPhone 6s Plus Lightning 接口和耳机插口: 步骤 11 中的图像 2,3 iPhone 6s Plus Lightning 接口和耳机插口: 步骤 11 中的图像 3,3
    • 将吸盘往上拉的同时, 将撬棒平的那头插进手机左侧, 屏幕与背盖间的缝隙。

  12. iPhone 6s Plus Lightning 接口和耳机插口: 步骤 12 中的图像 1,2 iPhone 6s Plus Lightning 接口和耳机插口: 步骤 12 中的图像 2,2
    • 将撬棒平的那头插进手机左侧, 前面板与背盖间的缝隙。

  13. iPhone 6s Plus Lightning 接口和耳机插口: 步骤 13 中的图像 1,2 iPhone 6s Plus Lightning 接口和耳机插口: 步骤 13 中的图像 2,2
    • 将撬棒平的那头插进手机右侧, 屏幕与背盖间的缝隙。

    • 将撬棒缓慢地沿着底部边缘移到右边。

  14. iPhone 6s Plus Lightning 接口和耳机插口: 步骤 14 中的图像 1,2 iPhone 6s Plus Lightning 接口和耳机插口: 步骤 14 中的图像 2,2
    • 当你用吸盘将屏幕小心地掀开时, 使用塑料Opening工具将后盖撑住。

    • 請勿將屏幕完全掀开, 因为屏幕上还有排线连接, 如果掀开角度过大, 可能造成排线损坏。

  15. iPhone 6s Plus Lightning 接口和耳机插口: 步骤 15 中的图像 1,2 iPhone 6s Plus Lightning 接口和耳机插口: 步骤 15 中的图像 2,2
    • 使用巧劲将吸盘往上拉, 将屏幕与机身分离。

  16. iPhone 6s Plus Lightning 接口和耳机插口: 步骤 16 中的图像 1,3 iPhone 6s Plus Lightning 接口和耳机插口: 步骤 16 中的图像 2,3 iPhone 6s Plus Lightning 接口和耳机插口: 步骤 16 中的图像 3,3
    • 以屏幕顶端为支点,将屏幕缓缓地向上掀起。

    • 将屏幕掀至约90º竖起, 并且在你操作的时候找个东西支撑着它。

    • 請勿將屏幕掀开超过90º, 因为屏幕上还有3条排线连接, 如果掀开角度过大, 可能造成排线损坏。

    • 用橡皮筋将前面板与支撑物固定住。这可以避免拉扯到显示排线。

    • 若在紧要关头时, 你也可以用未开过的罐装饮料撑着屏幕, 这也是可行方法。

  17. iPhone 6s Plus Lightning 接口和耳机插口, 电池连接座: 步骤 17 中的图像 1,1
    • 卸下电池排线固定架上的2颗Phillips #00 螺丝。

    • 1颗2.9 mm螺丝

    • 1颗2.3 mm螺丝

    • 在按照指南操作的同時,請仔細看顧所有的螺絲,並確保每一顆螺絲都能歸回原位。將任一螺絲裝置在錯誤的位置,都可能導致永久性毀損

  18. iPhone 6s Plus Lightning 接口和耳机插口: 步骤 18 中的图像 1,2 iPhone 6s Plus Lightning 接口和耳机插口: 步骤 18 中的图像 2,2
    • 取下电池连结固定板。

  19. iPhone 6s Plus Lightning 接口和耳机插口: 步骤 19 中的图像 1,3 iPhone 6s Plus Lightning 接口和耳机插口: 步骤 19 中的图像 2,3 iPhone 6s Plus Lightning 接口和耳机插口: 步骤 19 中的图像 3,3
    • 使用撬棒尖头那端(或您亦可使用乾淨的指甲)将电池连结座往上撬开, 与主板分离。

  20. iPhone 6s Plus Lightning 接口和耳机插口: 步骤 20 中的图像 1,3 iPhone 6s Plus Lightning 接口和耳机插口: 步骤 20 中的图像 2,3 iPhone 6s Plus Lightning 接口和耳机插口: 步骤 20 中的图像 3,3
    • 使用撬棒将电池连结座与主板从插槽分离,避免操作中不小心接触到电池。

  21. iPhone 6s Plus Lightning 接口和耳机插口, 前面板组: 步骤 21 中的图像 1,1
    • 卸下图上的5颗Phillips螺丝。

    • 3颗1.3mm 螺丝

    • 1颗1.6mm 螺丝

    • 1颗3.0mm 螺丝

    • 在重新组装过程中, 请特别注意3.0mm 螺丝必须是拧在右上角的位置。如果放错地方, 可能会造成主板的损坏。

  22. iPhone 6s Plus Lightning 接口和耳机插口: 步骤 22 中的图像 1,2 iPhone 6s Plus Lightning 接口和耳机插口: 步骤 22 中的图像 2,2
    • 从主板上取下屏幕排线固定板

  23. iPhone 6s Plus Lightning 接口和耳机插口: 步骤 23 中的图像 1,2 iPhone 6s Plus Lightning 接口和耳机插口: 步骤 23 中的图像 2,2
    • 请特别注意此步骤。只需断开排线与座子的连接即可,千万不要连着主板的座子一同撬开。

    • 使用塑料撬棒断开前摄像头排线和传感器排线与座子的连接,并与主板分离。

  24. iPhone 6s Plus Lightning 接口和耳机插口: 步骤 24 中的图像 1,2 iPhone 6s Plus Lightning 接口和耳机插口: 步骤 24 中的图像 2,2
    • 使用塑料工具, 断开传感器排线接口, 与主板分离。

    • 重新组装传感器排线时, 请注意不要按压传感器中间的地方。正确应该是先按压一边, 之后再按压另一边, 因为若按压中间的地方, 可能会使零件变形, 造成传感器损坏。

  25. iPhone 6s Plus Lightning 接口和耳机插口: 步骤 25 中的图像 1,2 iPhone 6s Plus Lightning 接口和耳机插口: 步骤 25 中的图像 2,2
    • 在此步骤中断开或重新连接电缆之前,请确保电池已断开连接。

    • 将 Home 键/指纹传感器电缆从主板上的插座中直接撬起,断开它。

  26. iPhone 6s Plus Lightning 接口和耳机插口: 步骤 26 中的图像 1,2 iPhone 6s Plus Lightning 接口和耳机插口: 步骤 26 中的图像 2,2
    • 至此,屏幕可以彻底与机身分离了。

    • 在重新组装的过程中, 若你有准备新的胶条, 请先将旧的胶条清除干净, 再将新的胶条黏贴上去。

  27. iPhone 6s Plus Lightning 接口和耳机插口, 扬声器: 步骤 27 中的图像 1,2 iPhone 6s Plus Lightning 接口和耳机插口, 扬声器: 步骤 27 中的图像 2,2
    • 使用撬棒的尖端撬起天线排线并将其从主板底部断开。

  28. iPhone 6s Plus Lightning 接口和耳机插口: 步骤 28 中的图像 1,2 iPhone 6s Plus Lightning 接口和耳机插口: 步骤 28 中的图像 2,2
    • 使用撬棒的尖端撬起Lightning接口排线并将其从主板上断开。

  29. iPhone 6s Plus Lightning 接口和耳机插口: 步骤 29 中的图像 1,2 iPhone 6s Plus Lightning 接口和耳机插口: 步骤 29 中的图像 2,2
    • 卸下用于固定Lightning接口盖的三颗十字螺丝:

    • 两个 3.5 mm 螺丝

    • 一个 2.7 mm 螺丝

    • 拆下盖子

  30. iPhone 6s Plus Lightning 接口和耳机插口: 步骤 30 中的图像 1,2 iPhone 6s Plus Lightning 接口和耳机插口: 步骤 30 中的图像 2,2
    • 使用撬棒的尖端撬起天线排线并将其从Lightning接口组件上取下。

  31. iPhone 6s Plus Lightning 接口和耳机插口: 步骤 31 中的图像 1,2 iPhone 6s Plus Lightning 接口和耳机插口: 步骤 31 中的图像 2,2
    • 使用撬棒的尖端撬起天线排线并将其从主顶部取下。

  32. iPhone 6s Plus Lightning 接口和耳机插口: 步骤 32 中的图像 1,3 iPhone 6s Plus Lightning 接口和耳机插口: 步骤 32 中的图像 2,3 iPhone 6s Plus Lightning 接口和耳机插口: 步骤 32 中的图像 3,3
    • 小心地提起天线电缆并将其从手机边缘拔出。使用撬棒的尖端帮助提升电缆,使其脱离固定夹。

    • 如果没有足够的空间来提起排线,请松开固定主板的十字螺钉,以便电路板有更多的活动空间。

    • 重新安装时,务必重新拧紧此螺钉。

    • 如果排线在 SIM 读卡器附近卡住,则它很可能卡在 SIM 托盘弹出器。 使用撬棒的尖端将此塑料棒滑开。

    • 在重新安装的过程中,一定要将天线排线绕着主板拐角放置。

    • 在重新组装过程中,您可以在重新放置天线排线后重新插入SIM卡托盘。

    • 如果您感觉到任何阻力,请停止并确保托盘没有卡住天线排线。

  33. iPhone 6s Plus Lightning 接口和耳机插口: 步骤 33 中的图像 1,2 iPhone 6s Plus Lightning 接口和耳机插口: 步骤 33 中的图像 2,2
    • 拧下将扬声器固定至后盖的六颗十字螺丝:

    • 一个 2.5 mm 螺钉

    • 两个 2.7 mm 螺钉

    • 一个 1.5 mm 螺钉

    • 一个 1.7 mm 螺钉

    • 一个将扬声器固定到后盖的底部边缘的 2.6 mm 螺钉。

  34. iPhone 6s Plus Lightning 接口和耳机插口: 步骤 34 中的图像 1,3 iPhone 6s Plus Lightning 接口和耳机插口: 步骤 34 中的图像 2,3 iPhone 6s Plus Lightning 接口和耳机插口: 步骤 34 中的图像 3,3
    • 在扬声器模块的长边和外壳之间插入撬棒的平端。

    • 轻轻撬动以松开扬声器模块。

    • 模块松动后,将扬声器模块和连接的天线排线从手机上提起并取下。

  35. iPhone 6s Plus Lightning 接口和耳机插口, Lightning 接口和耳机插口: 步骤 35 中的图像 1,2 iPhone 6s Plus Lightning 接口和耳机插口, Lightning 接口和耳机插口: 步骤 35 中的图像 2,2
    • 使用撬棒尖头那端, 将 Taptic Engine 线性马达排线与下缘的排线分离。

  36. iPhone 6s Plus Lightning 接口和耳机插口: 步骤 36 中的图像 1,2 iPhone 6s Plus Lightning 接口和耳机插口: 步骤 36 中的图像 2,2
    • 卸下2颗固定 Taptic Engine 线性马达到后机壳的Phillips螺丝。

    • 1颗 3.1mm 螺丝

    • 1颗 2.1mm 螺丝

  37. iPhone 6s Plus Lightning 接口和耳机插口: 步骤 37 中的图像 1,2 iPhone 6s Plus Lightning 接口和耳机插口: 步骤 37 中的图像 2,2
    • 使用撬棒平头那端, 将 Lightning 接口与后盖间的剩余黏胶断开。

  38. iPhone 6s Plus Lightning 接口和耳机插口: 步骤 38 中的图像 1,2 iPhone 6s Plus Lightning 接口和耳机插口: 步骤 38 中的图像 2,2
    • 卸下图中的5颗Phillips螺丝。

    • 1颗 2.9 mm 螺丝

    • 1颗 1.9 mm 螺丝

    • 1颗 1.5 mm 螺丝

    • 1颗 1.6 mm 螺丝

    • 1颗 1.3 mm 螺丝, 位于后盖下缘的地方。

  39. iPhone 6s Plus Lightning 接口和耳机插口: 步骤 39 中的图像 1,1
    • 准备一个iOpener, 加热后, 置于手后盖下方, 用来软化固定Lightning接口排线的黏胶。

    • 放置约一分钟, 让黏胶确实软化。

  40. iPhone 6s Plus Lightning 接口和耳机插口: 步骤 40 中的图像 1,3 iPhone 6s Plus Lightning 接口和耳机插口: 步骤 40 中的图像 2,3 iPhone 6s Plus Lightning 接口和耳机插口: 步骤 40 中的图像 3,3
    • 在 Lightning 接口柔性电缆处插入塑料三角撬片, 从排线右上方地方与后盖中间轻轻地撬开。

  41. iPhone 6s Plus Lightning 接口和耳机插口: 步骤 41 中的图像 1,3 iPhone 6s Plus Lightning 接口和耳机插口: 步骤 41 中的图像 2,3 iPhone 6s Plus Lightning 接口和耳机插口: 步骤 41 中的图像 3,3
    • 持续地将撬片慢慢地往排线下方推进。

  42. iPhone 6s Plus Lightning 接口和耳机插口: 步骤 42 中的图像 1,3 iPhone 6s Plus Lightning 接口和耳机插口: 步骤 42 中的图像 2,3 iPhone 6s Plus Lightning 接口和耳机插口: 步骤 42 中的图像 3,3
    • 使用撬片将位于后盖左下方的麦克风分离。

  43. iPhone 6s Plus Lightning 接口和耳机插口: 步骤 43 中的图像 1,2 iPhone 6s Plus Lightning 接口和耳机插口: 步骤 43 中的图像 2,2
    • 在耳机接口处插入撬棒尖端,轻轻晃动,将右方的麦克风也卸下。

  44. iPhone 6s Plus Lightning 接口和耳机插口: 步骤 44 中的图像 1,3 iPhone 6s Plus Lightning 接口和耳机插口: 步骤 44 中的图像 2,3 iPhone 6s Plus Lightning 接口和耳机插口: 步骤 44 中的图像 3,3
    • 卸下 Lightning 接口组件。

    • 如果你的更换部件未附带耳机插孔垫圈,请使用镊子从旧部件中取出垫圈并将其转移到新的更换部件。

    • 在重新安装之前,请使用撬棒清理后壳中剩余的残留物。你可以使用高浓度异丙醇来帮助完成该过程。

结论

把你的更换零件和原装零件做对比——你可能需要转移一些旧的零件,或者在安装之前把新零件后面的胶带去掉。

请按逆序操作重组你的设备。

把你的电子废料带到 R2 或者 e-Stewards 认证的回收商那里。

维修进展不如意?请查阅我们的iPhone 6s Plus 问题解答社区 来排除障碍。

163等其他人完成本指南。

由衷感谢以下译者:

en zh

100%

这些译者帮助我们修补全世界! 您也想加入吗?
开始翻译 ›

Arthur Shi

于01/03/18注册

252,842 声望

创作了526篇指南

团队

iFixit iFixit 的会员

Staff

135 名成员

创作了16,817篇指南

24条评论

Hardest thing I have every done!! But well worth it. Now I know I need to go up on my labor price!!! :-) Thanks a ton from South Carolina!!

apriltanner1975 - 回复

Just did this. Agree with everyone else, just flip the speaker over to get to the lightning connector assembly. Changes the repair time drastically

ztune - 回复

I just completed this repair, replacing the Headphone Jack/Lightening port, battery and iSight camera all at the same time. I removed everything as it explained in the guide, but can totally see how not removing the logic board would save time and isn't 100% necessary. I imagine that peeling the upper portion of the headphone/lighting port is slightly easier with the logic board removed, and you don't have to worry about that antenna cable. If I did it again, I would probably still remove the logic board.

Michael Cornforth - 回复

you would have to be crazy to remove the board. just flip the speaker up on its back and rest against logic board. 20 mins should complete this . i cant stress enough that board or camera does not need removed . PERIOD

Smartfone NI - 回复

I completed this and it starts charging, but the home button stop working. It still sense my finger print, but it does not respond when i click on it.

Any help?

Poh Chun Hou - 回复

添加评论

浏览统计数据:

过去 24 小时: 6

过去 7 天: 70

过去 30 天: 281

总计 128,941