简介
此指南会教导你如何更换iPhone 6 后盖。
你所需要的
-
-
将蓝色的手柄朝铰链的方向拉,以解除反向钳的分离模式。
-
将支撑臂滑过 iPhone 的左边缘或右边缘。
-
将两个吸盘放到Home键上方的屏幕——一个在前,一个在后(屏幕朝向自己的地方为前)。
-
将上方吸盘向下压以施加吸力到目标位置。
I found that the single suction cup from the kit worked very well. It didn’t take that much force to separate the front panel from the phone. I think any suction cup that you are able to get a firm grip on will probably work as well. There isn’t any adhesive holding the front panel in. It just snaps in and out. If you have a cracked screen and no screen protector, it may be hard to get a good suction seal. If that’s the case, someone else here suggested applying clear tape to the front glass to get a good surface for applying the suction cup. In my case, I already had a screen protector that was still intact so the suction cup sealed easily.
WORKED PERFECTLY… easy, no harm at all…. thanks a lot
-
-
-
卸下电池排线固定架上的两颗十字型螺丝。
-
一个2.2毫米螺丝
-
一个3.2毫米螺丝
-
-
-
用SIM取卡针或曲别针插入SIM槽旁边的小孔。
-
按压弹出卡槽。
Why isn’t this the first step in the process? Seems unnecessarily risky to fumble with popping the SIM in and out when you’ve already opened up the phone.
If you don’t have something small enough to open it, you can use the lever when the screen is off.
-
-
-
从iPhone取出SIM卡槽。
After reassembly phone would not detect SIM Card.
During repair while components were out of phone I used that opportunity to straighten the back case that was bent. While straightening the back case I bent the thin edge of the back case by the SIM Card slot. SIM Card would click into place and seemed to make a good connection but the phone would not detect the SIM Card. After really straightening the back case by the SIM Card slot almost back to cherry the phone would now detect the SIM Card. The tray has to fit really flush with the case.
My flashlight has stopped working altogether. It was intermittent for a while. I believe them to be original. When I try to use the flash on my camera app, it flashes weakly but not enough do really help. Any chance the flex went bad or is there a logic board issue? My other two iphones with the same apps and the same updates are not having any problems.
Bonjour j'ai un iphone 6 problème réseau
-
-
-
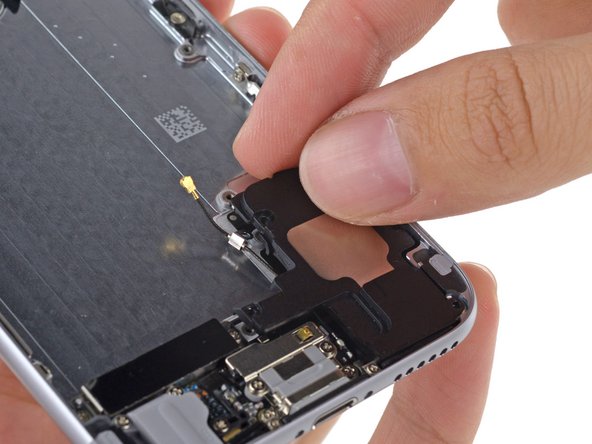
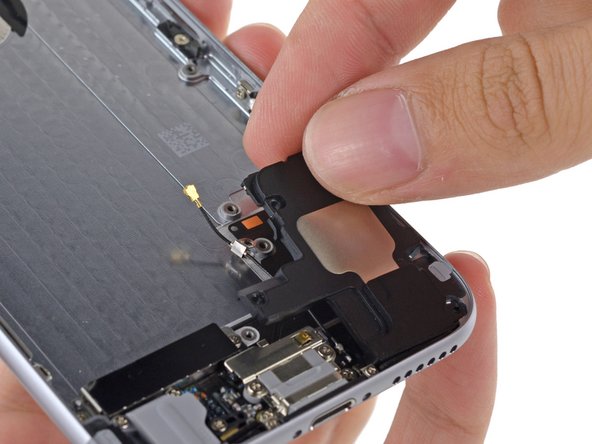
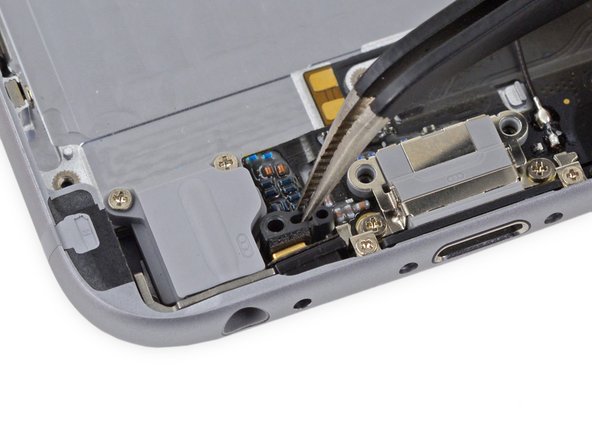
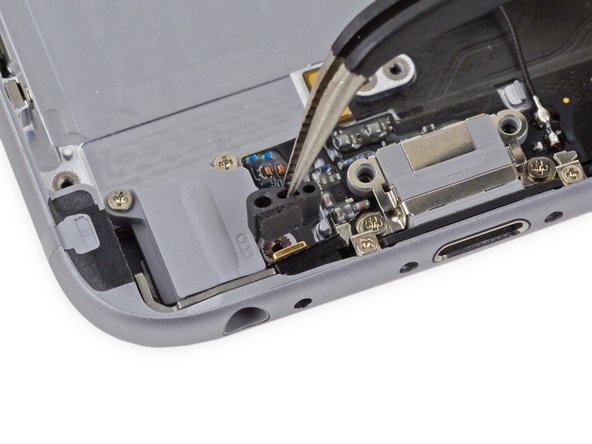
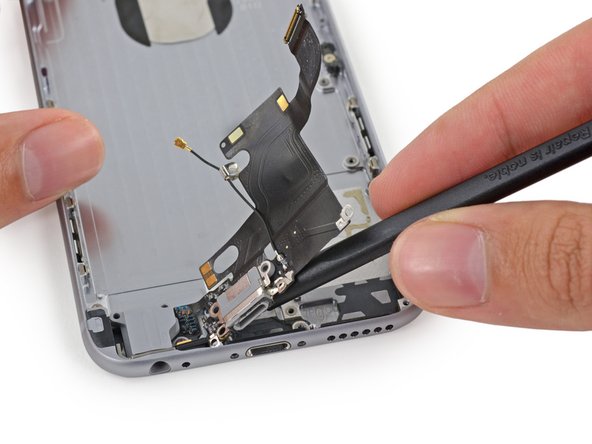
用平头撬棒挑起Lightning 接口排线并翻折至图2来移除扬声器模块
How vital is that foam looking piece on top of the antenna cable connector? It popped off when I was lifting.
Same thing happened to me. I hope it's not too vital!
If the foam piece on top comes off (which it probably will), replace with a tiny piece of electrical tape to maintain electrical isolation.
-
-
-
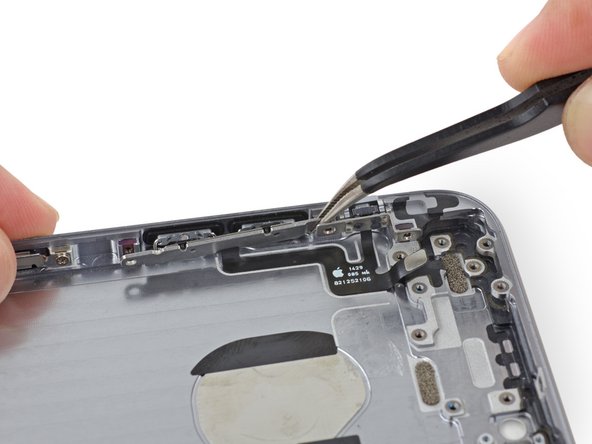
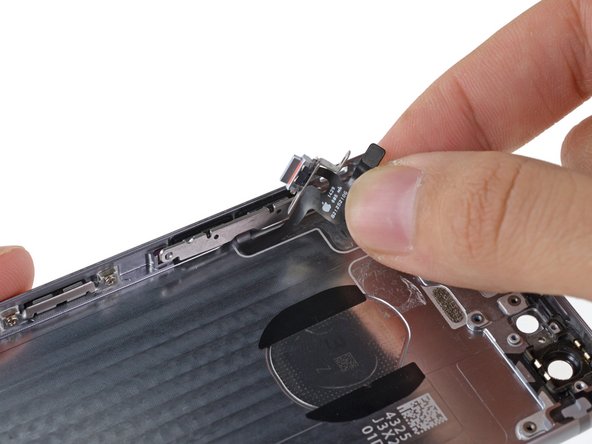
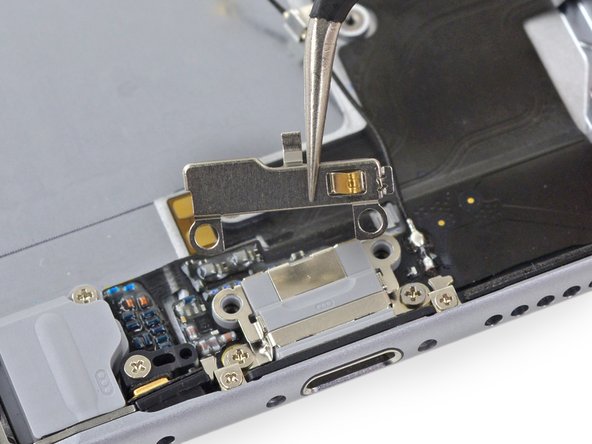
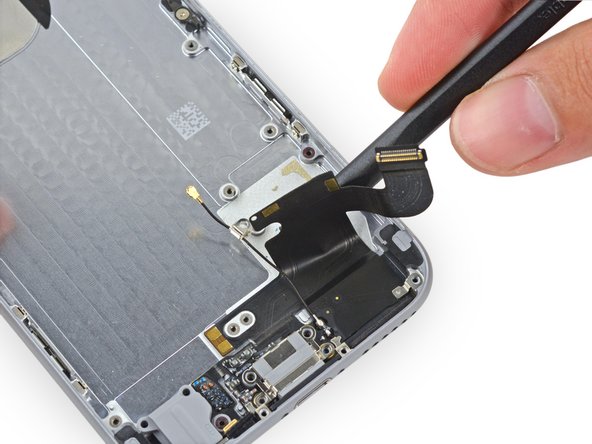
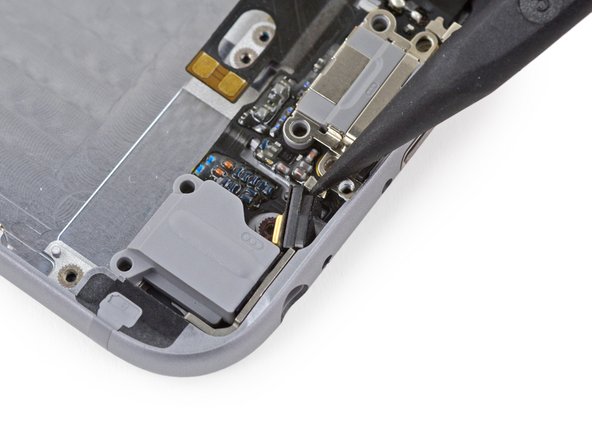
用尖头撬棒挑起天线接口,和逻辑主板脱离。
ripped off the foam on top while trying to pry it out. Also careful not to pull the entire logic board while doing this
Ah, isn't that a bugger to get back in place after finished repairs! Be patient! Position and gently press. If no click, reposition and try again... time an time again. Did I say, be patient?
Yes to this. Listen for that satisfying click…
Christa -
I found that this is not the best tool for removing this component.. The connector is round and the the pointed tip of the tool makes it very easy to slip off the connector and do damage to other components. As I was trying to disconnect the connector, the tool slipped and tore the wire out of the connector. The flat end of the spudger seems like it would work better.
Yes, the flat end of the spudger works definitely better.
(I had to do this step to replace the antenna flex cable)
I couldn’t pull this connector at all. Tried tip of spudger, flat end of spudger, my nail (which even got a dent in the process ^^) and finally the tweezers (I know, risky) but the little bastard wouldn’t come off…
I managed to pull out the logic board very carefully and twisted it in the least straining way for the cable to access the flex cable on the back.
In the end everything was fine and the repair worked ok.
Switching this step for this repair can be ok if you are extra carefull with twisting the cable
Found it easiest to go beneath the cable (on the opposite side from what’s shown on the photos) and leverage from there, using tip of spudger.
Seconded. After a while of trying, I decided to do this and it came off instantly.
YESSS thank you so much! this worked great!
What antenna does this cable attach to? I’m trying to determine if this would be the cellular antenna.
I second this… What antenna is this? Main celular radio? BT? so what is the flex antenna for then???
If you just need to look under the logic board to check for corrosion you can skip this step and just maneuver the logic board afterwords (I accidentally did this and it worked just fine and I didnt’ have to worry about putting the wire back in.
I lost the little black foam on top of this connector :(
It was not very well glued, I think I lost it while removing the whole logic board. I put some little piece of insulating tape. It seems everything works after reassembling, so…
i broke this cable. Lol.
until now “no service”. haha
Ripped off the little black foam on top of it.
On reassembly i simply put the foam on top of the connector. The process was working smoothly at first, but the day after tomorrow i have to open my iPhone 6 again because found it in “No Service” state and cannot find wifi :( !!!
I tried to once again assemble signal connector, yet with a full step from assembly to reassembly while cleaned the dust inside.
Thank goodness it worked after all the process. Whew
This morning I woke up with the same issues. No Service and couldn’t find any wifi signal.
And the unwanted thing happened, when trying to pry that small gold cable …… It’s plugged out together with it’s coupling on hte logic board LOL
Now that old iPhone 6 can’t come back to life. Sad
%#*@! I left the antenna cable under the logic board!!! Well, down I go again.. LOL
Did the same. DONT FORGET when the loci board back in to the phone to lift all cable including especially this little antenna one!!
(I got 10 steps further along before I realised I came to this step in the reassemble and realised my mistake).
I totally lucked out reconnecting this. It clicked in immediately lol
math_blows - 回复
Re-assemble: agree most difficult process. Patience required. Used magnifying glass and wore my generic reading glasses. Found that the connector went further up to the right than was required. For what it’s worth: used 2 spudgers - one to push it back towards its cable and the other to push down.
-
-
-
从上方移除两个 Phillip #00 螺丝
-
一个 2.9 毫米螺丝
-
一个 2.2 毫米螺丝
I reached till this step to replace the antenna cable using the toolkit I ordered with the cable from ifixit shop. But I could not open the orange marked screw in this step and had to roll back the whole thing as I did not want to destroy the screw by applying force. It seems to me the #000 philips screw driver bit I got is poor quality as I had trouble opening the small red screws as well.
Any recommendation for better quality #000 Phillips screw driver?
Put the phone on a solid surface (table or countertop), hold the screwdriver exactly vertical, press it down hard on the screw head, and turn. That’s all it takes! You’re not going to hurt anything by pressing down firmly. Some screws just require a little more force, and using a different screwdriver won’t change anything.
-
-
-
用平头撬棒把电源键排线从插口里撬起来。
-
用平头撬棒把音量键排线从逻辑主板上的插口撬起来。
I found that when reconnecting the smaller connector, sliding it from the top of the phone towards the battery was the easiest way to get it aligned.
Agree with Colin Lacey above - slide the small connector from the top of the phone towards the battery ( yes, counter-intuitive) and I felt a click and was able to push down and make the connection.
if permenant damaged is caused what should one do next?
what did you do? I think i mess up
The small connector corresponds to the side button that activates or deactivates the sound. In case of not connecting it well, this button will be disabled.
davidlluch - 回复
I have an iPhone 6 model model A 1549
it doesn’t turn on because it got wet
Do you repair this for me?
-
-
-
从Wi-Fi天线上拧下四个十字螺丝:
-
1.5 毫米 x1
-
1.4 毫米 x1
-
2.1 毫米 x2
unable to get 1.4mm screw out with included 000 ph driver. Any ideas?
I´m unable to remove all 4 screws with the tools provided
The 1.5 mm screw got stripped. Any ideas?
I can’t get the 1.4 and 1.5 screws out even after reading how to unscrew properly. Worried I am stripping screws.
Try a #0 driver and be patient. Had to push down a bit to ensure connection with the screw but worked for me.
Weil ich sehr schlechten WLAN- und Bluetoothempfang habe, wollte ich die Antenne tauschen. Nachdem ich alles wieder zusammengebaut hatte, wurde der Empfang noch schlechter.
Mir fiel auf, dass sich die Scheibe unter der 1.4 Schraube gelöst hat. Deshalb vermute ich den schlechten Empfang. Kann man diese Verbindungsstelle zur WLAN-Antenne löten?
Para que serve esta peça fixa na placa?
-
-
-
-
移除左上方部分的Wi-Fi天线模块
This isn’t the WiFi antenna - I suspect its for GPS reception. Removing this antenna makes no difference to wiFi or Blue tooth signal strength
Jon Harris - 回复
-
-
-
拧下两个 1.6 毫米 十字螺丝。
I have assembled an iPhone 6 and it seems that everything goes fine except the NFC. The phone does not respond to the POS when using Apple Pay. I think there should be some poor connection between the logic board and NFC antenna. If so, which screws should I scrutinise to fix this problem? Thank you.
These two little screws are in pretty tight.
I could not for the life of me get the screw on the left side out! But with the right hand screw out I was able to proceed and lift the logic board out without removing the bracket.
From my experience - coffee was a great idea the morning I started working on this project, but if caffeine in any way makes your hands shake, reassembly will be difficult! I had to put this part back in place using the tweezers, and then keep the tweezer points in the top right screwhole while I screwed in the left screw, because my screw slipping kept making the part fly off. This helps get the part in place for the 2nd screw to be put in easier.
Aaaaaaand this is where I gave up. These won’t budge no matter what I do :P
-
-
-
拧下以下的用来固定主板的支架的螺丝
-
一个2.6 毫米 螺丝
-
一个1.3 毫米 螺丝 (在iPhone顶部的边框上)
Is there an easy way to remove the 1.3MM screw in here I can't eem to remove it by hand.
I'm having the same problem, did you manage to remove it?
Came off easily enough with the flat side of the spudger
Adam Gal -
I faced it today, You can use a 1.5mm flat head screw driver to remove it. The guide mentions this in step 36 for stand-off screw. Hope iFIX changes the guide to indicate the flat screw driver or remove the step here.
Not sure we're talking about the same screw—this is definitely a Phillips (as shown in the photo), not a standoff. It's usually easiest with a dedicated Phillips driver, as opposed to the interchangeable bit drivers, which are fatter and a little tougher to angle in correctly.
Jeff, you are right, The instructions indicate a flat head screw driver. Since I ordered the kit with the part, it is easy to assume this will be part of it. My revised comment would be to highlight that the kit would not include it if pairing with the antenna cable replacement part order. Regarding the screw, big picture did not show the screw in orange, I mistook it as the one in later step. You are right it seems to be Phillips as shown in second small picture.
I wasn't able to remove horizontal screw, but was able to continue on with the remaining steps with no problems. The logic board slid from below the angled logic board bracket.
I wasn't able to remove the horizontal screw either and moved on with no problems as well. Thanks for the tip!
Also unable to remove the horizontal 1.3mm phillips screw, but it was OK as it didn’t prevent me from proceeding with later steps.
Same for me. Couldn’t get it out, left it in - worked perfectly.
And by the way - thanks sooooo much for the comments guys - helped me a lot through this repair!
Wusels -
Thanks for your comment! I also did what you suggested and it worked perfectly well.
Anja S -
I’m struggling to remove 2.6 mm screw. The head seems to be very worn. It’s the only screw left, holding the board to the case. I tried to unscrew it at different angles, applying pressure. Nothing is working. Any ideas how to remove it?
Stripped screws are a nightmare and there are no guarantees. If it’s only mildly stripped, you can try going up one size on your screwdriver and using a good amount of downward pressure. But if it starts to strip again, stop before you do any more damage. Try some of the additional techniques in the stripped screw guide. Good luck!
This is not just a mechanical bracket, but the upper cellular antenna tuning connection to the top bezel antenna. Thus it needs a good electrical connection, or your cell coverage will be bad.
To elaborate; When reassembling, the 2.6mm screw needs to go in quite tight, since it squeezes a small rise in the “angled logic board bracket” (really a connector between antenna tuner and the top bezel antenna) against a small gold pad on the main logic board.
This electrical connection needs to work, else the dynamic antenna tuning won’t work - which will cause problems in radio band switching (for instance between 3G and 4G, or different 4G bands). A typical indication that you have a problem here is that it can temporarily be “fixed” by squeezing the top of the phone. It’s really a crappy design choice by Apple.
Dormouse -
I also proceeded without removing the 1.3mm screw and continued on with the remaining steps with no problems. Gar Galen (above) was correct - “The logic board slid from below the angled logic board bracket.”
Couldn’t get the 1.3mm screw out but it didn’t stop me
i broke this part, under which name can i find it online?
bowoo king - 回复
Omg that 1.3 mm screw was the bane of my existence upon reassembly
math_blows - 回复
-
-
-
移除主板边缘托架
The right side of the bracket may be under some black tape that may need to be removed to allow you to remove the bracket.
Doug Whyte - 回复
Yes, further, It never came out for me. But, I lifted slightly and that was enough for board to slide out. Did not want to force the palstic/rubber part to avoid breaking it.
I discovered this bracket was broken in the middle when i removed it. I continued the tear down and replace the antena. It seens that it did not solve my GPS issue… could this angle bracket be the reason that GPS stopped working? Is this part available to sell?
Tuoa lafay - 回复
-
-
-
把主板上的一个 十字 1.2 毫米 的天线固定螺丝移除
Make sure to tighten these screws well when reassembling so you don't have issues with cellular reception. Had a phone that wouldn't connect to cellular connection after a screen replacement. I tightened the screw and it started working again.
This screw was missing from my phone. Could this be what is causing the bluetooth/GPS/wifi issues?
The Screw and Step´s 34 “antenna interconnect cable” are missing in my phone. Could this be what is causing the bluetooth/GPS/wifi issues?
-
-
-
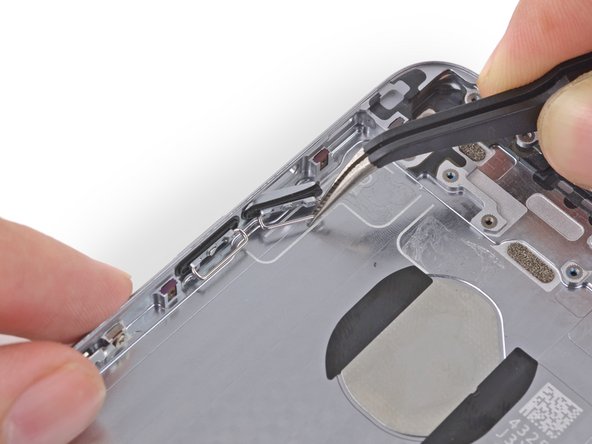
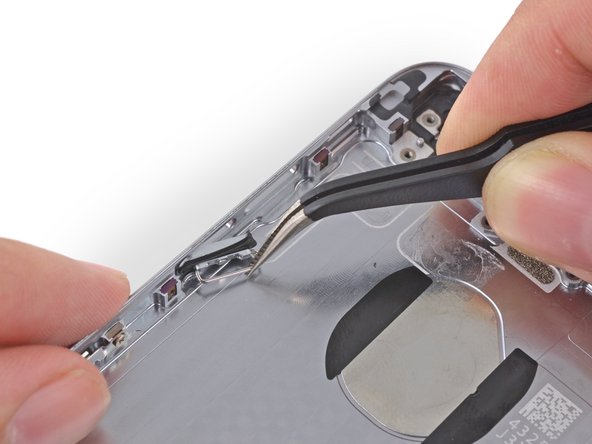
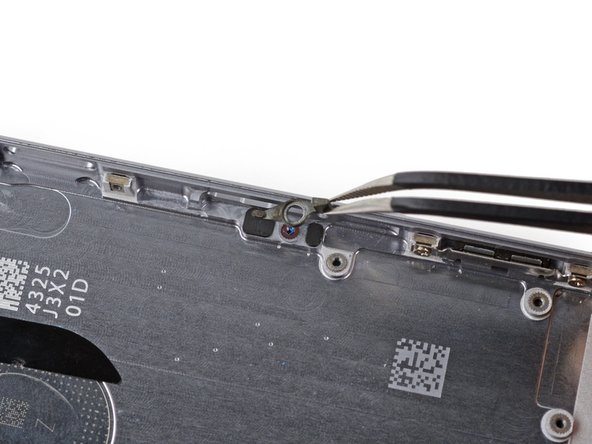
使用尖头撬棒从主板挑起天线。
Argh — easy to forget on the reassemble and even easier to break! A “do the reverse” of these instructions really isn’t sufficient.
Soo easy to forget, and I still don’t know how to put this back on. I’ve done several housing swaps on newer phones and this is so confusing!
-
-
-
使用平头撬棒断开摄像头排线。
-
如图翻折摄像头排线。
I found using the pointy end of the spudger was better to use here.
I found the hooked end of a hooked spudger was the only thing that worked for me.
Prying on the side with the pointy end of a pair of tweezers works fine too.
-
-
-
拧下以下把主板固定在后机壳上的螺丝:
-
两个1.9 毫米 十字螺丝
-
一个2.3 毫米 压铆螺柱螺丝
The standoff screw was difficult to remove because a normal phillips head screwdriver is the wrong shape. I had to use a small flat head screwdriver carefully to get it off.
I absolutely can not get this standoff screw off. Searching the web now for "iphone standoff screw" I see that there are specialized screwdrivers for getting this screw off. I wish I had one right at this moment! Anyway, an improvement to these instructions would be to mention this standoff screw upfront, so that one can be prepared with the right screwdriver before starting this job. I'm stuck at this step right now. A small flathead screwdriver just isn't cutting it.
Hello. I used a 1.5 mm flat screwdriver from iFixit Pro Tech Toolkit. It worked easily for me.
Never use the pointy end of the spuger to put back the standoff screw in place. It can break off some plastic in the hole since it’s threaded inside and you will have major problem to remove it. If the standoff scew isn’t tight enough when you put it back on, it’s not a big deal since you will put another screw in its center at the end of the rebuild and you will be able to tighten both screws at that point. Just don’t use the spudger to put it back on. That standoff screw is a poor concept.
Just a side note; I understand the list of tools required for this job includes a “Flathead 3/32” or 2.5 mm Screwdriver,” but wanted to mention that a Wera 2.5 mm diver is too thick (0.4 mm) to do a good job of removing the standoff. With a fair amount of pressure I was able to make it work, but as others have pointed out, I would expect a 1.5 mm flathead driver to have a thinner head (0.23 mm from Wera) and be more suited to the task, barring having an actual standoff driver.
Genius right here. The short, flat part slides right in!
The tool to remove this part does not come in the ifixIt New part Toolkit for this tutorial. That was an issue.
Sorry, it actually does. But it comes inside the new part package, apart from the other tools. I only opened it in the last step.
I used a pair of tweezers, A bit risky, just be careful. Line it up with the grooves and turn slowly
I used screw driver for eyeglasses….
I used screw driver for eyeglasses….
I used the flat side of the Spudger for this and it worked completely fine
-
-
-
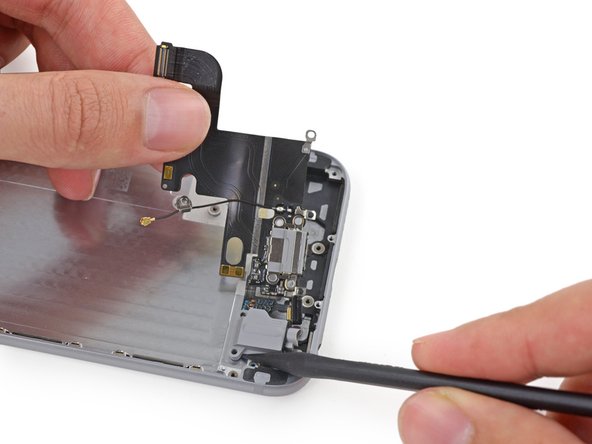
用平头撬棒挑起电池供电排线后轻轻撬起主板至可放下手指高度
Where is a safe place to put the logic board one removed?
Where can i buy a motherboard for my iphone 6
Thankyou ifixit..
-
-
-
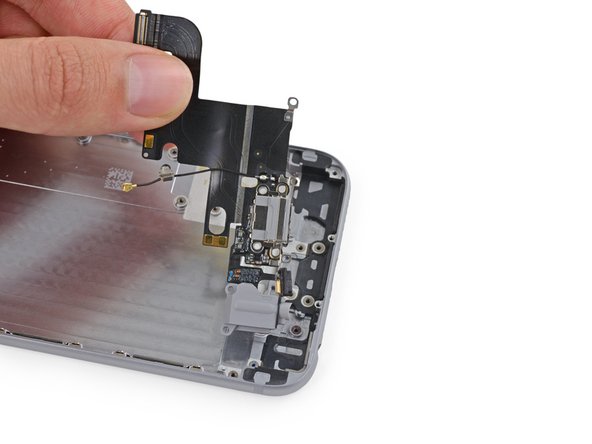
抬起电池接口一端的逻辑主板,把它从后机壳分离。
I've been told that the problem with my phone is the logic board. Can any standard logic board be swapped in for a defective one, or are there any additional steps needed to get the phone operational?
If you are following these instructions for the purpose of replacing the commonly failing wifi antenna cable, you will find it on the back of the logic board when you lift it out. You will need to fiddle around a bit to find the right position for the 4 connectors - they are microscopic - and you will hear tiny little clicks when they go in the right places. Check by looking at the board and antenna sideways, to see that they are all in place, before starting reassembly.
good tip, to look at it sideways to confirm seating of connectors.
Christa -
5-6 days from salt water damaged so this process will work so or not and this is my first time so i m afraid…i will go ahead or not?
When re-assembling make sure all the connectors remain above the logic board. Especially the power button and flash assembly connectors shown on Step 26.
When re-assembling make sure all the connectors remain above the logic board. Especially power button and flash connectors shown in Step 26 are tricky.
6 cables to keep above the board when re-inserting: two on top left, one top right, three at the bottom.
Don’t forget the the antenna interconnect cable, also in the top right, should be above the board.
What happened to the 00095-A part? Did it just disappear?
Ryan Scott - 回复
My phone is Iphone6, issues no sound at earpiece, new earpiece same issues, does replacing logic board solve this problem? Do i need to do anything i change my logic board? Like my data.
Hello we need full information of board if we seems some problems like memory problems and wifi problem we need all names of board every accessories
-
-
-
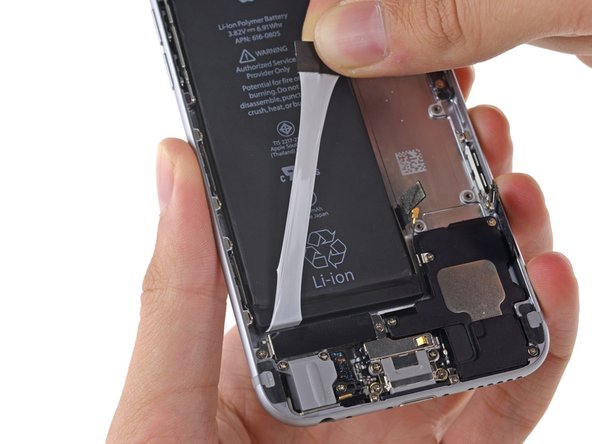
当你感觉到胶带长度已经被拉到极限时,轻缓地将胶带拉到电池左边底部地方。
-
在撕的过程,将胶带往上拉,并让胶带慢慢地从电池与后盖间分离。
-
若你成功地将两边的胶带撕除,请跳过接下来的两个步骤,直接进入步骤46。
-
若其中一个胶带在撕的过程中断裂,并无法用以上方法继续撕的话,请继续接下来的步骤。
im so confused, with the whole battery thing, do you use the same battery? or a new on? because the tabs i saw how u had to pull them off. will the battery will work without the glue tabs?
The glue strips are a separate component and can be replaced independently of the battery. Yes, the battery will work without them. However, it’s a good idea to replace your battery anyway. In particular, if the battery is even slightly deformed during removal, it may not be safe to re-use.
-
-
-
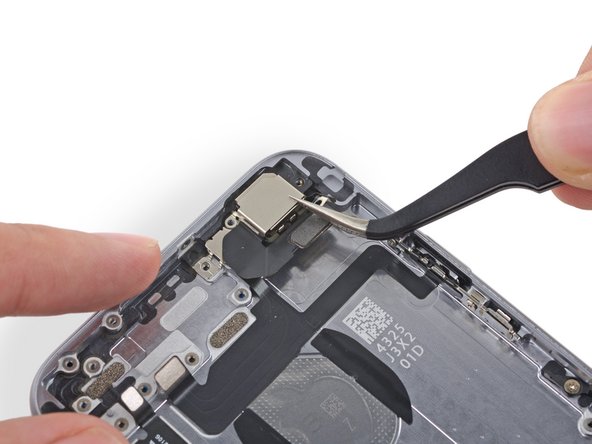
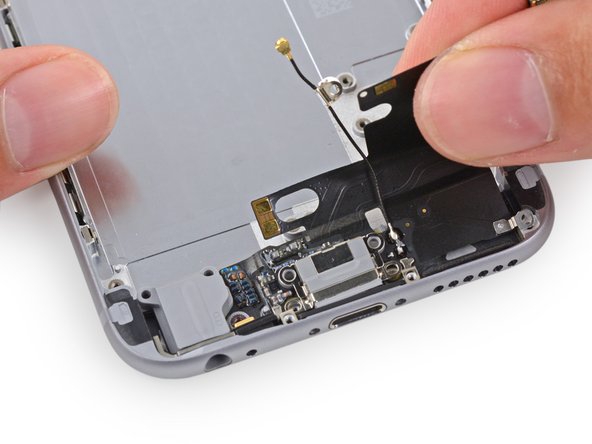
小心的拆下后面板的链接天线
Anyone know what the Antenna Interconnect does? I replaced my rear housing with a clear plastic one I ordered from someone off DHGate, and they didn't have the screw mount for that interconnect, so I wasn't able to re-attach it. I couldn't figure out what it does, and the phone seems to work without putting that screw back in. I'm suspicious that bracket must do SOMETHING, right?
Just conjecturing but it has a capacitor on it and must connect a transmitter chip to an antenna. Your phone would work without it but I would expect its range would be reduced.
Doug Whyte - 回复
-
-
-
拆除2个固定电源键的 2.2 mm Phillips #00螺丝.
When reassembling, do not make these screws too tight. Check power button for proper movement and clicking before continuing to reassemble the whole %#*@ phone like I did.
-
-
-
握住连结座底部,将音量控制键排线从后盖卸除。
-
在卸除的的过程中,请特别小心,不要过于用力。
-
将音量控制键排线从后盖卸除。
J'ai remonté mes boutons et ils ne reviennent plus en place. Ils restent enfoncés. Aie-je oublié une étape?
-
-
-
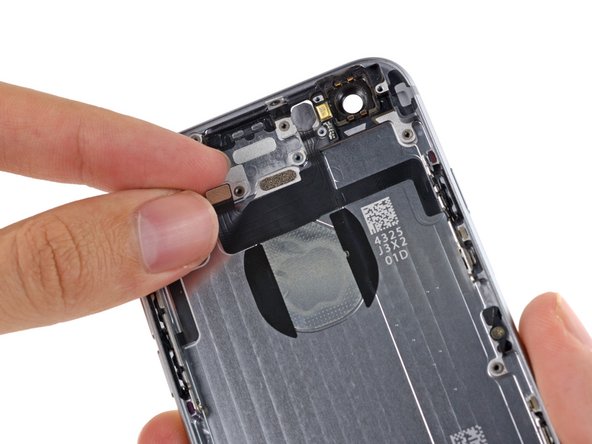
将扬声器从后盖掀起卸除。
After reassembling the whole phone the speaker did not work anymore. I did reconnect the antenna properly (I think), but I might have screwed up the underlying flatcable. Does somebody have any idea what might be the cause of the speaker not working anymore?
-
-
-
使用撬棒平头那端, 将Lightning 接口连接排线组与后盖轻轻抬起断开。
Seriously, you'll mess up your flex cable this way.
I suggest starting on the top left where the circle is. Use an utility knife / cutter to get beneath the cable and start prying from there.
Use a hair dryer to get the adhesive a bit looser ;)
Yeah, top left corner is better place to start peeling. I snapped my cable a little at first, just where the speaker connector wiring goes, and there goes my speaker functionality... I managed to keep the rest of the cable intact though proceeding from top left. And I used a lot of hairdryer.
-
-
-
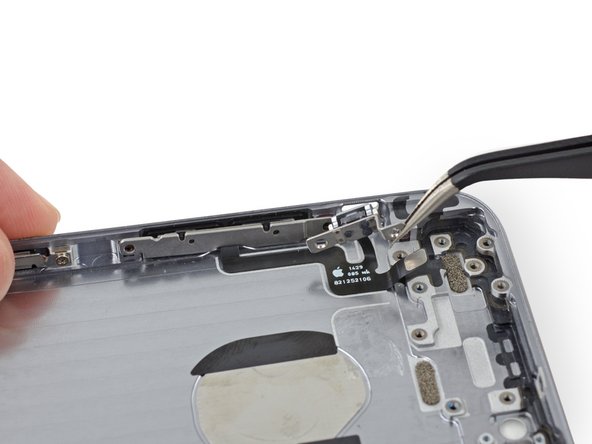
使用撬棒尖头那端,将耳机插孔从后盖卸下。
-
卸下Lightning连结排线组。
I removed the Lightning connector cable assembly, but it does not stay connected to new rear case that I added it to. Is there any recommended tape/adhesive to solve this issue?
-
-
-
卸下SIM卡读卡器。
It's probably not even worth mentioning since it's fairly obvious, but for me to complete my rear case replacement, I had to transfer three bumper-like brackets from the side edges of the old case. These brackets help hold the screen in place so they are pretty important. Six screws total. Two of the brackets were on the left and one on the right.
Additionally, there are three mesh screens behind the holes for the two microphones and the bottom speaker that weren't on my replacement case. For optimal sound performance, it's probably prudent to move these to the new case as well.
-


如要组装的话, 请按逆序操作一下步骤。
如要组装的话, 请按逆序操作一下步骤。
249等其他人完成本指南。


38条评论
My first time inside an iPhone. I slipped on some icy steps and bent my phone. Luckily it bent on the battery side and still worked except for the 'down' volume button. That wouldn't move because the housing was so deformed. Took my time and followed the guide carefully, it was absolutely fine. Took an hour and three quarters.
My issue is the glue on the battery! i destroyed my first battery saying to remove has anyone got any advice on this? thanks
I failed with both battery pull tabs, but I successfully used a microwaveable wheat bag in place of the iOpener, then carefully slid a store loyalty card under the battery. It took a bit of doing but I just took my time. The back of the battery was a bit bubbled but it still works fine.
nbuchan -
I successfully replaced my rear case but upon completion I've noticed my power and volume buttons are no longer clicky in fact they've lost all springiness. I feel like they are constantly touching the button contacts and have yet to turn the phone back on anyone have any ideas as to how to fix this?
In the middle of the volume buttons itself, on the inside is a round plate glued, you have to replace this on the new volume buttons
clbr -
Yeah the buttons themselves have a tiny piece of circular metal that meets a tiny piece of black (carbon?) on the flex button. They are TINY but if there is no black speck OR if the speck is off-center, then you won't have any successful clicking. When it works, it works. There's not mistaking. it's a very simple but tiny mechanical issue with buttons. But it's what makes them so nice.
Check if the circular metal piece on the button is in place. Check if the circular black rubber is in place on the flex cable. Also check if you put the rubber gasket around the button back.
i successfully replaced my case but after i finished my speaker doesnt work anymore, does anyone know how to fix this? the earpiece speaker works but the bottom one beside the charger doesnt
I was having th same issue. I took my phone apart and I pressed down harder on the connector at steps 22. This fixed my problem.
On the bottom of your speaker you have gold contacts. See if they are in place and that they touch the gold on the lightning flex cable.
Awesome guide! Now if you're doing what I'm doing which was a full blown part drop into a fresh frame - you still need to get the bottom grills, headphone plastic, speaker dampers and all that fun stuff with tweezers. Also to note, if you got a fresh stock frame, you'll also need to transfer the side-frame LCD stabilizers. 6 screws and 3 pieces but you still need to consider if your frame has everything in them before you start dropping the charge flex back in. Otherwise this is a complete teardown!
To harp on stock frames - they're great but I had to file my sim slot in order for my sim tray to fit. Also the buttons that come with stock frames do NOT have the extra padding to connect with the actual button on the flex. So unless you have the original button, you'll need to make sure your buttons have a solid click. If they don't, they're missing the tiny mid-connector.
Yep, correct. Tweezers and an utility knife / cutter are your best friend here.
Simply amazing! Used this guide to replace the wifi antenna and flex cover and after about an hour voila', it works! As others may have found, I believe the real problem is the small piece of insulation on the wifi antenna itself. Mine was stuck to the upper glass side of the case whereas the new one had it affixed to the antenna itself. Take your time and label each size screw as you go along and you'll do fine (I simply labeled a piece of scotch tape and placed the screw on it).
Okay tiny problem, I put it back together and didn't notice any problems at first. But when I made a call the other person could hear me, but I couldn't hear anything. Apon further inspection I noticed neither camera is functioning, the battery won't charge more than 15%, and no sound will play from my phone. Does anyone have any advice for fixing this?
Lauren May - 回复
Check the header plugs are in correctly. Some are harder to locate in than others.....
Malc -
After finishing everything, whenever I want to plug in my phone it says that the cable is not safe and won't charge. What should I do?
Great guide. I completed it, seemingly without a hitch. but now the phone won't power up. Either that or the display isn't working now. I checked the battery cable and display cable and they're plugged into their sockets correctly. Curious what else I should check.
I did accidentally re-connect the battery to the logic board at one point before completing the assembly. I quickly disconnected it after realizing I had a few more steps before I was supposed to plug it in, but I wonder if I could have fried the logic board by jumping the gun.
Not sure if you resolved your issue yet but try turning the phone on and looking closely at the screen with a light shining on it. Often times connecting/disconnecting the screen cables with the battery still plugged in can blow something on the backlight line (normally just a filter). If that's the case you should still be able to see things on the screen if you have the proper lighting.
This guide works great. However, be very careful when removing the lighting cable/audio jack housing. The wiring coming off of it (the flat black piece running to the right of the case) is heavily glued. I went too fast, and ended up damaging it by pulling on it too hard. It might be a good idea to warm up the back panel to loosen the adhesive prior to removing this part.
Hi! Question...
To get to the Lightning port, I have to remove almost Everything, right?
As always, Great guides!!! Much love from Chile :)
Check out the Lightning Connector Replacement guide, you only need to open the phone and then remove the speaker and Taptic engine. Best of luck!
Despues de cambiar la placa de carga lightening, el celular funciona pero al realizar llamadas la señal de la voz disminuye, pero al grabar audio con whats app funciona corrrectamente, no creo que sea el microfono pero que puede ser?
It would be useful if in teardown / repair guides like this you could indicate parts which can be transplanted straight into a new shell - for example the logic board obviously can’t come out of the old shell into a new one, but things like the power button/flash/microphone assembly can.
do you need to apply fresh adhesive when putting the flex cables back into place or are they in themselves adhesive?
YEEHAWW!!! Complete! Take your time. And pay close attention to any step that has many comments. Only issue I had was the standoff screw and its piggyback screw. Don’t mix up the 1.7 mm piggyback screw with the other 1.7 mm screws. They just wont thread in very well. :)
-Mike C.
I did everything as showed on the guide but the screen won’t light up now.
What might be some of problems. Also, pretty stupid from me, but didn’t back this up….how do I come about it now?
Same with me, did you managed to fix it?
My son smashed his screen and then because the phone lost its rigidity it bent in his pocket. I bought a broken phone with a good screen and case and swapped the innards (I left the buttons and cables as I assumed they’d be alright in the broken phone). And it worked! One good phone for a lot lot cheaper than any alternative. Brilliant guide. Thanks!
Just completed replacing the back housing and i was really surprised about how easy it was, so long as you follow these steps and you lay all the parts out on a piece of paper so you don’t muddle them up. If you do this you will be fine.
thomasnufc - 回复
I don’t know if the battery is punctured or not , but the battery seems to have bent a bit when I was trying to get it out how will I determine if the battery has punctured but the phone still works fine tho
@bashman2020 Don’t re-use any battery that you’ve removed in this way, even if you think it’s only slightly bent. It’s not worth the risk, especially with new batteries being as cheap as they are. Just replace the battery and recycle the old one.
The antennas, are they connected to the body? Their placement seems to be on the right side of the case ?!
I use ifixit guides a lot. They are very helpful for keeping screws organized because you know which screws are the same length. I went through this repair but I noticed that the guide left out transfer of the clips that hold in the screen. Not sure if this is something useful but I didn’t realize I left them in the other housing until I had already screwed the logic board in. Otherwise everything was straight forward and I was able to rebuild my phone from only have a working logic board.
I want to thank you so much for this manual, i didnt tought there would be any free manual around here, but here i am, it worked perfectly for me. I was able to place the parts and screws in their respective place. Thank you once again.
@sam I noticed that you forgot one step, the display retainer brackets on the case. If people don’t transfer this over, the display won’t stay in!
I was able to go through the whole repair while replacing the back case of my iPhone 6…but when I got to the last step of replacing the screen, for some reason the screen wasn’t snapping onto the case. I discovered that the old case has these three little “brackets” on the case of the phone which serve as soft locking mechanisms for the screen (two on the left side and one on the right). The replacement back case I bought didn’t come with these brackets! I’m pretty frustrated now because I need to disassemble almost everything in order to mount them, including the battery, which means my battery adhesive will need to come out!
Remember these brackets if you’re doing this repair. Verify if they are already on the case or if you need to use the old brackets (if they aren’t damaged).
When reconnecting be VERY careful not to over tighten. The connectors on the screen that these 3.6mm Pentalobe screws lock with are notorious for breaking off
Blair Tryba - 回复
what do i do if ive managed to tighten them too hard and now they wont come off?
kristian686 -
Before opening the phone, I gently warmed it using a buckwheat heating pad. This made removal of the adhesive strips (steps 20 to 24) easy.
Howard Bales - 回复
Exactly what I did as well, the gently warming made the adhesive removal work like a charm. The heat as well help to lift the screen easily, no need for the prying tools for me to open te phone.
For the adhesive removal just pull it slowly to the bottom of the phone and keep in under tension.
On reassembly, turn on the phone after getting all connectors back in place to verify all is working fine before putting all screws back in their spot.
Maarten Vergauwen -
Thanks for the suggestion! I heated up a hot/cold pack, and it worked great.
Linda Chandler -
I put mine back together but mine looks very different than this one. Why is it that when I make a call I cannot hear through the ear piece and have to put it on speaker. Also my screen doesn't go black when my face touches it
Bailey Wilson - 回复
Hey Bailey, which repair were you attempting? Is it possible you have a 6s, or maybe a 6 Plus? You may have better luck with faster troubleshooting if you post in our Answer Forum!
Sam Goldheart -
See its a long time ago you had this issue. You can try to remove the cable from front camera/sensor/earpiece from the motherboard port and gently push it back on. All the problems you relate to is thru the same cable. If this dont solve your problem, check if the earpiece is correctly placed onto the polarity poles, and that the proximity sensor is lying right down into the corresponding socket. If something is blocking the sensor, yeah then the screen wont turn on/off when you put it onto your ear.
Kenneth Hilstan -
I see in the preamble that when you replace your logic board, you would lose touch id functionality, so my question is what if you have the homebutton and thus the fingerprint reader for the logic board replacement, would touch id work?
socratesmens - 回复
The guide for the iPhone6 battery replacement needs to be revised. There are a couple of issues.
1) While the battery cover has two screws, they are different lengths. Since they are very small, it can be hard to see the difference (until one tries to screw the smaller one into the longer hole). The video needs to mention this.
2) The application of the adhesive strip if very different from what is mentioned. Also, there is a “one piece plastic” applique, and it is very unforgiving. The video should show this process in more detail.
I believe the attention to this detail would help folks correctly install their iPhone 6 batteries, and with the recent Apple disclosed battery problem, would continue to show that iFixit is very committed to the end-user.
Gary Long - 回复
I felt a bit silly getting stuck at the end of a long repair, unable to screw one of these last screws back in. What worked was gently pinching the phone above and below the screw, to make sure the screen and back were perfectly aligned.
Matt D - 回复
Apple edits posts on their Communities website that link to this fix page justifying as follows:
“We’ve edited your post because following the procedures at the site you provided may lead to damage to the user’s device.”
What is certain is that following Apple Support’s advice of resetting our phones again and again never works whereas this fix works. Apparently Apple does not want people to know that their hardware fails and can be fixed, because then they would need to explain why they don’t offer neither the fixing service nor the fixing advice by directing us to this website.
Brice - 回复
Before you get started, I suggest you confirm you are replacing the correct camera. If you are thinking of a camera, the front is the side of the device with the main lens. On an iPhone this is actually known as the rear facing camera. Once the phone is disassembled your orientation can be distorted and it is not that hard to fail to realize your are replacing the wrong camera. Doh!
William Miller - 回复
I found it very useful to use a magnet sheet when doing these repairs. I use electrical tape or a sharpie to make a grid, and place each micro screw in a separate box on the grid.
I work directly over the magnet sheet, so that if something drops I have a better chance at not losing it.
If you do lose a screw, go over the work area with a fridge magnet. It will pick it up if it hasn’t popped too far away.
Megan Telliano - 回复
I agree. The Magnetic Project Mat makes your project incredibly easier and keeps your screws/parts organized. Here is the link for anyone interested:
Magnetic Project Mat
Cooper -
or some masking tape with sticky side up and the ends folded underneath on a piece of paper, then you can write notes like
“1.4mm for FOO bracket →”
“7x2.3mm for EMI cover, different one by camera →”
The arrows point as appropriate.
If you drop something, put a flashlight on the floor & shine it across the floor — Turn off ceiling & other lights off to maximize the shadow from the flashlight.
Bass Clef -
These screws are tiny, and the first two are the biggest of the lot. Get a magnifying glass or good reader glasses.
Jennifer Porter - 回复
Which torx is this T?
klemenecanze - 回复
The screws are no torx screws they are Apple Pentalobe screws. You need to buy a Pentalobe screwdriver seen above.
Claes -
I have to use the P2 right?
Aman Singh - 回复
The best advice I can give is not to perform this operation over carpet.
Bruce codding - 回复
I'm an amateur, but I was able to replace the parts almost perfectly while looking at this explanation, thank you very much.
irichin.3.26 - 回复
was fairly easy more nerves than anything, one thing one should have on hand is alcohol just in case its needed. also if one doesn’t get the entire tape strips out, use the alcohol like suggested and lift the battery up. Then can grab the remaining tape strips with tweezers and pull it out. Easy to put back together just make sure the connectors are in. The screws are tiny so take your time. I plugged it in and it started charging and it worked. Great to have my 6 back for a trip as I wanted to use it for the camera, also my game phone so nice to have a battery that lasts. Yes having a flat place to put the parts and put them in separate area so they don’t get mixed up. It took about a hour with hunting for a spare bottle of alcohol.
Greg Wischmeyer - 回复
The first step should always to be to backup your phone as there is always a slim chance that even a simple battery replacement may render the phone inoperable and data on it lost.
Jim - 回复
Please do not forget to remove the SIM-Card tray!!
Steffen Albrecht - 回复
I didn’t need to remove my sim card tray when I did my iPhone 6 battery replacement. Why do you suggest to remove it?
Jim -
You dont need to remove sim card while battery replacement
bertan - 回复
Did mine today, with iFixit battery and iFixit tool kit. Did not need suction cup, to open case, as it had partially sprung open on left, as a result of a badly swollen battery. Supported base and screen with a bookend and rubber bands. This kept these parts at a 90 degree angle, so that screen did not need to be removed. IFixit screwdriver tips were perfect fit. Somewhat difficult to remove battery adhesive strips, but slow and steady got it done, after mild heating with hair dryer. Took about 3 minutes to reposition battery connector…just a wee bit tricky, to position correctly. Was careful to place top of screen in place first, and remainder snapped into place with light pressure, and replaced the 2 pentalobe screws.
Will highly recommend iFixit for such a repair. Repair kit and battery, are first rate. I give this an 11, out of 10.?
Len Drasin - 回复