简介
请按照本指南安全地拆卸和更换 2018 年末 MacBook Air 的电池。
为最大限度地降低损坏风险,请打开 MacBook,让电池完全放电后再开始此操作。已充电的锂离子电池如果意外被刺穿,会非常危险。电池肿胀怎么办]
你所需要的
-
-
如果你的 MacBook 运行的是 Big Sur v11.1 或更高版本,禁用自动启动可能不起作用。 你可以正常进行拆卸,但请务必在打开后盖后立即断开电池连接。
-
使用P5 螺丝刀卸下以下螺丝:
-
2个7.9毫米螺丝
-
2个7.1毫米螺丝
-
6个2.6毫米螺丝
-
-
-
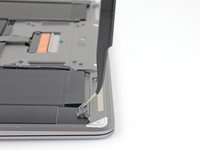
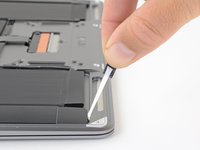
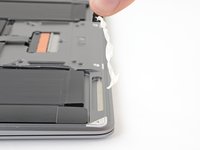
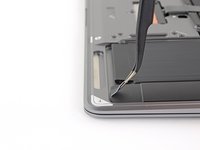
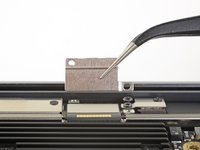
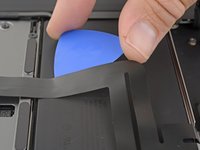
在显示屏和底壳之间放进手指,然后向上拉以将底壳从夹扣中弹出。
-
移除底壳。
Are there any suggestions to removing the pressure fasteners more easily?
I used a suction cup to lift up the cover. I mean those to lift up an iPhone display. Worked like charm.
-
-
-
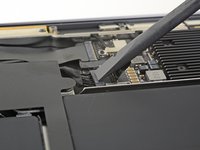
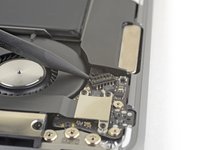
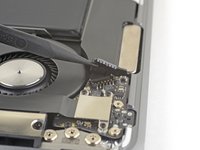
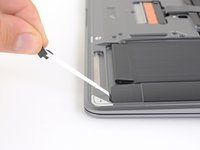
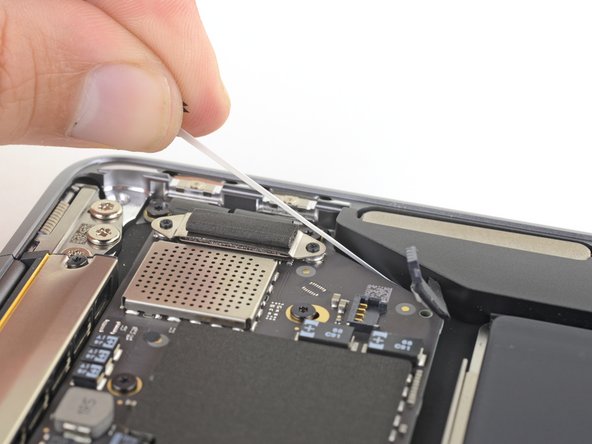
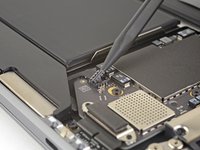
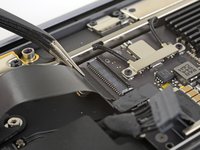
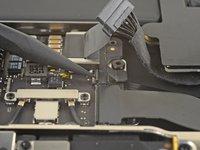
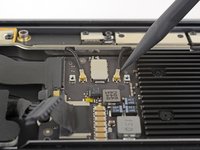
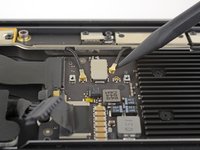
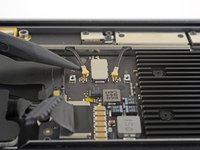
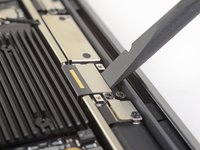
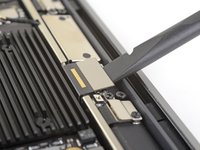
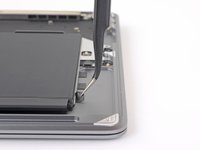
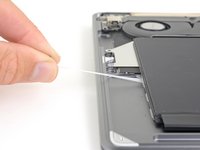
使用撬棒将电池接口行于主板滑动并从主上的插座中取出。
Before the battery can be fully disconnected, the battery disconnect button needs to be held down. There is a gold button just above the battery socket, along with a small LED much like the 12” machines. Once this has been held down and the LED has switched off it is safe to remove the battery.
This seems like an important step?
Also, seems like this should be done after the battery is disconnected, not before? Otherwise, wouldn’t the battery re-charge it?
What if the white LED dosent light up after pressing the yellow button again?
Iron05 -
I just performed this repair on my late 2018 mac air. I did click the gold button but saw no LED illuminated or otherwise. Question- after reassembly does the button get pressed again to connect the battery? Please clarify if this button is to be pressed and if it needs pressing again after the repair.
All said - I pressed again after the battery connector clicked, assembled the back and all worked perfectly. The original issue was one dead port (no charge, no communication). The battery charge lightening bold icon was acting funny too. Genuis bar guy in Naperville said it was likely a logic board too. But it was not. The port was apparently confusing the logic board with regards to the charge function. Thanks Adam for saving me $440 and sending my computer back to Apple. I am 71 yrs young - who says an old dog can’t learn new tricks with good training!!
I didn't see Aaron's comment before completing the battery replacement. Afterwards, the computer would not turn on despite multiple SMC reset procedures. Upon double-checking the comments I see the importance of pressing the gold button. I pressed the gold button before disconnecting the new battery, then pressed it again after reconnecting for good measure. Computer booted!
It would be good of iFixit to add this important step as most people probably don't open up every single comment on (seemingly) simple steps.
Seconding Corey's comment. If paid more attention to the comment section, I would have avoided 15-30 minutes of panic. (BTW I did not notice any LED, but the golden button was easy to find).
Where is the gold button? I replaced my battery and my laptop will not start
-
-
-
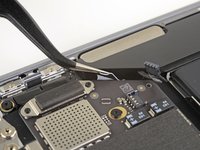
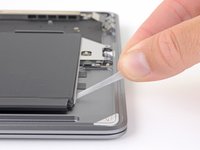
用镊子将右扬声器底部的黑色粘性拉条抬起,足以用手指抓住它。
-
抓住胶带的拉条,然后缓慢小心地将胶带从扬声器下方拉出。
-
如果胶带断裂,则将其留在里面并继续下一步。
What do you do to get the speaker to stick once you put things back together? Are these adhesive strips reusable? If not, where can we get new ones?
The strips will tend to remain edhesive in some cases but if not just use some thin double sided adhesive tape of a similar width. I will not link because I am in Australia but it isn’t hard to find. I used some heat (100°C) and a plastic spudger to aid removal or a hair dryer on lower heat. Slow and steady, it’s not hard. The strips will almost certainly break.
-
-
-
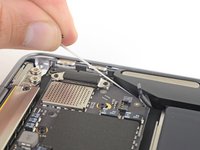
将撬棒的尖端滑到右侧扬声器电缆下方,然后笔直向上撬起以断开扬声器连接。
Broke both speaker connectors by spudging straight up. Looks like they should slide apart like a normal zif.
Pulled straight up and broke both connectors.
What works for me with these is gently sliding one edge up off the pins first, then the other side.
This technique (one edge at a time) worked for me
-
-
-
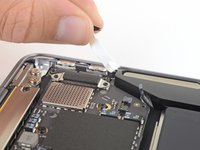
使用镊子将右扬声器顶部的粘性拉条抬起到足以用手指抓住的位置。
-
抓住胶带的拉条,然后缓慢小心地将胶带从扬声器下方拉出。
-
向扬声器加热,以软化下方的粘合剂。
-
小心地将撬棒或撬棒滑到扬声器下方,以分离粘合剂。
This business of pulling the adhesive out (here and with the batteries) - at first it seems impossible, but persevere. Pull it really, really, slowly - it extends to around 30cm before it's all out. I applied a bit of heat with a heat gun (at least with the batteries) and after a few failed attempts got the hang of it. When it works, it's like magic and very satisfying, and much better than giving up and prising the part off with the adhesive in place.
-
-
-
从底部垂直向上提起右扬声器,然后将其卸下。
Step 5 the right speaker adhesive broken while removing, other end adhesive slipped out ok. But it's extremely hard to now lift up the battery, feels like I break something if I try harder.
handsonmac - 回复
This is not as easy as it sounds. Neither adhesive strip broke, but that bugger resists removal, because it is attached with adhesive tape to the bottom. Use different angles of attack to pry it up with steady force.
-
-
-
用镊子将右扬声器底部的黑色粘性拉条抬起,足以用手指抓住它。
-
抓住胶带的拉条,然后缓慢小心地将胶带从扬声器下方拉出。
-
如果胶带断裂,则将其留在里面并继续下一步。
Auf der rechten Seite ist mir der Klebestreifen gerissen. Habe dann auf der linken Seite nicht nur an der schwarzen Lasche gezogen, sondern mit Daumen und Zeigefinger am weißen Klebestreifen nachgegriffen. So kam er ohne Reißen raus.
-
-
-
-
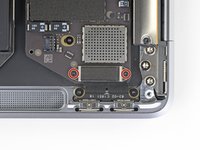
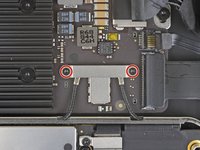
使用T3 Torx螺丝刀卸下两个固定触控板接口盖的1.4毫米螺丝。
-
移除触控板接口盖
My machine used T4 screws
Me too! I tried with T3 and it wasn’t working.
I stripped my screws trying to get them out with a t3 driver...
-
-
-
使用 T3 Torx 螺丝刀卸下固定 USB-C 端口接口盖的两颗 1.3 毫米螺钉。
-
卸下 USB-C 接口盖。
There is no need to remove the logic board!!
Skip steps 16 through 28 and go to step 29 to release the trackpad cable from the battery. then follow steps to 30 through 33 to release the battery. The battery can be removed by slipping it counter-clockwise under the trackpad cable. The new battery can be slipped in place in the same way.
Much easier!!
josephgray - 回复
Removing a few of the logic board screws allowed me to get the to right screw bracket under the logic board to give enough clearance as w98fxr mentioned.
This can be done, but it's very tight. Still, beats removing the logic board and the possibilities of breaking something in the process.
maccentric - 回复
-
-
-
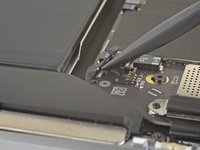
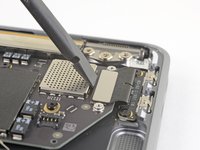
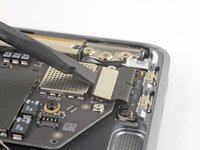
使用撬棒的扁平端将 USB-C 排线接口向上撬出主板上的插座。
please reconsider removing the logic board and and usb-c connector as is recommended in the prior step. i had a very difficult time reconnecting the usb-c connector
It should be cautioned that this connector is very easily bent, meaning a bend in the length of the metal surface you press against to reconnect (or pry against for removal). Once bent it becomes very hard to establish a good connection.
-
-
-
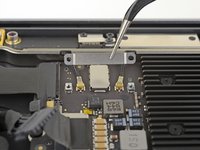
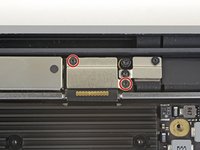
使用 T3 Torx 螺丝刀卸下用于固定天线电排线盖的两颗 1.4 毫米螺钉。
-
拆下天线排线盖。
These are T4 screws
The MBA I just finished with were T3. I'm fairly confident with my tools as I recently updated/upgraded nearly my entire set with WiHa. I should also mention the many tools acquired from iFixit over the years have all been were exceptional lasting years. There's no doubt iFixit would have been my source but a close friend went to work for WiHa. His discount(s) & being motivated to help him was a major impact. For anyone not having such an advantage IMHO tools from iFixit are one of the best values anywhere. Let's not forget; buying from iFixit will also help to push "Right to Repair" forward. Here in Minnesota Right to repair ALMOST PASSED. Many believe it will become law during the next session! I can't tell you how proud this would make me. I would obtain as many service manuals as possible and post them all online!!! What a great dream...
-
-
-
将撬棒的尖端插入靠近接口的天线排线下方。 竖直向上撬以断开排线连接。
-
对另一根天线排线重复此操作。
Be SUPER SUPER CAREFUL pulling off the gold WiFi antenna connectors! As described, use the spludger to press up the black cable just behind the metal connector. I tried to ping them off from the bottom of the gold connector where it clips into the socket on the motherboard and ended up pulling off the SMD sockets from the motherboard - huge and costly mistake that will probably render it useless.
-
-
-
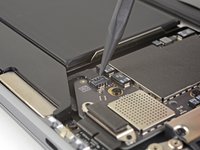
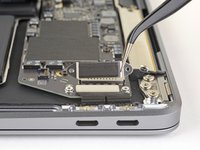
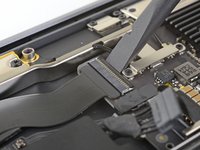
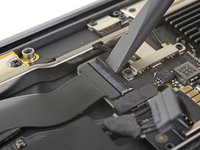
使用撬棒的扁平端撬起显示屏排线接口。
How do I reconnect display connector??
Kris Queck - 回复
Just align the plug section of the display flex with the socket on the logic board and gently press it in until it locks in place. Do not force it but just ensure it’s correctly aligned before pushing it into the socket.
Pro tip: You can remove the two T5 screws on the LCD connector side (located to the right of the display connector and to the left of the heat shield). From there, tilt the whole skinny LCD board towards the logic board connector and gently pinch the connector in to the socket. Before laying the skinny board back down, screw in the shield from Step 15 so it doesn’t pop out of the socket again.
-
-
-
使用T4 Torx螺丝刀卸下以下螺丝:
-
一颗5.5毫米螺丝
-
三颗2.6毫米螺丝
-
两个1.9毫米螺丝
These are T5 Torx driver screws
Need torx 5 AND torx 4 driver here ;)
During re-assembly be soft when screwing in the logic board because those antenna plugs in Step 14 are quite awkward to pin back into their sockets and there is little leeway in the cables; to make this task a little easier in Step 14, secure the logic board loosely right up against the near outside edge; after re-connecting all the cables in Steps 16-9, return to Step 17 to firm up the logic board screws.
This tip was a huge help, hate these cables lol
The 5.5 mm screw goes into a hexagon standoff which may come off with the logic board being sanswiched beteen the 5.5 mm screw screw and the standoff like happened to me. Just something to be aware of. It also has a black rubber bumper over the screw which was not mentioned at all. It pulls straight off to give access to the screw.
On my board I needed to use T6 for all the screws except the rubber bumper for which I used a T7. I have a full set of small Torx drivers and tried for the best fit.
jeffyouell - 回复
T5 fit best is all the screws on my machine
-
-
-
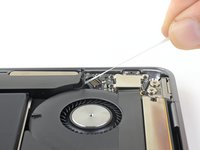
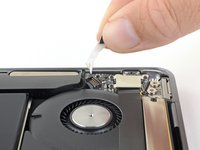
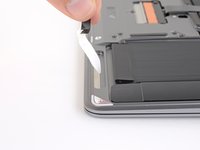
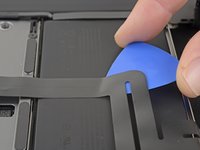
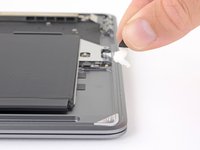
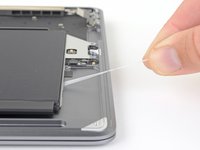
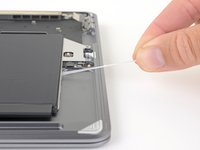
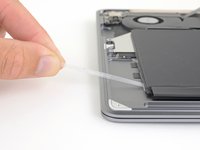
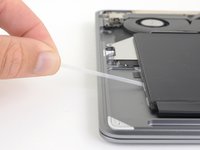
用镊子将电池侧面的黑色粘性拉舌抬起,足以用手指抓住它。
-
抓住胶带条的拉条,然后缓慢小心地将胶带条从电池下面拉出。
-
如果胶条断裂,则将其留在里面并继续下一步。
-
-
-
移除电池。
-
校准新安装的电池:将其充电至100%,并继续充电至少2小时。拔下电源插头并正常使用以耗尽电池电量。当你看到电池电量不足警告时,请保存你的工作,并保持笔记本计算机处于打开状态,直到由于电池电量不足而进入睡眠状态。等待至少5个小时,然后为笔记本电脑不间断充电至100%。
-


将新的替换部件与原部件进行比较--在安装之前,可能需要转移剩余部件或去除新部件上的背胶。
要重新组装设备,请按照相反的顺序执行上述步骤。
将电子垃圾送到R2 或 e-Stewards 认证的回收商。
维修没有按计划进行?请访问我们的 社区 获取故障排除帮助。
将新的替换部件与原部件进行比较--在安装之前,可能需要转移剩余部件或去除新部件上的背胶。
要重新组装设备,请按照相反的顺序执行上述步骤。
将电子垃圾送到R2 或 e-Stewards 认证的回收商。
维修没有按计划进行?请访问我们的 社区 获取故障排除帮助。
40等其他人完成本指南。


12条评论
Well done article and I acheived my goal of changing out my very puffy old battery for the new one (still need to recycle the old… ASAP). Curiously, I had to open it again as I, somehow, didn’t get the battery cable pushed in far enough and it wasn’t working. Now, all is well. Strangely, even after a couple of attempts at resetting the SMC, my fan is running almost constantly. I’m kind of not sure what to do about that at this point (yes, I used the iFixIt guide to clean my fan as well). Anyway, thanks for the help.
great article, havent used it as yet, but just wanted to check the complexity before I purchased the battery
New battery is in and on 1st round of charging! Thank you very much!!!
As a note, I also purchased some Tesa tape with the battery as the shopping cart recommended it. I used that under the speakers before replacing them. The left & right sides of the batteries are kind of loose, but I’m not overly worried about that as it’s attached to metal backing.
Extremely pleased with this tutorial and the ifixit.com battery replacement kit. Since one of my USB-C ports died and the Apple certified folks told me to expect to pay over $500 to replace the port and battery I came here to sort it out myself. Happy to say with ifixit's awesome parts and tutorials that I have a fully functional Air again for about $150. I also recommend the magnetic project board as this was super helpful in keeping all of the various sized screws organized to the steps.
Great guide, except a small mistake in the required tools: we don't need a T4 screwdriver at all but we do need a T5 screwdriver.
HugoThomas - 回复
There is no need to remove the logic board!!
Skip steps 16 through 28 and go to step 29 to release the trackpad cable from the battery. then follow steps to 30 through 33 to release the battery. The battery can be removed by slipping it counter-clockwise under the trackpad cable. The new battery can be slipped back in the same way.
Much easier!!
josephgray - 回复
I skipped steps 16-28 as per @josephgray 's comment and it worked. HOWEVER, I had clock problems afterwards, which were resolved by following the steps to delete the plist file found in this post: https://www.macobserver.com/tips/how-to/... - the steps are for an M1 MacBook and mine is Intel (otherwise of course I wouldn't be writing here), but the solution worked for me.
And I totally ditto @jenniferbarnes 's words above - one of my USB-C ports died and the Apple certified folks in the Czech Republic told me to expect to pay the equivalent of over $500 USD to replace the ports and battery. Not only did I manage it myself for 1/5 the price, but I still have the tools and the magnetic project board for my next effort! A huge THANK YOU to iFixit and the iFixit community!!!
(English Below)
Sehr coole Anleitung, vielen Dank! Besonders guter Hinweis von @josephgray, die Schritte 16 bis 29 zu überspringen. In nicht einmal einer Stunde war das MacBook wieder betriebsbereit. Lautsprecher habe ich mit doppelseitigem Klebeband fixiert. Und jetzt läuft das MacBook wieder ewig lange mit einer Batterie-Ladung. Danke!
Very cool instruction, thank you! @josephgray particularly gave a good tip to skip steps 16 to 29. The MacBook was up and running again in less than an hour. I secured the speakers with double-sided tape. And now the MacBook runs for ages on one battery charge. Thank you!
If the first thing you do is disconnect the battery, is it really an issue if you don’t (or can’t) disable auto-boot?
maccentric - 回复
I agree, why disable Auto-Boot when the lid is closed and the battery is disconnected immediately? – I've never had an issue since 2016 when the feature was introduced.
stevebsiegel - 回复
On my machine, the longest two screws were in the corners, while the other two long screws were in the middle. Perhaps previous service in the past had them replaced into the wrong place? In any case, the longest screws do seem to fit in either place. I guess 0.8mm is not very much of a difference. Seems like poor design if they could have used one size of screw.
johann beda - 回复
Just did one, and it also had longest screws in the corners.
maccentric -
Just did another, and the long ones were in the middle. Definitely poor design and quality control.
maccentric -