washer showing error Ld
The machine won't start and has code Ld
声誉积分: 101.2千
![]() 8
8
![]() 172
172
![]() 358
358
mamajtown, Ld code is for Long Drain: this could indicate that the washing machine is taking longer than 5 minutes to drain out enough water to reset the water pressure switch. This can be caused by a clogged or blocked drain hose(remove drain hose and check for clog or colasped/pinched hose), a clogged drain pump or a defective drain pump(remove pump disassemble check for debri,etc., test pump for function/replace pump if not working).
这个答案有帮助吗?
I have a questions, I just had purchase a new drain pump and the problem is still the same, I know it's not the old pump because both old and new, have the same problem. Could it be the computer board or a relay switch?
I just now lowered the drain hose, to see if that is the problem..

声誉积分: 782.8千
![]() 1.1千
1.1千
![]() 893
893
![]() 2.3千
2.3千
mamajtown just to add to the excellent answer from @lpfaff1. It could be that you have a defective drain pump or something in the pump preventing it from draining. You could always try to unclog the pump. Here are some decent instructions:
Things You Will Need
Pliers
Bucket
Duct tape
5/16-inch nut driver
Needle-nose pliers
Unplug your Maytag Bravos washer from the electrical outlet.
Slide the washer forward to access the drain and water supply hoses. Turn off the Bravos’ water supply at the wall. Use pliers to turn the water supply hose connections at the back of washer counterclockwise to remove them from the appliance. Use a bucket to catch any water left in the hoses. Pull the drain hose from the appliance drain hose or utility sink.
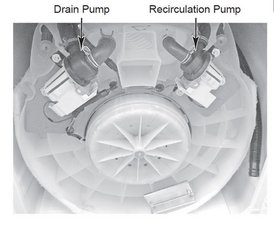
Secure the washer lid to the cabinet with a piece of duct tape. Tilt the Bravos washer forward and let the front of the appliance rest on the floor so you can reach the drain and recirculation pumps.
Locate the drain pump on the top left side of the washtub and the recirculation pump on the top right of the tub. Short, elbow-shaped inlet hoses connect both pumps to the bottom of the washtub. Discharge hoses connect to the side of the pumps and run up the side of the washtub. Two hose clamps hold the inlet hoses to the washtub and to the pumps.
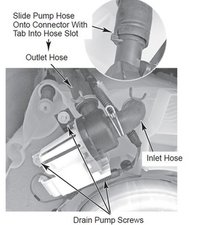
Use pliers to squeeze the ends of the inlet hose clamps closest to the pumps. Slide the clamps halfway up the inlet hoses. Squeeze the ends of the discharge hose clamps and slide them away from the pumps.
Find the three 5/16-inch hex head screws holding the drain and recirculation pumps to the bottom of the washtub. Use a 5/16-inch nut driver to remove the screws from the pumps.
Unsnap the wire covers from the ends of both pumps to reach the wire harnesses. Unplug the harnesses from the pumps.
Look inside the inlet opening on both pumps. Use needle-nose pliers to remove any cloth or debris clogging the pump inlets. Look inside the inlet hoses still connected to the underside of the washtub for any cloth or debris clogging the pump inlet hoses. Use the needle-nose pliers to remove debris from the inlet hoses.
Reconnect the pumps to the bottom of the washtub. Attach the inlet and outlet hoses to the pump. Slide the hose clamps back to their original positions. Plug the harnesses back into the pumps and snap close the wire covers.
Return the Maytag Bravos washer to its upright position. Reconnect the inlet hoses to the back of the appliances. Insert the drain hose into the drain pipe or reconnect it to the utility sink. Turn on the water supply, plug the appliance into the wall and push it back into its original location. from here
这个答案有帮助吗?
I'm having this same problem. There are no clogs. We took the drum out checked under the plastic screen, checked hoses,etc. Even replaced the pump. Still getting ld. The light is on rinse last time. I'm baffled. There's not any exposed wires or loose connections. Glad y'all had better luck
We are having the same problem as you. We've replaced the panel and the pump to no avail!
@Karina Loewen what make and model? You tried hat was suggested in the above answers?
I took off the pump and checked it, it was clean no debris, impeller turned when I applied 110V power to it. Answers above are making me lose hope.
I had the same issue, found a nickel and little sticker in drain pump. Still had the ld code. My issue was the drain hose was positioned too high, i moved to a utility sink and then drained no problem, no issues after that, no more ld code
声誉积分: 25
![]() 1
1
I ran the washer’s self test (search for Maytag Bravos Diagnostic Modes) and found that the drain step (C7 or C8) did not drain. Definitely pointed to drain pump issue.
I followed the instructions to check the drain pump. It was clear, so used a pair of Disconnect Wire Connectors attached to the male end of an old power cord to connect the drain pump to AC power and found it would drain the washer.
My next step was to unplug the washer and then take the control head off (3 screws) to get at the control board. Before taking anything off the control board take pictures of the wiring harnesses and pressure sensor tube, then number each connector as you disconnect it. Note that the blue wires on connector P4 run to the drain pump. At this point you could order a replacement control board for about $150.
Before spending $150 I wanted to look at the control board to see if there was anything obvious. Use a wrist strap if you have one (otherwise ground yourself on one of the chassis screws) to remove the control board and place on an anti-static mat or bag. Following the blue wire connections on P4 I found that the drain pump was controlled by power relay K9 (I think that was the number - follow the traces to double check). All the solder connections looked OK so I suspected the power relay failed. I ordered a Omron G5Q-A4 DC12 from Newark Electronics ($1.37 + shipping so I got 3). With a soldering iron, solder sucker, and solder I was (after figuring out the technique) able to remove the old power relay and install a new one. Using the anti-static procedure I used earlier I re-installed the control board, reattached the connectors and pressure sensor tube, and reattached the control head.
I re-ran the washer’s self test and was very happy it completed. I have since run a few full loads and it’s still draining. Hopefully there is not a problem with any of the power circuitry on the control board or with the drain pump that will cause the relay to fail again, but only time will tell.
这个答案有帮助吗?
Forgot to mention that there is a coating on the back of the board. I used a dremel wire wheel to remove from the 4 pins that have to be unsoldered. Careful not to damage the traces on the PCB
This was spot on to repair my issue, and it is indeed relay K9.
Is Omron G5Q-A4 DC12 the correct part number? I could not find that par number but I did find Omron G5Q-1A4 DC12 (note the "1" in front of the "A4"). Thank you!
过去 24 小时: 15
过去 7 天: 137
过去 30 天: 654
总计 47,556
8条评论
@mayer, same with this title
由 oldturkey03 完成的
@oldturkey03 No I can.t fix this one @evan
由 mayer 完成的
@mayer, looks fixed. It's got a title....
由 oldturkey03 完成的
Well that's what i typed in but it didn't seem to take on this one.
由 mayer 完成的
@mayer, sorry I added title this morning.
由 L Pfaff 完成的
显示更多的3条评论