跳转到主内容

iPhone 6s Plus 扬声器更换

你所需要的

  1. iPhone 6s Plus 扬声器更换, SIM 卡托: 步骤 1 中的图像 1,2 iPhone 6s Plus 扬声器更换, SIM 卡托: 步骤 1 中的图像 2,2
    • 使用SIM卡取卡针或是回纹针插入SIM卡退卡孔中。

    • 用力的向里面按压, 使卡托弹出。

  2. iPhone 6s Plus 扬声器更换: 步骤 2 中的图像 1,1
    • 从iPhone卸下SIM卡托。

    • 当你要将SIM卡装回时, 请注意卡托与SIM卡方向。

  3. iPhone 6s Plus 扬声器更换, 五角螺丝: 步骤 3 中的图像 1,1
    • 在拆卸你的 iPhone 之前,将电池放电到电量低于 25%。如果您意外刺破一块充满电的锂离子电池,其可能会起火甚至爆炸。

    • 在你开始拆卸之前,将 iPhone 关机。

    • 拧出 Lightning 接口两侧的 2 颗 3.4 mm 五角(梅花形)螺丝。

  4. iPhone 6s Plus 扬声器更换, 使用反向钳的流程: 步骤 4 中的图像 1,3 iPhone 6s Plus 扬声器更换, 使用反向钳的流程: 步骤 4 中的图像 2,3 iPhone 6s Plus 扬声器更换, 使用反向钳的流程: 步骤 4 中的图像 3,3
    • 接下来的三个步骤会用到反向钳,我们设计的一个让分离屏幕更方便的工具。如果你没有反向钳,跳过下面的3个步骤来寻找其他的方法。

    • 完整的反向钳的使用指导, 请参阅此说明

    • 将蓝色的手柄朝铰链的方向拉,以解除反向钳的分离模式。

    • 将支撑臂滑过 iPhone 的左边缘或右边缘。

    • 将两个吸盘放到Home键上方的屏幕——一个在前,一个在后(屏幕朝向自己的地方为前)。

    • 将上方吸盘向下压以施加吸力到目标位置。

    • 如果发现反向钳压在设备上的表面太滑或者不稳,可使用胶带来创造一个抓力更强的表面。

  5. iPhone 6s Plus 扬声器更换: 步骤 5 中的图像 1,3 iPhone 6s Plus 扬声器更换: 步骤 5 中的图像 2,3 iPhone 6s Plus 扬声器更换: 步骤 5 中的图像 3,3
    • 向前拉蓝色手柄以锁定手臂。

    • 顺时针旋转手柄 360 度或直到吸盘开始拉伸。

    • 确保吸盘彼此保持对齐。如果它们开始滑出不对齐,请稍微松开吸盘并重新对齐手臂。

    • 当防夹产生足够大的间隙时,在屏幕下方插入三角撬片。

    • 如果反向钳无法形成足够的间隙,请将手柄旋转四分之一圈。

    • 不要一次旋转超过半圈,然后每两次之间要等一分钟。让反向钳和时间帮你完成剩下的工作。

    • 跳过接下来的三个流程。

  6. iPhone 6s Plus 扬声器更换, 拆卸步骤大全: 步骤 6 中的图像 1,1
    • 可以选择使用iOpener或吹风机对iPhone的下边缘进行大约一分钟的温和加热。

    • 加热可软化固定显示屏的粘合剂,使其更容易打开。

  7. iPhone 6s Plus 扬声器更换: 步骤 7 中的图像 1,1
    • 6s Plus屏幕四个边缘周围有黏胶固定, 若你选择要更换黏胶的话, 在你拆解之前, 最好是先准备好新的黏胶。若你本身不想更换新黏胶也行, 因为在功能上, 跟使用原有的黏胶没有太大差别 。

    • 将吸盘置于屏幕左下角, 进行拆解。

    • 如果您的显示器严重开裂,用一层透明胶带覆盖其表面可以会让吸盘吸住。另外,也可以使用非常结实的胶带来代替吸盘。如果所有其他方法都失败了,您也可以将吸盘粘在破碎的屏幕上。

  8. iPhone 6s Plus 扬声器更换: 步骤 8 中的图像 1,2 iPhone 6s Plus 扬声器更换: 步骤 8 中的图像 2,2
    • 使用巧劲拉动吸盘, 直到屏幕与后盖中间出现缝隙为止。

    • 注意, 若拉太大力会造成屏幕损坏。只要打开到让显示屏与后盖有个小缝隙即可。

  9. iPhone 6s Plus 扬声器更换: 步骤 9 中的图像 1,3 iPhone 6s Plus 扬声器更换: 步骤 9 中的图像 2,3 iPhone 6s Plus 扬声器更换: 步骤 9 中的图像 3,3
    • 在屏幕下有个槽口, 位置正好在耳机插槽上方。这里是撬开的最佳位置。

    • 当吸盘还吸附着屏幕的同时, 将撬棒平面那头插进屏幕与后盖的缝隙, 也就是耳机插槽上方位置。

  10. iPhone 6s Plus 扬声器更换: 步骤 10 中的图像 1,2 iPhone 6s Plus 扬声器更换: 步骤 10 中的图像 2,2
    • 用撬棒将缝隙左右边撑开, 使屏幕从机身上分离。

  11. iPhone 6s Plus 扬声器更换: 步骤 11 中的图像 1,3 iPhone 6s Plus 扬声器更换: 步骤 11 中的图像 2,3 iPhone 6s Plus 扬声器更换: 步骤 11 中的图像 3,3
    • 将吸盘往上拉的同时, 将撬棒平的那头插进手机左侧, 屏幕与背盖间的缝隙。

  12. iPhone 6s Plus 扬声器更换: 步骤 12 中的图像 1,2 iPhone 6s Plus 扬声器更换: 步骤 12 中的图像 2,2
    • 将撬棒平的那头插进手机左侧, 前面板与背盖间的缝隙。

  13. iPhone 6s Plus 扬声器更换: 步骤 13 中的图像 1,2 iPhone 6s Plus 扬声器更换: 步骤 13 中的图像 2,2
    • 将撬棒平的那头插进手机右侧, 屏幕与背盖间的缝隙。

    • 将撬棒缓慢地沿着底部边缘移到右边。

  14. iPhone 6s Plus 扬声器更换: 步骤 14 中的图像 1,2 iPhone 6s Plus 扬声器更换: 步骤 14 中的图像 2,2
    • 当你用吸盘将屏幕小心地掀开时, 使用塑料Opening工具将后盖撑住。

    • 請勿將屏幕完全掀开, 因为屏幕上还有排线连接, 如果掀开角度过大, 可能造成排线损坏。

  15. iPhone 6s Plus 扬声器更换: 步骤 15 中的图像 1,2 iPhone 6s Plus 扬声器更换: 步骤 15 中的图像 2,2
    • 使用巧劲将吸盘往上拉, 将屏幕与机身分离。

  16. iPhone 6s Plus 扬声器更换: 步骤 16 中的图像 1,3 iPhone 6s Plus 扬声器更换: 步骤 16 中的图像 2,3 iPhone 6s Plus 扬声器更换: 步骤 16 中的图像 3,3
    • 以屏幕顶端为支点,将屏幕缓缓地向上掀起。

    • 将屏幕掀至约90º竖起, 并且在你操作的时候找个东西支撑着它。

    • 請勿將屏幕掀开超过90º, 因为屏幕上还有3条排线连接, 如果掀开角度过大, 可能造成排线损坏。

    • 用橡皮筋将前面板与支撑物固定住。这可以避免拉扯到显示排线。

    • 若在紧要关头时, 你也可以用未开过的罐装饮料撑着屏幕, 这也是可行方法。

  17. iPhone 6s Plus 扬声器更换, 电池连接座: 步骤 17 中的图像 1,1
    • 卸下电池排线固定架上的2颗Phillips #00 螺丝。

    • 1颗2.9 mm螺丝

    • 1颗2.3 mm螺丝

    • 在按照指南操作的同時,請仔細看顧所有的螺絲,並確保每一顆螺絲都能歸回原位。將任一螺絲裝置在錯誤的位置,都可能導致永久性毀損

  18. iPhone 6s Plus 扬声器更换: 步骤 18 中的图像 1,2 iPhone 6s Plus 扬声器更换: 步骤 18 中的图像 2,2
    • 取下电池连结固定板。

  19. iPhone 6s Plus 扬声器更换: 步骤 19 中的图像 1,3 iPhone 6s Plus 扬声器更换: 步骤 19 中的图像 2,3 iPhone 6s Plus 扬声器更换: 步骤 19 中的图像 3,3
    • 使用撬棒尖头那端(或您亦可使用乾淨的指甲)将电池连结座往上撬开, 与主板分离。

  20. iPhone 6s Plus 扬声器更换: 步骤 20 中的图像 1,3 iPhone 6s Plus 扬声器更换: 步骤 20 中的图像 2,3 iPhone 6s Plus 扬声器更换: 步骤 20 中的图像 3,3
    • 使用撬棒将电池连结座与主板从插槽分离,避免操作中不小心接触到电池。

  21. iPhone 6s Plus 扬声器更换, 前面板组: 步骤 21 中的图像 1,1
    • 卸下图上的5颗Phillips螺丝。

    • 3颗1.3mm 螺丝

    • 1颗1.6mm 螺丝

    • 1颗3.0mm 螺丝

    • 在重新组装过程中, 请特别注意3.0mm 螺丝必须是拧在右上角的位置。如果放错地方, 可能会造成主板的损坏。

  22. iPhone 6s Plus 扬声器更换: 步骤 22 中的图像 1,2 iPhone 6s Plus 扬声器更换: 步骤 22 中的图像 2,2
    • 从主板上取下屏幕排线固定板

  23. iPhone 6s Plus 扬声器更换: 步骤 23 中的图像 1,2 iPhone 6s Plus 扬声器更换: 步骤 23 中的图像 2,2
    • 请特别注意此步骤。只需断开排线与座子的连接即可,千万不要连着主板的座子一同撬开。

    • 使用塑料撬棒断开前摄像头排线和传感器排线与座子的连接,并与主板分离。

  24. iPhone 6s Plus 扬声器更换: 步骤 24 中的图像 1,2 iPhone 6s Plus 扬声器更换: 步骤 24 中的图像 2,2
    • 使用塑料工具, 断开传感器排线接口, 与主板分离。

    • 重新组装传感器排线时, 请注意不要按压传感器中间的地方。正确应该是先按压一边, 之后再按压另一边, 因为若按压中间的地方, 可能会使零件变形, 造成传感器损坏。

  25. iPhone 6s Plus 扬声器更换: 步骤 25 中的图像 1,2 iPhone 6s Plus 扬声器更换: 步骤 25 中的图像 2,2
    • 在此步骤中断开或重新连接电缆之前,请确保电池已断开连接。

    • 将 Home 键/指纹传感器电缆从主板上的插座中直接撬起,断开它。

  26. iPhone 6s Plus 扬声器更换: 步骤 26 中的图像 1,2 iPhone 6s Plus 扬声器更换: 步骤 26 中的图像 2,2
    • 至此,屏幕可以彻底与机身分离了。

    • 在重新组装的过程中, 若你有准备新的胶条, 请先将旧的胶条清除干净, 再将新的胶条黏贴上去。

  27. iPhone 6s Plus 扬声器更换, 扬声器: 步骤 27 中的图像 1,2 iPhone 6s Plus 扬声器更换, 扬声器: 步骤 27 中的图像 2,2
    • 使用撬棒的尖端撬起天线排线并将其从主板底部断开。

  28. iPhone 6s Plus 扬声器更换: 步骤 28 中的图像 1,2 iPhone 6s Plus 扬声器更换: 步骤 28 中的图像 2,2
    • 使用撬棒的尖端撬起Lightning接口排线并将其从主板上断开。

  29. iPhone 6s Plus 扬声器更换: 步骤 29 中的图像 1,2 iPhone 6s Plus 扬声器更换: 步骤 29 中的图像 2,2
    • 卸下用于固定Lightning接口盖的三颗十字螺丝:

    • 两个 3.5 mm 螺丝

    • 一个 2.7 mm 螺丝

    • 拆下盖子

  30. iPhone 6s Plus 扬声器更换: 步骤 30 中的图像 1,2 iPhone 6s Plus 扬声器更换: 步骤 30 中的图像 2,2
    • 使用撬棒的尖端撬起天线排线并将其从Lightning接口组件上取下。

  31. iPhone 6s Plus 扬声器更换: 步骤 31 中的图像 1,2 iPhone 6s Plus 扬声器更换: 步骤 31 中的图像 2,2
    • 使用撬棒的尖端撬起天线排线并将其从主顶部取下。

  32. iPhone 6s Plus 扬声器更换: 步骤 32 中的图像 1,3 iPhone 6s Plus 扬声器更换: 步骤 32 中的图像 2,3 iPhone 6s Plus 扬声器更换: 步骤 32 中的图像 3,3
    • 小心地提起天线电缆并将其从手机边缘拔出。使用撬棒的尖端帮助提升电缆,使其脱离固定夹。

    • 如果没有足够的空间来提起排线,请松开固定主板的十字螺钉,以便电路板有更多的活动空间。

    • 重新安装时,务必重新拧紧此螺钉。

    • 如果排线在 SIM 读卡器附近卡住,则它很可能卡在 SIM 托盘弹出器。 使用撬棒的尖端将此塑料棒滑开。

    • 在重新安装的过程中,一定要将天线排线绕着主板拐角放置。

    • 在重新组装过程中,您可以在重新放置天线排线后重新插入SIM卡托盘。

    • 如果您感觉到任何阻力,请停止并确保托盘没有卡住天线排线。

  33. iPhone 6s Plus 扬声器更换: 步骤 33 中的图像 1,2 iPhone 6s Plus 扬声器更换: 步骤 33 中的图像 2,2
    • 拧下将扬声器固定至后盖的六颗十字螺丝:

    • 一个 2.5 mm 螺钉

    • 两个 2.7 mm 螺钉

    • 一个 1.5 mm 螺钉

    • 一个 1.7 mm 螺钉

    • 一个将扬声器固定到后盖的底部边缘的 2.6 mm 螺钉。

  34. iPhone 6s Plus 扬声器更换: 步骤 34 中的图像 1,3 iPhone 6s Plus 扬声器更换: 步骤 34 中的图像 2,3 iPhone 6s Plus 扬声器更换: 步骤 34 中的图像 3,3
    • 在扬声器模块的长边和外壳之间插入撬棒的平端。

    • 轻轻撬动以松开扬声器模块。

    • 模块松动后,将扬声器模块和连接的天线排线从手机上提起并取下。

  35. iPhone 6s Plus 扬声器更换, Wi-Fi 天线: 步骤 35 中的图像 1,3 iPhone 6s Plus 扬声器更换, Wi-Fi 天线: 步骤 35 中的图像 2,3 iPhone 6s Plus 扬声器更换, Wi-Fi 天线: 步骤 35 中的图像 3,3
    • 使用镊子将天线排线扬声器边上剥离。

  36. iPhone 6s Plus 扬声器更换: 步骤 36 中的图像 1,3 iPhone 6s Plus 扬声器更换: 步骤 36 中的图像 2,3 iPhone 6s Plus 扬声器更换: 步骤 36 中的图像 3,3
    • 继续将天线排线从扬声器较长的那面剥离。

    • 在这过程中, 固定天线排线的夹子, 可能会从扬声器中脱落。 如果脱落的话, 再组装时, 记得要将夹子装回原来的位置。

  37. iPhone 6s Plus 扬声器更换: 步骤 37 中的图像 1,3 iPhone 6s Plus 扬声器更换: 步骤 37 中的图像 2,3 iPhone 6s Plus 扬声器更换: 步骤 37 中的图像 3,3
    • 使用撬棒平头那端, 将Wi-Fi天线撬开, 与扬声器分离。

    • 卸下天线。

  38. iPhone 6s Plus 扬声器更换, 扬声器: 步骤 38 中的图像 1,1
    • 最后就只剩下这个扬声器了。

结论

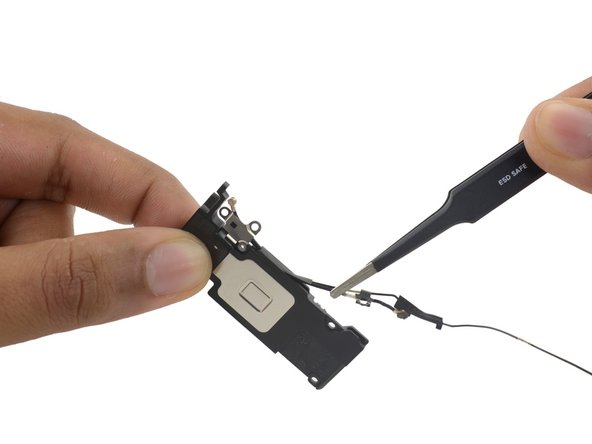
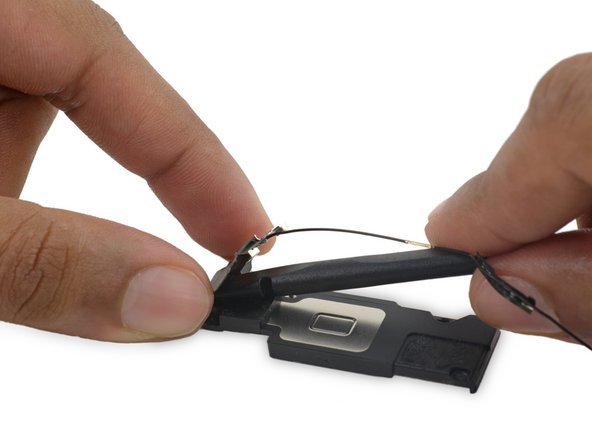
把你的更换零件和原装零件做对比——你可能需要转移一些旧的零件,或者在安装之前把新零件后面的胶带去掉。

请按逆序操作重组你的设备。

把你的电子废料带到 R2 或者 e-Stewards 认证的回收商那里。

维修进展不如意?请查阅我们的问题解答社区 来排除障碍。

37等其他人完成本指南。

由衷感谢以下译者:

en zh

100%

这些译者帮助我们修补全世界! 您也想加入吗?
开始翻译 ›

Arthur Shi

于01/03/18注册

252,818 声望

创作了526篇指南

团队

iFixit iFixit 的会员

Staff

135 名成员

创作了16,817篇指南

4条评论

It is possible to perform this repair without separating the display from the back, and without removing the logic board (which means you need not remove the camera, cellular antenna cabling, audio cabling, and other components). I carefully completed steps 1-15, 38-39, 50-52, and 54-60. It's also not necessary to disconnect the WiFi diversity cable from the logic board . This saves a lot of time and greatly reduces the risk of damaging delicate parts.

Mark Cousins - 回复

I second Mark's comment. In fact, if you are inexperienced with repairing small electronics, I highly advise against removing (or even touching) the logic board, as it is certainly the most expensive part, and among the most easily damaged.

Talon - 回复

Agree with the other commenters. It would be insane to perform all of these repair steps for just the loudspeaker. Press the back button in your browser and watch the Loudspeaker repair video, not this ridiculous guide. Or use this guide and after removing the display, skip to step 50. This is like taking the engine out of your car to change the wipers.

Peter G - 回复

This guide has been updated! Unnecessary steps have been trimmed.

Arthur Shi - 回复

添加评论

浏览统计数据:

过去 24 小时: 1

过去 7 天: 25

过去 30 天: 95

总计 44,334