


-
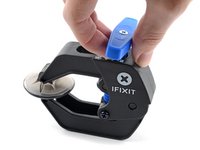
在这个步骤中使用的工具:Clampy - Anti-Clamp$24.95
-
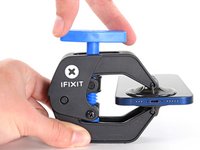
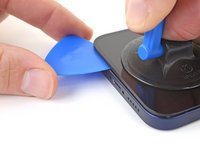
将蓝色手柄拉向铰链以解除开启模式。
-
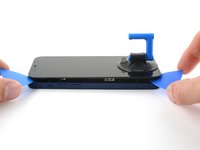
将手臂滑过 iPhone 的左边缘或右边缘。
-
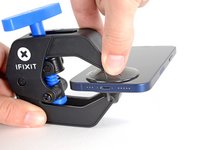
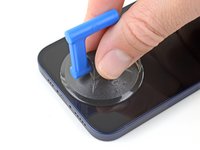
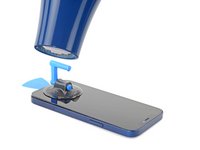
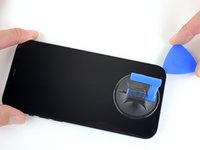
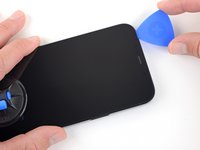
将吸盘放在屏幕上主页按钮的正上方——一个在前面,一个在后面。
-
向下推吸盘以将吸力施加到所需区域。
-
-
Also: 3D Printer's heated bed set to 70-80 degrees Celcius for a few minutes does the job, as it basically works the same way heating mats used in professional repair shops do.
-
-
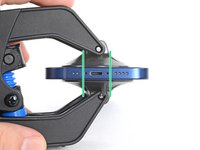
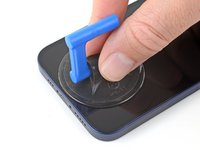
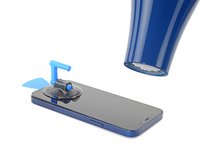
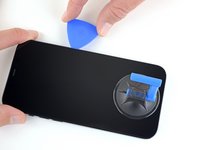
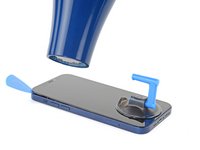
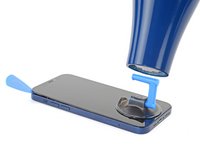
用力、恒定的压力向上拉吸盘,在屏幕和后壳之间形成微小的间隙。
-
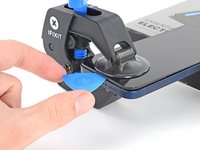
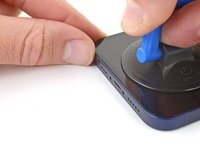
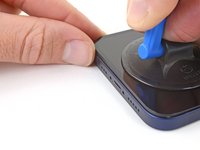
将撬片插入屏幕塑料边框下方的缝隙中。
This seems impossible. I've been trying for an hour with heat and rocking, and the screen doesn't budge. :(
Don’t give up! Use more heat and a tad more force. I know you may fear breaking it more, but as long as you don’t stick the prying tool too far or tug too hard, you can do it! I have faith that you can do it!
I'm in the same boat, this isn't coming off. I've tried the hair dryer as well as the heating pad from ifixit. Any other ideas?
The suction cup comes off before the screen will
Is there a better tool for this? Just saw a video on YouTube where a kid pryed it open with no heating/etc. in 5 seconds.
I've changed the batteries in probably a half dozen iphones of different models. But 25 minutes of heating and pulling had no effect on iPhone 12
Welp. I finally ended up breaking the screen attempting this. DO NOT ATTEMPT THIS REPAIR! Not worth the broken screen and losing the cost of shipping both ways when you return the battery.
thx, I ll go to an apple repair center
Back (and bad...) experience ! Even if you heat a lot, the screen is hardly sticked. Take care, before sliding the mediator under the screen, this one should be moved up, at least 2 mm. On my side i have slided around 1 mm and .... inserted the mediator between the glass screen and the screen structure ring.... result : glass break and screen to change (my initial exercise was the battery removal !). I feel that next time i will visit a repair center...
Pro tip for anyone having trouble with this. You have to use multiple rounds of heat and pulling. Use a hair dryer and not the iOpener that comes with the fix kit and get it just too hot to touch then quickly start pulling and wiggling it up and down. Once it cools down grab the hair dryer again and repeat it a couple times until you start to get a big enough gap.
I just did this yesterday and it took around 5 rounds of heating and pulling to get it to seperate enough from the body.It's important to insert the pick under the bezel. I just delaminated my screen. The screen was probably fine, but it was glitching, so I wanted to check for a bad connection. Anyway, now I get a new screen.
Under the bezel, eh.
After reading this almost a year later to the day I last commented on it, I now know that the best way I have found to remove a screen, from pretty much any phone, not just this one, is heat (I use a heating pad on 80 degrees celsius) and before putting the phone on the heating pad, I use 91% isopropyl alcohol around the edges that you will be sliding your pry tools in, and I leave it on for 10 min. I then take it off, add more alcohol, and then put it back on the pad for another 5 min. Also, while I am sliding my tools around the screen, I continuously add more alcohol, and if it takes a really long time, then more heat as well. Heat, alcohol, and patience, lots of patience, and you should be good. Hope this helps, good luck!
Can confirm, this does indeed work. Just keep warming it up, lifting up and down, and repeat when phone goes cold. After around 10 rounds it would move enough to where I could see inside the phone when lifted. You can then insert pick
Tip: You can also try to apply heat and lift the other corner, just enough to make it move slightly. This will ease pressure needed to separate the glue on the other side as-well.
No worries guys! it’s completely doable! You just need to be patient and keep trying multiple times
I don't doubt that you folks eventually got this open, but how on earth do you not lose your mind with the suction cup popping off every 5 seconds? Agree with Ryan above, have replaced batteries on several other iPhone generations with nowhere near this much effort. Still working on it going on 1 hr, about 10 rounds of hair dryer heat. Did Apple use a stronger adhesive for the 12?
Success. iOpener doesn't get the phone nearly hot enough. Multiple rounds of hair dryer + isopropyl alcohol dribbled in b/w case and screen while pulling up on suction cup. For me, the bottom left hand corner (volume rocker side) seemed to lift up first, so I moved the suction cup to that corner while doing the heat + alcohol.
When I changed the battery on a 7+ instead of the suction cup/heat method I used an Cacto blade inserted horizontally along the bottom edge to break the seal. Would this work on the 12?
I struggled with this step, but eventually got it. Use LOTS of isopropyl alcohol, and soak the entire perimeter. Let it sit for 30 seconds after application, then heat it up, then pull with the clamp and rock back and forth. Reapply the alcohol and repeat until it works. Took me about 30 mins, but I eventually got it up just enough for the first pick. The iOpener is completely useless, I just used a shrink wrap gun and made sure to hold it 8-12 inches from the phone on the lowest heat setting.
iOpener along the bottom edge, the Anti-Clamp, and three tries about 5 minutes each worked for me. Never popped off, just needed lots of patience and 1.5 screw turns on the clamp. Bottom left corner was first, like another commenter.
Neal Sofge - 回复
-
-
-
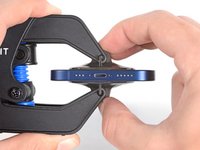
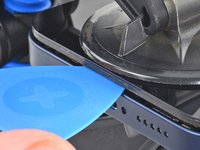
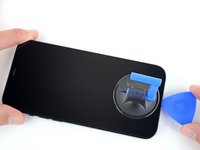
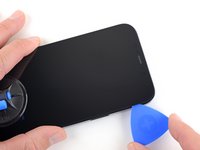
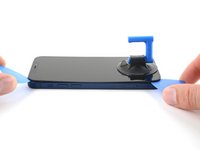
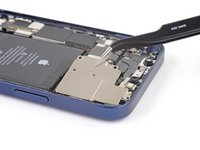
在 iPhone 的右下角插入撬片以分离粘合剂。
-
沿着右侧边缘滑动撬片到右上角。
-
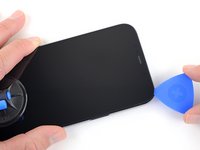
在进行下一步之前将撬片留在右上角。
There is a spot on this side where a slight ridge in the iPhone frame makes the pick stick. Eventually I used two, one twisting a bit to open a path for the other. But if you're not expecting it you feel like you're going to break something.
Neal Sofge - 回复
-
-
-
-
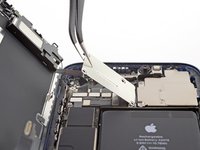
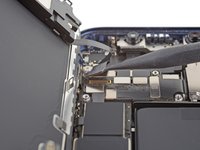
在iPhone的右上角滑动三角撬片,以分离顶部的粘合剂。
-
在继续下一步之前,将撬片留在左上角。
-
-
-
用吹风机加热iPhone的左侧边缘90秒,或直到屏幕略微发热,无法触摸。
Also: 3D Printer's heated bed set to 70-80 degrees Celcius does the job - it basically works the same way professional heated mats that are used in phone repair shops.
-
-
I kinda forgot about this step when I opened my first iPhone 12.
For the next one, I'm going to mark that edge of the phone with blue tape roughly where each cable is to help me remember.Also FWIW, I got the 70 cent adhesive cutting tool from Apple with my genuine battery and used that for all my display prying needs after getting the first opening propped with a guitar pick.
It worked great and did not damage anything so no need to sweat inserting something too far and causing damage.
Could you PLEASE move this to step 13?? I tore the front sensor cable. 😭
-
-
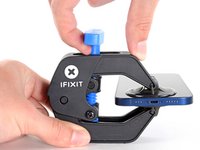
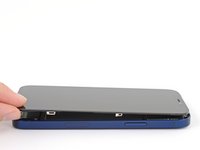
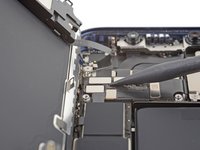
旋转你的 iPhone,使右侧朝向你。
-
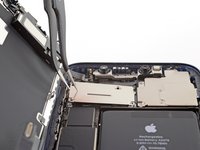
像书的封面一样从右侧向上旋转显示屏,以打开iPhone。
-
当你在手机上工作时,将显示器靠在东西上,以保持其支撑。
i did this and the shroud with the earpiece speaker still stuck with the phone so its just wedged in there i cant get it out
lil teslas - 回复
-
-
-
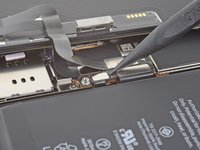
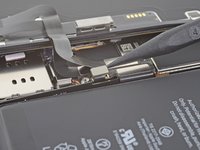
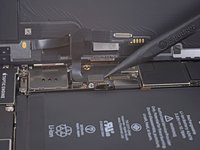
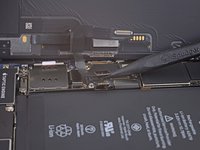
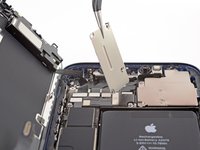
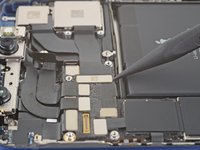
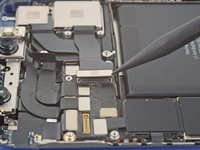
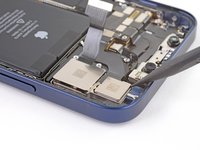
卸下两颗1.1毫米长的Y000螺丝,以固定电池和显示屏接口盖。
Ouch, I see a broken flat here…
Can I use a y 0.6 if I don’t have y000
Yep! The measurements for Y000 are 0.6 mm.
-
-
-
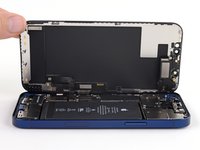
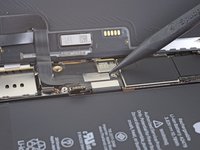
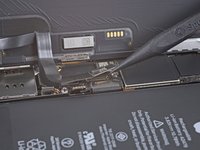
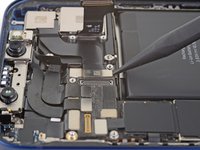
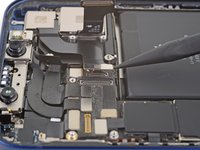
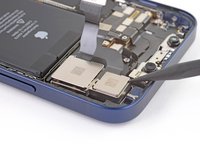
移除盖子。
Hi
On my original display on an iPhone 12, there is no metal hinge as shown here and therefore no place for it when closing the phone. Have double-checked model and the original display - and it is just not there. Is there another model based on serial number?
Hinge marked: https://www.dropbox.com/scl/fi/asztgi60g...
Best regards,
Carsten
-


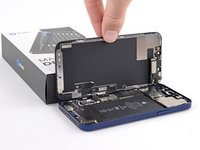


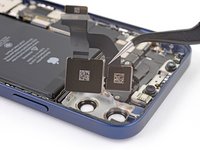
将新的替换零件与原始零件进行比较——在安装之前,你可能需要转移剩余的组件或从新零件上取下粘性衬板。
按照逆序,重新组装设备。在用异丙醇(> 90%)清洁了相关区域后,必要时涂上新的粘合剂。
将你的电子垃圾带到R2或e-Stewards认证回收商。
维修没有按计划进行吗?尝试一些[[修复后的问题|基本故障排除],或寻求我们的iPhone 12 社区 的帮助。
将新的替换零件与原始零件进行比较——在安装之前,你可能需要转移剩余的组件或从新零件上取下粘性衬板。
按照逆序,重新组装设备。在用异丙醇(> 90%)清洁了相关区域后,必要时涂上新的粘合剂。
将你的电子垃圾带到R2或e-Stewards认证回收商。
维修没有按计划进行吗?尝试一些[[修复后的问题|基本故障排除],或寻求我们的iPhone 12 社区 的帮助。
24等其他人完成本指南。


3条评论
I heard that after replacing the camera, this phone won't function well. For example, the power button won't work. Still true to date?
Not true at all
yac -
This youtube video stole your content and you should have them take it down: https://www.youtube.com/watch?v=BEltuGWA...
Do you sell the waterproof seals separately or are they included in the kit?
Heather Furnas - 回复
Do you sell the waterproof seals separately or are they included in the kit? (I would like to know this as well.)
CaliforniaGunner - 回复
I just got my Fix Kit and it includes the seals. Not sure if a "part only" version would, though.
Neal Sofge - 回复