跳转到主内容

Hitachi GST Deskstar HDS721010CLA332 Hard Drive Controller Replacement

你所需要的

  1. Hitachi GST Deskstar HDS721010CLA332 Hard Drive  Controller Replacement, Controller: 步骤 1 中的图像 1,3 Hitachi GST Deskstar HDS721010CLA332 Hard Drive  Controller Replacement, Controller: 步骤 1 中的图像 2,3 Hitachi GST Deskstar HDS721010CLA332 Hard Drive  Controller Replacement, Controller: 步骤 1 中的图像 3,3
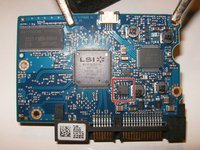
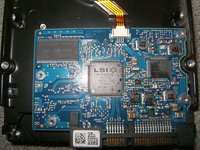
    • Here is the failed Hitachi HDS721010CLA332. It does not get recognized by the computers BIOS and cannot get accessed by any other means. No clicking or other mechanical noises present

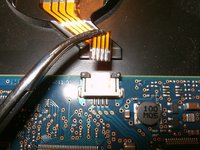
    • Turn the drive over to get to the controller PCB

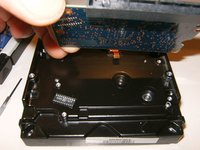
    • Remove the four T8 screws from the PCB

  2. Hitachi GST Deskstar HDS721010CLA332 Hard Drive  Controller Replacement: 步骤 2 中的图像 1,3 Hitachi GST Deskstar HDS721010CLA332 Hard Drive  Controller Replacement: 步骤 2 中的图像 2,3 Hitachi GST Deskstar HDS721010CLA332 Hard Drive  Controller Replacement: 步骤 2 中的图像 3,3
    • Here is the T8 driver to remove the screws

    • The drive flex cable is a simple compression fitting.

    • Use a tool like hemostat or your fingers to remove the cable....

  3. Hitachi GST Deskstar HDS721010CLA332 Hard Drive  Controller Replacement: 步骤 3 中的图像 1,3 Hitachi GST Deskstar HDS721010CLA332 Hard Drive  Controller Replacement: 步骤 3 中的图像 2,3 Hitachi GST Deskstar HDS721010CLA332 Hard Drive  Controller Replacement: 步骤 3 中的图像 3,3
    • ....by simply pulling it out to the back of the connector

    • Remove the controller PCB from the drive.

    • Locate the controller board BIOS IC. This BIOS contains the unique configuration data for this drive. Without changing it the files on the drive cannot be recovered.

  4. Hitachi GST Deskstar HDS721010CLA332 Hard Drive  Controller Replacement: 步骤 4 中的图像 1,3 Hitachi GST Deskstar HDS721010CLA332 Hard Drive  Controller Replacement: 步骤 4 中的图像 2,3 Hitachi GST Deskstar HDS721010CLA332 Hard Drive  Controller Replacement: 步骤 4 中的图像 3,3
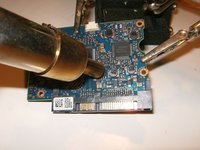
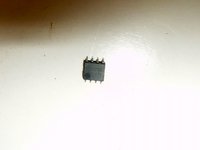
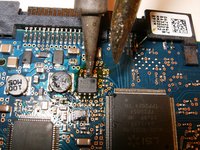
    • Use a hot air rework station or a soldering iron to remove the BIOS IS

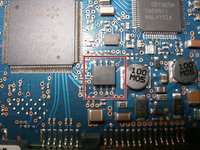
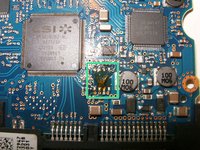
    • Here is the removed BIOS IC. This is the one that will have to be transplanted to the new controller PCB. Ensure that this IC does not get mixed up. Keep it separate

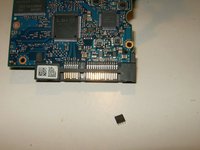
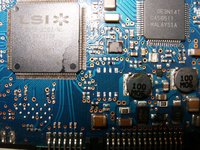
    • Here is the new controller PCB with the BIOS IC that needs to be replaced.

  5. Hitachi GST Deskstar HDS721010CLA332 Hard Drive  Controller Replacement: 步骤 5 中的图像 1,3 Hitachi GST Deskstar HDS721010CLA332 Hard Drive  Controller Replacement: 步骤 5 中的图像 2,3 Hitachi GST Deskstar HDS721010CLA332 Hard Drive  Controller Replacement: 步骤 5 中的图像 3,3
    • Remove the BIOS IC from the new PCB by using a hot air rework station or a soldering iron.

    • BIOS IC removed from the new controller PCB.

    • Next clean the solder pads on the new PCB where the BIOS IC sat. Apply flux

  6. Hitachi GST Deskstar HDS721010CLA332 Hard Drive  Controller Replacement: 步骤 6 中的图像 1,3 Hitachi GST Deskstar HDS721010CLA332 Hard Drive  Controller Replacement: 步骤 6 中的图像 2,3 Hitachi GST Deskstar HDS721010CLA332 Hard Drive  Controller Replacement: 步骤 6 中的图像 3,3
    • Use a soldering iron and desoldering braid to clean the solder pads

    • Clean the flux with some high grade isopropyl alcohol and a cotton swab

    • Here are the cleaned solder pads.

  7. Hitachi GST Deskstar HDS721010CLA332 Hard Drive  Controller Replacement: 步骤 7 中的图像 1,3 Hitachi GST Deskstar HDS721010CLA332 Hard Drive  Controller Replacement: 步骤 7 中的图像 2,3 Hitachi GST Deskstar HDS721010CLA332 Hard Drive  Controller Replacement: 步骤 7 中的图像 3,3
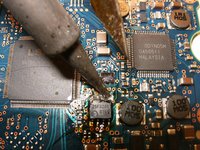
    • Apply some flux to the solder pads and place the old BIOS IC onto the solder pads of the new controller PCB. Ensure the proper placement of the IC.

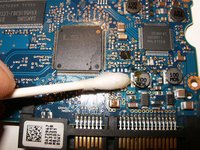
    • Solder the BIOS IC into place

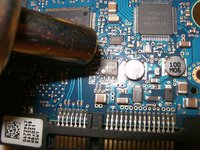
    • Ensure that the soldering iron does not accidentally heat up the components next to the BIOS IC, particular the ones at the top end.

  8. Hitachi GST Deskstar HDS721010CLA332 Hard Drive  Controller Replacement: 步骤 8 中的图像 1,3 Hitachi GST Deskstar HDS721010CLA332 Hard Drive  Controller Replacement: 步骤 8 中的图像 2,3 Hitachi GST Deskstar HDS721010CLA332 Hard Drive  Controller Replacement: 步骤 8 中的图像 3,3
    • BIOS IC properly placed and soldered onto the new controller PCB

    • Clean the flux with some high grade isopropyl alcohol and a cotton swab

    • Last step is to reinstall the new controller PCB with the old drives BIOS IC which contains the unique data for this drive.

结论

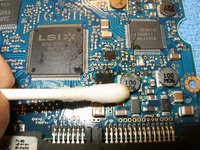
After replacing the board and replacing the BIOS IC from the original board, the drive was once more recogized. This allowed for the data recovery of some 1000 pictures as well as other documents.

10等其他人完成本指南。

oldturkey03

于09/29/10注册

778,207 声望

创作了118篇指南

团队

Global Fixers Global Fixers 的会员

Community

31 名成员

创作了520篇指南

4条评论

Hello, thanks for your tutorial.

I wonder, when facing this kind of problem (drive not recognized), i have read somewhere else that you could just change the PCB board and be fine with it. Do you always have to transfer bios or is it just for some special cases like this one?

Yann Nève - 回复

@yannos you need to replace the BIOS so that the computer can recognize that drive and can access the files. Otherwise it will read it as a new drive.

oldturkey03 -

I have the same Hitachi hdd but I don't know how to find the correct model of pcb please tell me how to find the correct one

Ashin John - 回复

添加评论

浏览统计数据:

过去 24 小时: 5

过去 7 天: 16

过去 30 天: 85

总计 7,192