简介
本维修指南由 iFixit 员工撰写,未经 Google 认可。 详细了解我们的维修指南 here。
通过这个指南来移除Pixel的屏幕 --以便更换它者维修其他部件
警告:由于粘贴屏幕的胶非常牢固,为了插入你的维修工具你将需要使用高温并进行一些疏通,在这个过程中你很有可能会损坏原来的屏幕。如果你在更换损坏的屏幕,不用担心这一点,但进行其他的维修操作就必须非常小心的进行操作,并做好更换屏幕的准备.
你所需要的
-
-
作为参照,左图是拆开后的手机背板。注意显示单元左右侧与 OLED 面板之间的狭窄间距。(屏幕正面的边框与其间距大小相对应)
For reference, the iFixit opening tool (the blue prybar) has pry hooks of about 1.5-2mm in length.
You can measure your tools to 1-2mm and mark them on some, and 9mm on others, so that you have an indicator line for depth.
You can also use the line from the top/bottom and side bezels as a guide for how deep to “slice” with the pick.
Mr. Porter - 回复
The display panel consists of two components. The outer component is a glass panel with a digitizer fused onto it, and the second component is a fragile AMOLED panel with electronic circuitry and a ribbon cable that connects it to the phone internals. The digitizer and AMOLED panel both extend to within 1.5mm of the sides of the glass panel. To avoid destroying the AMOLED panel when removing the display panel, start at the bottom (Steps 3 and 4) and do not insert any opening or cutting tools deeper than 1.5mm at the sides or 9mm at the top or bottom (Steps 4 and 5). [Maybe add this text to Step 2 to help prevent others destroying the AMOLED panel].
Alan Upson - 回复
Update on my earlier post: my replacement display panel (pre-owned) appears to be a different construction to my original display panel in that the AMOLED panel, digitizer and glass panel are bonded together in some way, so they appear to be a single component. I guess it is possible that my original display panel could have been like this at first, and that I managed to separate the AMOLED panel from the digitizer as I removed the display panel from the phone, but there is no sign of any adhesive.
Alan Upson - 回复
-
-
-
使用 Suction Handle 来拉起显示屏并在显示屏和设备外框之间创建一个小缝隙
-
如果无法拉起屏幕并创造一个小缝隙,您可能需要继续加热。保持耐心,这需要时间。一旦您可以将工具轻轻地插入间隙中,请继续下一步。
the glass will have to be extremely hot to do this, i was able to achieve it by setting the phone of the heated bed of a 3d printer and setting it to 110 C .
I used a hairdryer, moving back and forth over the area I was planning on using the suction cup at first, with my finger near the metal chassis so I could feel if it was getting absurdly hot. I would then suction a little, and not see any change. Heat again, suction again, seeing movement, but not enough space to get a tool in. Repeat this several times until you’re just able to get the tip of a tool in there, then continue to gently pull up with the suction cup while gently “slicing” around the edge until you’ve got a few spots free. (I’ve got another tip in the comments on the next step.)
Mr. Porter - 回复
This worked like a charm with lots of patience, stopping and drying every step and cutting the glue when I can see it clearly and move further down.
Tip one: ONLY FOCUS ON HALF THE SCREEN AT A TIME. As you get further along, you can start moving back and forth, but start focusing only on the upper or lower half.
—
NEXT, as I started the slicing process, I would leave a pick in on each of the sides as I got to them, to kind of save my spot in case my pick slipped out. If you feel like you’re not getting anywhere, apply some light heat across the edges of the entire display, depending on how far in you are.
—
When you’re on the last few bits, get a headlamp on and hold the phone so you can see in between the screen and rest of the body. As you gently lift the screen, you can see inside and slice the remaining strands and gunked up areas with less fear of damaging other components, because you’ll be lifting them away.
Mr. Porter - 回复
-
-
-
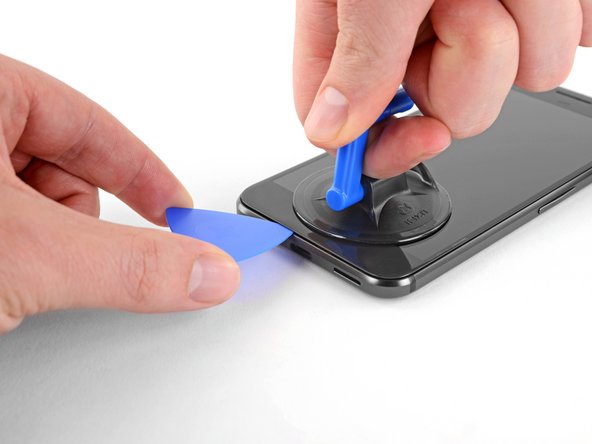
在背板和显示屏总成之间的缝隙插入一三角撬片或是一张扑克牌。
-
之后在显示屏周围反复划动开启片,以破坏用于固定的胶水。
I needed a stronger tool than the provided guitar picks to actually get between the glass and the frame. Had to use a metal tool to get in there. Once I could get in, things went fairly smoothly.
Only mistake after that was not getting a great seal on the glue when reassembling the phone so now the glass toward the bottom of the screen doesn’t completely stay in place. :(
Dang! Metal is a scary choice, but I’m glad it worked out for the most part. That’s good to know. You could try re-heating the adhesive around the part of the screen that isn’t staying in place, and then putting the phone under a stack of books for an hour or so! That might get it to seal up completely.
I got the glass free by using plenty of heat, an x-acto knife to start the opening and playing cards under the glass to break the glue. I did not use the suction cup because it kept feeling like it would break the glass.
+1 to Michael Hendricks. I ended up putting mine in my toaster oven (which worked splendidly), and I did have to use an x-acto knife to get it started. After that, it was possible to continue using the picks, but DON’T EXPECT TO BE ABLE TO REUSE THE SAME DISPLAY. New displays are $35 on ebay. Just get a new one before you start the work or you’ll almost certainly be without a phone for a week.
I was super careful based on all the comments to not even get close to touching the back of the screen. But when reassembled I get nothing but a vibration when turning the phone on.
I used the suction cup, lotsa heat, started from the top and pried screen off towards the bottom just barely teasing the edges with a special pick that I had from previous battery replacements (special pick limits penetration). It seemed to come off unscathed. But the results say otherwise.
I agree with what other have stated. I tried both the iOpener and a hair dryer but was never able to get the suction cup to pull the glass up at all. I saw other instructions that use a “Thin Metal Pry Tool” to get under the glass. I improvised with some very thin metal I found from some parts I have available and that is able to get under even without heating. You don’t use the metal to pry open at all, just to get under the glass enough to get some thin cards under to remove the seal. The picks are too thick for any of these steps it seems. Just sliding the picks under the glass as shown seemed to be enough bending that I saw some hairline cracks in the glass. But I also damaged the OLED in the process. So, as others have reported, I too ended up with a dead screen. Waiting for my new one to arrive soon.
I think it would be good to show more information about how you expect this step to work as it doesn’t seem to work as shown here. Or, look up some of the other resources online that work better.
I can’t see any way this can be done without screwing up the screen. I bought a replacement screen and then didn’t have to worry.
Daniel Yeo - 回复
Would it be possible to use a specially made opening pick that is protruding no more than 1.5mm from a thicker section that could run along the sides and top of the device to help ensure that the pick would not penetrate more than 1.5mm into the device? If suitably designed, it could probably be made of metal. Are any such specially made opening picks available from iFixit or elsewhere?
Alan Upson - 回复
Alan, this is an excellent idea! We have had tools like that in the past, but since every device is different it’s hard to make one pick that will work for every device. You might be able to find something like that somewhere else online, I’m not sure. Another thing you can do is measure your pick and mark 1.5 mm with a marker so you have a visual indication of how far your pick should go in!
No surprise the number of comments in this section. My experience here is slightly different. I took extreme care in screen removal and in the end everything works great! HOWEVER!!! I have the blue Pixel 1 with a white screen. DESPITE using ALL PLASTIC tools I scratched the white off from the back of the phone glass. It’s very noticeable along the top and bottom edges but does impact how it functions. In hindsight I think I could be careful and patient enough to avoid this but I had NO CLUE this was something else to look out for. No on mentions this anywhere. I considered before re-assembly of taking a white paint pen or Sharpie to the glass in an attempt to “repair” but decided that might do more harm than good.
-
-
-
-
继续小心的分离设备周围的粘合剂
there should be two notes here - “while adhesive is still warm, REMOVE ALL OF IT or you would be fcked later.” additionally, “ensure you are not separating the OLED from the glass as this will somehow render the screen completely useless”
Agreed. I just removed the glass from the OLED display…oopss. I’m hosed.
Removing the adhesive while it is warm is a great idea!
Re: removing the glass from the OLED, as long as you aren’t inserting your opening pick deeper than Step 2 recommends, you should be safe from separating the glass and the display panel unless you are using a ton of heat, in which case you might be frying the display anyway!
I didn’t apply enough heat during this process and subsequently separated the digitizer from the glass, instead of the whole assembly from the case. I had 3/4 of the screen free from the case when I became impatient and just tried to muscle my way through the rest of the adhesive. It is important to stop and apply more heat during this process any time it starts feeling difficult to move the pick through the adhesive, otherwise you risk breaking the screen and having to get a whole new one.
I got the glass off without cracking anything, but now that it’s back together it doesn’t seem to work. Could it have been damaged from the heat? It flickers green for an instant when plugging in to power or pressing the power button.
Hey Phillip! I’d go with the pre-made adhesive to save yourself the headache of measurement, cutting, and having a whole roll of 3M tape you might not need. It would definitely work if that’s what you prefer though!
Here’s a guide for applying the pre-made adhesive that you can follow, or just curb from if you use the 3M tape! Google Pixel Display Adhesive Installation
-
-
-
如图所示,使用手慢慢将屏幕从设备顶部方向(有听筒的一侧)抬起并撕开粘合剂,小心的将它垂直翻转到面向设备底部并放下.
Ruined my Pixel following these instructions. Ribbon cable is at bottom (chin) of phone and not as shown in pictures. My advice take it somewhere and have them replace the battery, that way when they break it it’s their fault.
I’m sorry the instructions weren’t clear, John! I’ve updated the guide to better illustrate where ribbon cable is and how to work around it.
And another note - I used the suction cup to lift the glass. Unfortunately the glass cracked at that point…bummer. I would update this to describe HOW to lift the glass. As in, LIGHTLY lift up with the suction cup while mostly lifting up on the guitar picks to help separate..
No, don’t use the guitar picks to lift, those are to “cut”. The suction cup is only to help you get the first pick in, after that, all you’re doing is separating glue so you can lift the screen with your fingers.
DO NOT “flip it over vertically toward the bottom of the device, and rest it on its face, as shown. “ unless you want to spend your day getting adhesive off the screen. Instead get the screw driver ready (step 7) before you start this step.
That occurred to me when I reached this step. I used an opening pick (since I already had them on hand) and rested it between the midframe and screen to avoid that very issue. I added it to the guide, now I just hope it gets verified!
Gut bewährt hat sich eine Heißluftpistole mit Temperaturvorwahl - möglichst mit optional aufgesteckter Flachdüse. Bei 120-140 Grad Celsius kann man die Wärme zielgerichtet und dosiert auf den zu lösenden Teil des Displays ausrichten. Nach Ansetzen des Saughebers solange erwärmen, bis sich der benötigte Spalt für das Plektrum zeigt, und danach den Displayrand weiter zonenweise vorsichtig erwärmen, bis sich das Display ohne Druck und damit ohne Bruchgefahr abnehmen lässt.
-
-
-
使用T5 Torx螺丝刀,移除后方固定显示排线托架的3.5mm T5螺丝。
when removing the screen i have scratched the black square up the top left here. (right of the speaker)
scratched down to the silver component below.
i broke the screen while replacing my battery, will this brick my phone? or would a new screen still work?
Hey anarchy, your phone should still be okay! Most of the midframe assembly (including the stuff you scratched up) is there to reduce signal interference and provide structure for the fragile screen, so you most likely didn’t do any bricking! If your cracked screen still functions, you can plug that back in and make sure everything is okay before you pull the trigger on a new one. Hope this helps!
-
-
-
使用镊子将固定屏幕连接头的支架移除。
-
这只是一块金属,应该很容易取出。(排线将在下一步中被移除。)
Using extreme care, another broken screen here. Instead of coming off together, the adhesive separated between the outer glass and the digitizer panel/screen. Both were damaged in the process. Waste of time and money.
Chris Kahn - 回复
Yes, me too. I’d like advice as to how to vary the glue heating process for this to not occur. Does the heat need to be applied for longer so the deeper OLED panel releases without pulling from the glass?
I spent about an hour and a half working on removing my screen. It took many bursts of heat (from a hair dryer, I lost patience for the iOpener), some suction, more heat, more suction…. etc, until I was able to start moving the pick around. Even then I still applied heat from time to time to help the adhesive move along.
-
-
-
使用撬棒来从设备上移除链接头,然后可以完全地移走屏幕了。
-
请勿强行安装排线,否则可能会造成损坏。 (安装成功时会感觉到轻微的咔哒声,但超过这个力度会永久损坏你的排线。)
(from other ifixit tutorial. Did not know this-and it is important!)
To re-attach press connectors like this one, carefully align and press down on one side until it clicks into place, then repeat on the other side. Do not press down on the middle. If the connector is misaligned, the pins can bend, causing permanent damage.
bgwong2476 - 回复
Very good to know, thank you!
-


别忘了将你需要更换的部件与原来的部件对比一下--你可能需要从换下来的部件中迁移一些零件到新部件上,或者需要移除新部件上的保护膜等.
要重新组装你的设备,将上面的步骤反过来进行即可.
把你的电子垃圾带到 R2 或者 e-Stewards certified recycler.
修理过程中出现问题?通过我们的 社区 来寻求帮助
别忘了将你需要更换的部件与原来的部件对比一下--你可能需要从换下来的部件中迁移一些零件到新部件上,或者需要移除新部件上的保护膜等.
要重新组装你的设备,将上面的步骤反过来进行即可.
把你的电子垃圾带到 R2 或者 e-Stewards certified recycler.
修理过程中出现问题?通过我们的 社区 来寻求帮助
59等其他人完成本指南。


19条评论
No, it does not. Just replaced my screen. The residual adhesive is good enough to keep it on temporarily, but I’m going to a local repair shop to grab something better.
It’s also best to, if you haven’t already, look at your replacement part to get a feeling of how far you can go with the guitar pick or pry tool. It’s around 1/16th of an inch on the sides so you don’t want to go too far in and damage the display
Honestly, this felt easier than what the guide advised, definitely invest in the ifixit opening kit, made this a breeze. Hardest part was just scrapping the leftover residue off after removing the cracked screen.
You can use any adhesive for screen replacements for this screen. I personally used a double-sided tape 2 mm wide. The replacement screen does not usually come with the fabric covering the phone speakers, so make sure to transfer it from your old screen.
How do I remove the screen from the LCD. There are plenty of screens only on Amazon for pretty cheap and my LCD is working perfectly fine.
I can absolutely see how difficult this job is if your screen isn’t already broken. (Un)Luckily for me, my screen was already broken, so I removed the glass, then the actual LCD, while breaking them even more along the way. The screen in the Pixel is SO thin and delicate, I was scared I was gonna break the new one before even installing it. But once the old one is out, the install is a breeze, granted that your metal edges aren’t too dented.
I used a space heater and held the phone in front of it for about 60 seconds at a time to soften the adhesive. I also used a razor blade to “slice” through the adhesive.
Used screen was perfect quality and worked fine.
My experience:
1) I used a heat gun (ZeopoCase Mini Hot Air Gun - $20 Amazon)
2) My original screen wasn’t cracked, and it took a long time to break apart the old adhesive, even with the gun. More muscle than I would have expected.
3) Removing the old screen worked per instructions.
4) Removing the old adhesive was a MONSTER job. You’ll need to buy 91% alcohol and swabs FIRST, so that should be added to the recipe’s ingredients. Still, even with the alcohol and scraping, I never got it all off, and you risk smearing it all over the insides of the phone. Not good.
5) Kit does NOT include replacement adhesive. I bought it separately, and that came with no instructions. It’s a giant die cut slab of adhesive, and you only need the outer bits. This isn’t clear at all w/o instructions.
6) Seating the connector is a bit of guesswork.
7) Had to swap out the grill cover. That should be added to the guide.
8) Have to heat the new adhesive again before you clamp it all down.
So far, tho, it’s working.
Hey Chris, I’m glad to hear everything went alright for the most part! If you bought the kit from us, it should definitely have come with the replacement adhesive, I’m sorry about that. I am currently writing a guide about how to use the replacement adhesive, it will be ready soon—I’ll be sure to include all those details you were looking for. Thank you for your feedback!
I got the glass off with a blow dryer and some playing cards. Unfortunately, I stuck a playing card too far into the bottom of the display and accidentally cut the display cable. Pay close attention to the warning about how deep you can insert instruments under the glass.
If you simply get one of the corners to open with a little bit of heat and a razor blade, you can use a syringe to add ISO to get rid of most of that adhesive. It doesn’t damage the original screen (which can be recycled) and it makes the screen come off extremely easy.
Luke Piper - 回复
A lot of the padding underneath the screen came off. A lot of it is stuck to the display. I ordered a new display, will the lack of padding affect the function of the pixel?
Hobin, the lack of padding shouldn’t affect the function of your Pixel. It does, however, provide a bit of support for the screen, so maybe just be a little more careful about applying pressure to the new screen after you install it!
I got my replacement screen for my pixel phone, but the replacement screen has a blue plastic cover on the back, which I believe needs to come off. But as I started removing it, a sticky black layer started coming off as well. Is this what is supposed to happen? Thank you.
If your phone screen is turning black and unresponsive during calls, it’s because the proximity sensor is covered up. For whatever reason, the tinting or paint on the proximity sensor window on the the screen iFixit shipped caused my phone to always register as covered up. I fixed this by scratching off the paint on the proximity sensor window (the little bubble just above the screen) with a tiny piece of sandpaper and it works good as new.
A spudger is the wrong tool to remove the video connector. You cannot see where you are poking with that tool and several commenters to that section of the procedure report dislodging one of the surface mounted devices hidden by the connector and ruining their phones. I also broke a ground path near the corner of the middle frame that is not mentioned in this repair procedure. I wish I had watched this YouTube before beginning disassembly. The tool used looks more appropriate for removing that video connector and they show releasing the ground connection without breaking it:
I began removing the adhesive with an opening pick and the screen cracked almost immediately. I suspect I didn't have enough heat and would have had better luck with a heat gun like another commenter suggested. Thankfully it's an old device that I'm only tinkering with. Now I have to figure out how to enable developer mode with a cracked screen so I can use the device with scrcpy.
When reassembling, does the adhesive still hold the phone together when closed or do we need to apply more adhesive?
Jess Haddow - 回复
Step 10 addresses this: there should be a plastic sheet that looks like your screen in the repair kit. This is the new adhesive for reassembly.
Peter Karski -
Unfortunately also cracked my display on the way in. You have to go pretty deep under the top and bottom of the screen but BARELY in around the sides, especially the corners. If I had to do it over again, I would have either tried a playing card or put some type of depth limit/mark on my pick so I didn’t go more than a few millimeters in.
Matthew Jastremski - 回复
Use plenty of heat here and take your time. Start from the top, then the sides. use a gentle prying motion with the picks but don’t go too deep.
Richard Wood - 回复
It’s EXTREMELY easy to crack the screen. Just buy a new display module before fixing it. The old screen will be disposable.
Buyi Yu - 回复
Don’t even waste your time with the iOpener. I went straight for the hair dryer and opening picks took 30 mins to get the screen off with no issues.
eric duchene - 回复
Hair dryer worked for me, thanks!
David Gault -
As others have said, the iOpeners didn't work for me at all. I tried microwaving, I tried boiling, but even when the iOpener was too hot to touch the phone didn't get that hot. A hair dryer eventually worked, but took a long time too, and I had to pull quite hard (similar to pulling on a really stuck LEGO brick, I was surprised my screen didn't crack). I also dripped some isopropyl along the edge where I could lift it a teeny bit but not get a pick in, which seemed to get the gap to widen. Once I had an edge up and could start sliding the pick along though everything went much more smoothly. Reading other comments, I bet a heat gun would have been a better tool.
Mark Fickett -
If you haven’t purchased this kit yet then stop right here. The difficulty, as stated, is very difficult. This was my first attempted repair. I spent a good hour heating the adhesive and felt good about getting the display off. I even paused to boot the phone to make sure I didn’t damage the screen before flipping it over - it worked fine still! Then I went to pull the display from the top using the picks. Shattered the corner of the screen. $129 for a new screen. At this point, the Pixel 3 is $499. I bought a new phone. Just be prepared to break the screen. Many people mention it in the comments. I felt confident I could do it. I couldn’t.
Michael Neil - 回复
do yourself a favor and purchase a replacement screen when you order a battery. it’s impossible to remove the screen without damaging it no matter how careful you are.
Andrey Gerasenkov - 回复
100% agree. So glad that I did. My new screen was only £20 from ebay - took ages to arrive as it came from China, but works perfectly.
Daniel Yeo -
I managed it - this was my first repair. It’s a lot harder than I was expecting, but totally doable! I recommend just sliding the very edge of the pick around first until you find a corner that starts to peel up. Once you can see under the screen (without bending it, of course!), you can go further in to break the stubborn adhesive globs. It took me just under 30 minutes to remove the screen.
Peter Karski -
My tip: Place a hot-water bottle on the screen for 2 minutes. Use the suction handle to lift one edge and insert an opening pick. Use an opening tool to cut through the adhesive at the bottom and place another opening pick in the second corner. Place the hot-water bottle on the phone again and wait 2 minutes. Cut through the sides with the opening tool (if you are focused it's nearly impossible to put this tool in too deep) and do the same on the top of the phone as on the bottom. I was afraid of the high difficulty, but it only took me 15 minutes to remove the screen with no problems. Medium difficulty.
Dorian - 回复
I didn’t crack the screen, but somehow the thing wouldn’t power on after. Not sure if it was heat, or if I borked the cable somehow. New screen went in and it works great.
Chris Jones - 回复
It IS possible to get the screen off without breaking it, just take your time. I spent about an hour using the included picks along with the iopener.
That said, the adhesive is a bear to fully remove from the screen without marring it up.
Kixwooder - 回复
I didn’t fully remove the old glue; When I put it back together, I melted the old glue (and some new glue) to seal it all closed again.
David Gault -
Tip, use a gallon ziplock bag with some hot water (maybe 150 degrees). Place the phone on a towel and fold the towel over and shield the part you aren’t working on, then use the bag for ~30s to apply and re-apply heat as needed. I first heated up the entire phone and ended up separating the screen from the glass (thus breaking the screen). The second time I did it, I just heated up one section at a time and I succeeded in removing the screen without breaking it.
Daniel Beardsley - 回复
Couldn’t get it open with anything, including dunking it (wrapped in a ziplock) in freshly boiled water for from 2 to 20 minutes. But then I managed to get it with only minor discolorations along top and bottom edges (which are noticeable when the screen is off or on dark backgrounds).
What did the trick was setting the heat gun to 100°C and heating it really up close for 2 minutes. 60°C didn’t do squat, but 80-90°C would probably work better, without damaging the screen.
With that done, the glass required a little bit of force to lift up, force of gravity on the rest of the phone wasn’t enough.
gelraenua - 回复
I attempted this with an iOpener and gave up as it didn’t seem to heat it enough to lift the edge of the screen.
I remembered I had a heat gun at that point (duh, should’ve been what I started with). I had the gun at 350 initially and moved it around relatively quickly. But, discovered that if I lingered a little it discolored the screen (tested and the screen still works where it’s discolored, but it’s slightly off-color at one corner). I ended up using 200 deg (F) instead and moved more slowly. I put slight pressure on with the suction cup while heating the edges and finally got a corner up. Plopped a pick in there and used another pick to slowly cut along that edge while heating where cutting. I kept a pick plopped in each corner as I went. Once I got most of the screen free I grabbed the edges of the screen to keep upward pressure from the glue and heated any places that were still stuck with the heat gun and cut the last strands with another pick.
TL;DR - The iOpener doesn’t seem sufficient for this job.
Jonathan Stucklen - 回复