简介
This repair guide was authored by the iFixit staff and hasn’t been endorsed by Google. Learn more about our repair guides here.
This guide shows how to remove and replace the fingerprint sensor for your Pixel 3 XL.
If you replace the fingerprint sensor, recalibrate the reader to maintain its functionality.
你所需要的
-
-
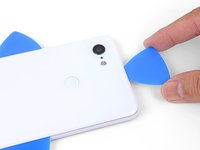
Heat an iOpener and apply it to the right edge of the back cover for a minute.
-
While you wait, note the following areas on the back cover:
-
Strong adhesive—there are large patches of adhesive near the bottom of the phone.
-
Fingerprint sensor cable—be careful not to slice through the cable as you pry
-
-
-
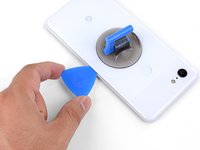
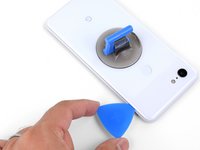
Apply a suction cup to the heated edge of the back cover, as close to the edge as possible.
-
Pull up on the suction cup with strong, steady force to create a gap.
-
Depending on the age of your phone, this may be difficult. If you are having trouble, apply heat to the edge and try again.
-
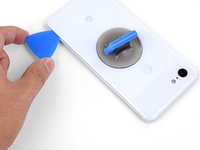
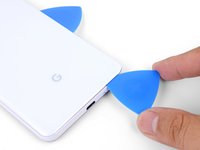
Insert the point of an opening pick into the gap.
-
-
-
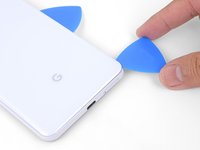
Slide the opening pick along the right edge to slice through the adhesive.
-
The adhesive gums up and becomes hard to slice once it cools. If that happens, re-apply heat to the edge to make slicing easier.
-
Once you have sliced through the edge, leave an opening pick in the seam to prevent the adhesive from re-sealing.
-
-
-
Apply a heated iOpener to the bottom of the back cover for a minute.
-
-
-
Use an opening pick to slice around the bottom right corner and continue along the bottom edge of the phone.
-
Leave a pick in the edge to prevent the adhesive from re-sealing.
-
-
-
-
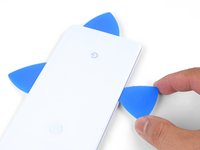
Continue heating and slicing the remaining edges of the phone.
-
Be careful as you slice along the left edge of the phone. If your pick feels like it's stuck near the top, you may have snagged the fingerprint sensor. Retract the pick out of the seam slightly and try again.
-
Be sure to cut through the thick portions of adhesive near the bottom and right edge of the phone.
-
-
-
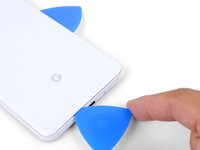
Gently pry up the right edge of the back cover.
-
Use an opening pick to slice through any remaining adhesive along the edges.
-
-
-
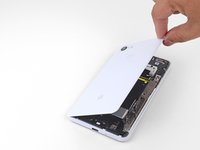
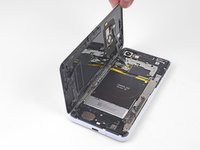
Swing the right edge of the back cover upwards and rest the flipped panel along the left side of the phone.
-
-
在这个步骤中使用的工具:Tweezers$4.99
-
User tweezers to carefully peel up the yellow tape over the fingerprint sensor connector.
-
-
-
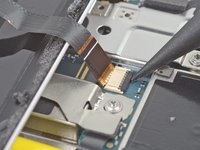
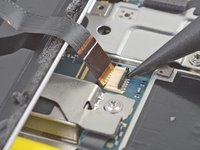
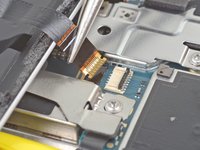
Use the point of a spudger to carefully flip up the black lock bar on the fingerprint sensor's ZIF socket.
-
Grasp the cable's tab with your fingers or tweezers and gently walk the flex cable out of the socket.
-
-
-
Apply a heated iOpener over the fingerprint sensor for a minute.
-
-
-
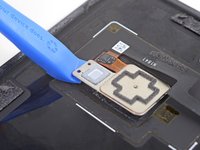
Insert the edge of an opening tool underneath the square portion of the fingerprint sensor and slowly pry up to loosen the sensor.
-
Continue prying around the perimeter of the fingerprint sensor until it is loosened.
-
-
-
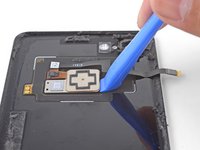
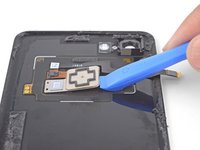
From the outer side of the back cover, use your finger to push the fingerprint sensor out of its cutout.
-
-
在这个步骤中使用的工具:Tesa 61395 Tape$5.99
-
Remove the fingerprint sensor.
-


To reassemble your device, follow these instructions in reverse order.
Repair didn’t go as planned? Try some basic troubleshooting, or ask our Answers community for help.
To reassemble your device, follow these instructions in reverse order.
Repair didn’t go as planned? Try some basic troubleshooting, or ask our Answers community for help.
11等其他人完成本指南。


4条评论
Can you please tell me what the square flex circuit (with 2 square contacts) is for, which is surrounding the FP Sensor? Mine was damaged, when my back cover was cracked. I have replaced the back cover, and will be getting another FP sensor (as mine is inoperable), but that large square flex is also damaged. I have no idea what this is for? I thought it was connected to the NFC circuit, but the phone still charges wirelessly.
I think that is the NFC antenna, which is mainly used for contactless payment and ID systems. It’s not used for wireless charging, which is the coil on top of the battery. Depending on how it is damaged, your NFC function may still work—it may just have less range if the antenna’s damaged.
The link to the Google tool to get the Pixel 3XL phone to recognize the new fingerprint sensor only works for Pixel 6 and newer. Perhaps the tool accessed by the link previously supported the Pixel 3XL, but no longer does. Either a correct reactivation tool for the Pixel 3 should be provided or this guide should be taken down. As it stands, it seems useless to replace the sensor unless a way is provided to get the phone to recognize the new one. If there is an alternate way to activate the new sensor, the method should be provided in the guide.
No recalibration of a new sensor is required on the 3XL. You can replace a broken sensor with a new one and it should be properly detected by the phone.
No software should be necessary, though you will likely have to setup fingerprints again. When the fingerprint sensor is broken, the phone software may not detect it and Android will not even give you the options to configure fingerprints. Once a working sensor is installed, it should provide the options again.
This guide is wrong when it describes a recalibration for the 3XL, it is likely that this was cut/pasted from another device.