
iPod Shuffle 2nd Generation Battery Replacement

简介
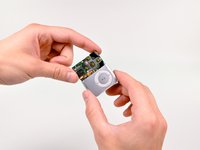
转到步骤 1Use this guide to replace your Shuffle's battery. Replacing the battery requires a fine-tipped soldering iron and knowledge of surface-mount soldering.


-
-
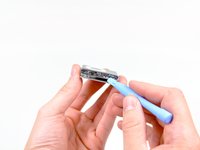
Use the edge of an iPod opening tool to pry the plastic cover off the headphone jack side of the Shuffle.
-
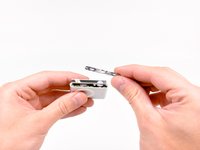
Remove the plastic cover and set it aside.
-
-
-
-
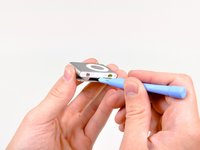
Use the edge of an iPod opening tool to pry the plastic cover off the controls side of the Shuffle.
-
Remove the plastic cover and set it aside.
The On-Off switch here is turn around. Usually it is green when the iPod is turned on.
Nils Kober - 回复
The plastic cover has small clips at either edge in the middle and alongside the button. Put the iPod opening tool in about a third of the way in from either end to avoid breaking the clips.
-
-
在这个步骤中使用的工具:Tweezers$4.99
-
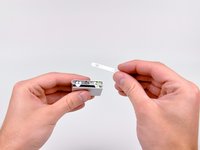
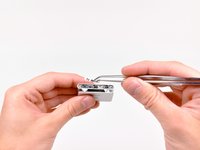
Use a pair of tweezers to remove the hold and shuffle sliders from the Shuffle.
-
-
在这个步骤中使用的工具:Tweezers$4.99
-
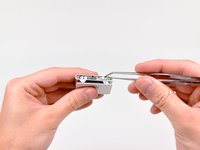
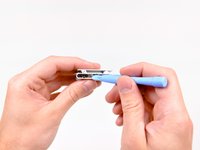
Use the edge of an iPod opening tool to peel the adhesive under the battery that secures it to the logic board.
-
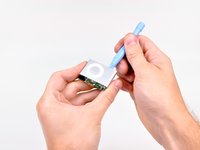
Flip the battery upwards to reveal the solder pads soldered to the logic board.
-
Desolder the battery from the logic board by heating up the solder joint with a soldering iron and simultaneously using a pair of tweezers to pull the battery wire away from the logic board.
-
If you have never soldered before, we have a guide that makes it easy.
If after leaving the charger plugged into a known good power source overnight and the green indicator light on the shuffle is not lit, there’s a pretty good chance the battery is dead.
-


To reassemble your device, follow these instructions in reverse order.
To reassemble your device, follow these instructions in reverse order.
78等其他人完成本指南。

20指南评论
Followed your clear instructions and made a successful battery change. It would be helpful to explain that both cover plates are held ond by double sided sticky tape and to give caution on the location of the miniclips on the control cover - I cut through 2 of them by mistake. Thanks for the help.
Regards, Frank, North yorkshire, UK
I rarely find instructions so detailed and foolproof. I ended up with a "new" iPod saving a bunch of money.
Read on about the incidents I encountered.
The working end of the plastic pry tool snapped off rendering it useless, but not before it irreparably bent the pink housing. The suggested screwdriver for which I paid extra did not undo the tiny screws, and I eventually tapped them out with a miniscule eyeglass-repair screwdriver. (Is it a coincidence I did not see a screwdriver in any of the photos?)
Ditto on the suggestion that the super-sticky adhesive presents itself as an obstacle. A suggestion to apply pressure slowly as the adhesive releases would have been helpful.
I loved that the instructions were really easy to follow. It would be helpful to mention that the logic board ought to be really carefully pushed out. It was difficult in my case and I had to apply a considerable amount of force to slowly push it out.
Despite taking care to control my strength and push it out, part of the protective yellow tape got torn and one of the components was dislodged and broken. It must've been pretty important cuz unfortunately my iPod didn't work after I put it together in one piece. I'm sure the fault lies in my carelessness, the instructions were great. I hope you guys have better luck with yours (:
just to add what Frank said: the white plastic control cover has 6 tiny clips; two either side of the sliding switches and two in the middle. I found that gently levering the cover up by inserting the tip of an Xacto blade through the holes the sliders ride in avoids damaging the clips. Be careful not to turn the iPod on when you do this or scratch the green paint next to the on/off slider.
Does anyone have what the best approach to removing the resin from the solder points?
We followed the instructions, it worked!!
I scraped the epoxy off of the solder points with the end of the #00 screwdriver (using it like a file).
My FIL did the soldering, with a big blunt tip, he's amazing.
Thank you!!
Really.. I am thankful to you (Andrew Bookholt), Also it would be more helpful if you mention the link where the original battery will be available.
I have had success by soaking each end in 99% isopropyl alcohol for a few hours to let it break down the adhesive. That way you won’t break tabs on the switch side.
Also, to remove the resin - you can melt it off with the soldering iron instead of using a metal implement to scrape it off.
Thank you! Seems to have worked OK - charging the new battery now…. - I’ll see if it plays when it’s charged up I used alcohol to ease the sticky tape, as advised by another person on here…. VERY fiddly and I should have used a much smaller soldering iron tip - maybe a thin nail or something. Need good eyesight!.
This stops at taking the battery out. Is there nothing about putting a new battery in, and the process of reassembly (and what may be required, e.g. more soldering, epoxy, etc.)?
I was wondering this too. Plan on trying this out once I have all the parts and tools. 🤞
Excellent tutorial!!!
Why is that button green ?!
Edit : I think he put the button the wrong way.
Gabriel-Science - 回复