跳转到主内容

当前版本的文档还未经巡查,您可以查看最新的已查核版本

你所需要的

  1. , 防撬螺丝: 步骤 1 中的图像 1,1
    • 在开始之前,将电量用至25%以下。 充满电的锂电池如果意外被刺穿可能导致着火或者爆炸。

    • 在拆解前请将您的iPhone关机。

    • 打开iPhone将会损害到防水密封。 如果您不重新安装密封粘合剂,手机将失去防水性能。

    • 在iPhone底部处拆下两颗3.5mm 六角梅花螺丝。

  2. , 标记你的三角撬片: 步骤 2 中的图像 1,3 , 标记你的三角撬片: 步骤 2 中的图像 2,3 , 标记你的三角撬片: 步骤 2 中的图像 3,3
    • 如果插入太深,三角撬片可能会损坏你的设备。 按照此步骤标记撬片并防止损坏。

    • 从尖端测量 3 毫米,并用永久性记号笔标记三角撬片。

    • 你还可以用不同的尺寸标记三撬片的其他角。

    • 或者,将 将一枚硬币 粘在距撬片尖端 3 毫米处。

  3. , 用胶带覆盖破损: 步骤 3 中的图像 1,3 , 用胶带覆盖破损: 步骤 3 中的图像 2,3 , 用胶带覆盖破损: 步骤 3 中的图像 3,3
    • 如果 iPhone 的后玻璃破裂,请在维修过程中通过在玻璃上贴胶带来防止进一步破损并防止人身伤害。

    • 将重叠的透明包装胶带条黏在 iPhone 的后玻璃上,直到覆盖整个手机后部。

    • 戴上安全眼镜以保护你的眼睛免受修理过程松散玻璃的伤害。

    • 如果在接下来的几个步骤中无法让吸盘粘在手机上,请将强力胶带(折叠到把手中,然后用它提起后玻璃。

    • 如果所有措施都不可行,你可以用502胶把吸盘粘到后玻璃上。

  4. , 反向钳使用指南: 步骤 4 中的图像 1,3 , 反向钳使用指南: 步骤 4 中的图像 2,3 , 反向钳使用指南: 步骤 4 中的图像 3,3
    • 接下来的两个步骤演示了如何使用反向钳,一个旨在简化打开过程的工具。 如果你不使用 反向钳,请跳过这两个步骤以使用替代方法。

    • 有关如何使用 反向钳的完整说明,请查看本指南

    • 将蓝色手柄拉向铰链以解锁反向钳的手臂。

    • 将反向钳手臂滑过 iPhone 的左边缘或右边缘。

    • 将吸盘放在靠近 iPhone 底部边缘的位置——一个在正面,一个在背面。

    • 向下推吸盘以将吸力施加到所需区域。

    • 如果发现设备表面太光滑而反向钳无法吸住,请使用包装胶带来创造一个更容易抓握的表面。

  5. : 步骤 5 中的图像 1,3 : 步骤 5 中的图像 2,3 : 步骤 5 中的图像 3,3
    • 向前拉蓝色手柄以锁定手臂。

    • 顺时针转动手柄 360 度或直到吸盘开始拉伸。

    • 确保吸盘彼此对齐。 如果在拉伸过程中吸盘慢慢不对齐,请松开吸盘并重新对齐手臂。

  6. : 步骤 6 中的图像 1,2 : 步骤 6 中的图像 2,2
    • 加热 iOpener并将其穿过反向钳。

    • 你还可以使用吹风机热风枪或电热板,但过热可能会损坏显示屏和/或内部电池,因此请小心操作。

    • 折叠 iOpener,使其位于 iPhone 的底部边缘。

    • 等待一分钟,让粘合剂有机会释放并出现开口间隙。

    • 将撬片插入间隙中。

    • 如果反向钳无法形成足够的间隙,请对该区域施加更多热量并将手柄旋转四分之一圈。

    • 一次不要转动超过四分之一圈,并在转动之间等待一分钟。 把工作交给反向钳和时间来完成。

    • 跳过接下来的三个步骤。

  7. : 步骤 7 中的图像 1,1
    • 接下来的三个步骤展示了如何使用吸盘分离屏幕。

    • 加热iPhone的底部将会有助于软化屏幕底下的粘合剂,使其更加容易打开。

    • 使用吹风机或者准备好的iOpener来加热iPhone的底部大约90秒来软化下方的粘合剂。

  8. : 步骤 8 中的图像 1,2 : 步骤 8 中的图像 2,2
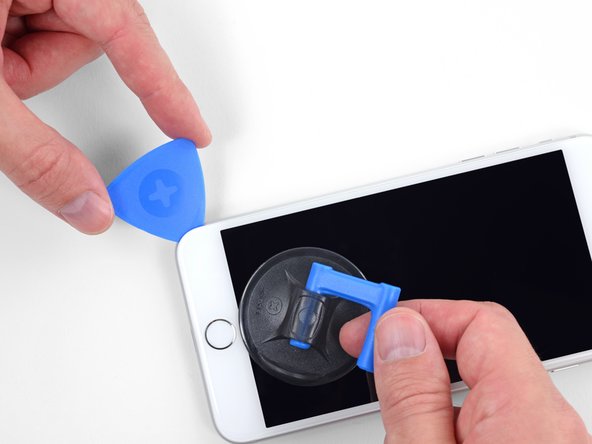
    • 将吸盘放置在前面板的下方一半位置,home 键上方。

    • 请确保吸盘没有吸附在home 键上,这样做的话将不会使得吸盘和玻璃形成密封。

  9. : 步骤 9 中的图像 1,3 : 步骤 9 中的图像 2,3 : 步骤 9 中的图像 3,3
    • 用力拉动吸盘,持续的压力将会在前面板和后壳之间创造出一个小的缝隙。

    • 在缝隙里插入撬棒或者其他几毫米的撬动工具

    • 将显示器固定到位的防水粘合剂非常牢固; 弄开这个缝隙需要很大的力量。 如果你很难打开一个缝隙,应继续加热手机,并上下轻轻晃动屏幕,以削弱粘合剂,直到你能够打开足够大缝隙插入你的工具。

  10. : 步骤 10 中的图像 1,3 : 步骤 10 中的图像 2,3 : 步骤 10 中的图像 3,3
    • 在您的手机的角落处滑入撬片滑向左上角,朝着音量控制和静音键方向滑动,将固定显示屏的粘合剂分离开来。

    • 在显示屏的左上角附近停下。

  11. , 注意事项: 步骤 11 中的图像 1,1
    • iPhone 的右边缘有易损排线。 请勿将撬片尖端插入此处,因为可能会损坏排线。

  12. : 步骤 12 中的图像 1,3 : 步骤 12 中的图像 2,3 : 步骤 12 中的图像 3,3
    • 将您的工具重新插入到iPhone的右下角,并将其划到手机右上角,以划开粘合剂。

    • 请勿将撬片尖端插入超过 3 毫米,否则可能会损坏显示屏排线。

  13. : 步骤 13 中的图像 1,1
    • 小心地抬起吸盘,来提起显示屏地底部。

    • 切勿提起超过15º 超过这个范围您将可能损坏显示连接排线。

  14. : 步骤 14 中的图像 1,1
    • 从吸盘上揭起一角来将其从前面板上移走。

  15. : 步骤 15 中的图像 1,3 : 步骤 15 中的图像 2,3 : 步骤 15 中的图像 3,3
    • 在屏幕的顶部边角处滑入一个撬片来切割最后的粘合剂。

  16. : 步骤 16 中的图像 1,2 : 步骤 16 中的图像 2,2
    • 将显示屏幕稍微向下滑动(远离手机的顶部)来将显示屏上的卡口与后壳分离。

  17. : 步骤 17 中的图像 1,3 : 步骤 17 中的图像 2,3 : 步骤 17 中的图像 3,3
    • 打开iPhone仅需要摆动显示屏左侧,就像翻书一样。

    • 切勿尝试完全将显示屏与手机主体分离,显示屏还有许多易碎的排线与iPhone逻辑板相连。

    • 在您对iPhone操作的同时请将屏幕被某些物件支撑来保持直立的状态。

  18. , 断开电池: 步骤 18 中的图像 1,2 , 断开电池: 步骤 18 中的图像 2,2
    在这个步骤中使用的工具:
    Magnetic Project Mat
    $19.95
    购买
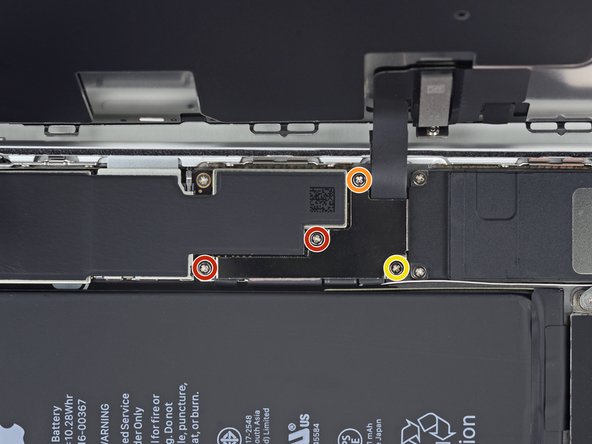
    • 移除四颗将显示排线支架与逻辑板相固定的十字(JIS) 螺丝,它们的长度如下:

    • 2颗 1.3mm 螺丝

    • 1颗 1.4mm 螺丝

    • 1颗 2.7mm 螺丝

    • 在本指南中,请仔细留意螺丝的位置 以便每个螺丝都可以在组装时装回到它原来的位置。 在错误的地方安装螺丝可能会造成永久性损坏。

  19. : 步骤 19 中的图像 1,1
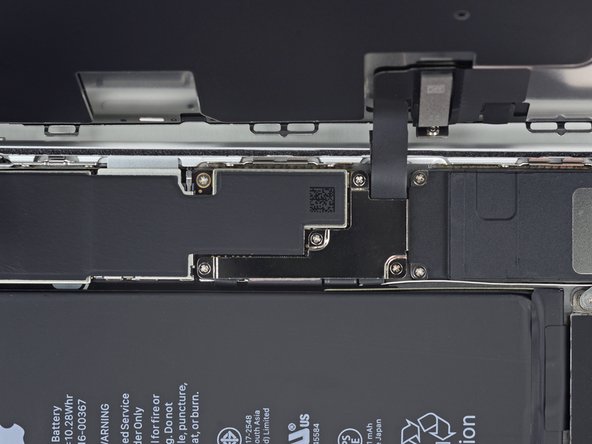
    • 移除显示排线支架。

  20. : 步骤 20 中的图像 1,2 : 步骤 20 中的图像 2,2
    • 使用撬棒的尖端来将逻辑板插座上的电池连接插头撬开。

    • 稍微将电池连接插头弯曲,防止在您进行维修操作时意外与插座连接。

  21. , 显示屏总成: 步骤 21 中的图像 1,2 , 显示屏总成: 步骤 21 中的图像 2,2
    • 使用撬棒的尖端或者手指甲来直接将插头从插座中撬出来断开大的低显示排线。

    • 在重新连接类似这个按压连接插头时,先将一侧完全按压到位,然后再操作另一侧。 切勿在插头中间按压。 如果连接插头产生微小的错位,连接插头可能被折弯,造成永久的损伤。

  22. : 步骤 22 中的图像 1,2 : 步骤 22 中的图像 2,2
    • 断开另一个低显示排线插头,这个就在你前一步骤断开的插头的后面。

  23. : 步骤 23 中的图像 1,2 : 步骤 23 中的图像 2,2
    • 移除两个将支架与前面板传感器组件固定的三点Y000螺丝

    • 1颗 1.0mm 螺丝

    • 1颗 1.2mm 螺丝

  24. : 步骤 24 中的图像 1,1
    • 卸下覆盖前面板传感器组件连接器的支架。

  25. : 步骤 25 中的图像 1,2 : 步骤 25 中的图像 2,2
    • 使用撬棒尖端或者支架来断开插座上的前面板传感器组件插头。

  26. : 步骤 26 中的图像 1,1
  27. 这个步骤还没有翻译 帮忙翻译一下

    , 听筒扬声器: 步骤 27 中的图像 1,1
    • Remove the five Phillips screws securing the earpiece speaker bracket:

    • Two 1.8 mm screws

    • One 2.3 mm screw

    • One 2.4 mm screw

    • One 2.8 mm screw

  28. 这个步骤还没有翻译 帮忙翻译一下

    : 步骤 28 中的图像 1,1
    • Remove the earpiece speaker bracket.

  29. 这个步骤还没有翻译 帮忙翻译一下

    : 步骤 29 中的图像 1,3 : 步骤 29 中的图像 2,3 : 步骤 29 中的图像 3,3
    • Use the flat end of a spudger to lift the front-facing camera from its housing.

    • Gently bend the camera ribbon cable to the side to clear the way to the earpiece speaker underneath.

  30. 这个步骤还没有翻译 帮忙翻译一下

    : 步骤 30 中的图像 1,1
    • Remove the earpiece speaker.

  31. 这个步骤还没有翻译 帮忙翻译一下

    : 步骤 31 中的图像 1,2 : 步骤 31 中的图像 2,2
    • Gently fold the camera and attached ribbon cable toward the bottom of the iPhone to allow access to the components underneath.

  32. 这个步骤还没有翻译 帮忙翻译一下

    : 步骤 32 中的图像 1,1
    • Use a hairdryer or heat gun or prepare an iOpener and apply it to the top front of the display for about a minute, in order to soften the adhesive securing the sensors.

    • The sensors in the following steps are fragile. To increase your chances of removing them without damage, repeatedly add more heat as needed. Alternatively, add a drop or two of isopropyl alcohol and let it penetrate under the sensors before you pry them up.

  33. 这个步骤还没有翻译 帮忙翻译一下

    : 步骤 33 中的图像 1,2 : 步骤 33 中的图像 2,2
    • Slide a spudger under the ambient light sensor flex cable, and lift the sensor out of its housing.

  34. 这个步骤还没有翻译 帮忙翻译一下

    : 步骤 34 中的图像 1,3 : 步骤 34 中的图像 2,3 : 步骤 34 中的图像 3,3
    • Slide the tip of a spudger underneath the proximity sensor flex cable, and lift the sensor out of its housing.

  35. 这个步骤还没有翻译 帮忙翻译一下

    : 步骤 35 中的图像 1,3 : 步骤 35 中的图像 2,3 : 步骤 35 中的图像 3,3
    • Insert the sharp edge of an iFixit opening tool underneath the camera assembly's flex cable, on the opposite side from the front-facing camera.

    • Use an iOpener or hair dryer as needed to heat the top portion of the display and soften the adhesive securing the flex cable.

    • Pry up to separate the edge of the flex cable from the back of the display.

  36. 这个步骤还没有翻译 帮忙翻译一下

    : 步骤 36 中的图像 1,3 : 步骤 36 中的图像 2,3 : 步骤 36 中的图像 3,3
    • Insert the point of a spudger underneath the same portion of the flex cable that you separated in the previous step.

    • Continue separating the remainder of the flex cable, pushing the spudger underneath the row of circular gold earpiece speaker contacts.

  37. 这个步骤还没有翻译 帮忙翻译一下

    : 步骤 37 中的图像 1,3 : 步骤 37 中的图像 2,3 : 步骤 37 中的图像 3,3
    • Remove the front camera and sensor cable assembly.

    • A piece of black double-sided insulating tape lies between the display and three rows of copper contacts on the back of the camera/sensor cable. It may remain stuck to the display, or it may come off with the cable.

    • When reassembling, verify the tape is in place, or else cover the contacts on the back of the cable with an appropriate tape, such as Kapton tape.

终点

31等其他人完成本指南。

Jeff Suovanen

于08/06/13注册

428,158 声望

创作了259篇指南

团队

iFixit iFixit 的会员

Staff

135 名成员

创作了16,820篇指南

8条评论

What happens if the camera/ sensor cables come apart but dont tear if ya know what i mean? theres 2 cables and theyre like taped on top of one another and they connect eachother… well, in my case they just came apart..

Devayn “LiveLoveDMND” Diamond - 回复

Just had the same problem. I placed a new flexcable, they're not very expensive.

Davy Thoelen -

what is the tape, or the gold connectors that the tape covers for?

lewis - 回复

Salve,

Ho proceduto alla sostituzione della camera frontale ma, quando accendo il tel il sistema si avvia in modalità loop senza mai avviare il sistema operativo.

Ovviamente se non collego il flat della camera frontale il telefono si avvia regolarmente. Ho anche provato con una camera frontale nuova senza risultato.

Potreste aiutarmi?

maurizio.r - 回复

I removed one of the 2 small circular stickers (one is white, one green) from where the sensor gets placed. Is it a problem?

alberto pias - 回复

添加评论

浏览统计数据:

过去 24 小时: 12

过去 7 天: 104

过去 30 天: 473

总计 62,380