简介
Use this guide to replace a worn-out or dead battery in your Xiaomi Redmi Note 7.
It is possible to remove the battery without removing the loudspeaker and the main flex cable first. However for easier handling during the battery removal we highly recommend to remove both.
If your battery is swollen, take appropriate precautions. For your safety, discharge your battery below 25% before disassembling your phone. This reduces the risk of a dangerous thermal event if the battery is accidentally damaged during the repair.
You’ll need replacement adhesive to reattach components when reassembling the device.
你所需要的
-
-
Apply a heated iOpener to the rear glass to loosen the adhesive underneath. Apply the iOpener for at least two minutes.
-
-
-
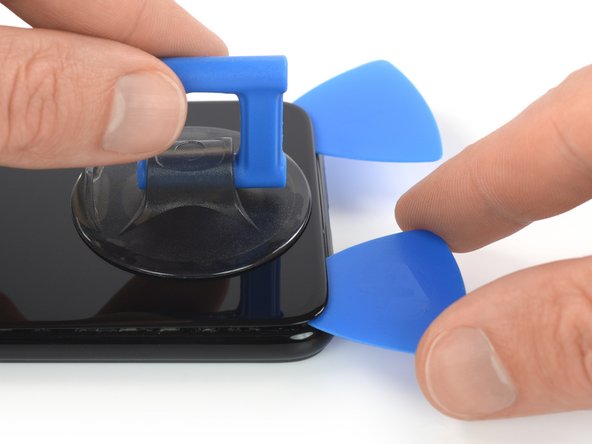
Secure a suction handle to the bottom edge of the rear glass, as close to the edge as possible.
-
Lift the rear glass with the suction handle to create a small gap between the glass and the frame.
-
Insert an opening pick into the gap.
-
Slide the opening pick to the bottom right corner to slice the adhesive.
-
-
-
Insert a second opening pick and slide it to the bottom left corner to slice the adhesive.
-
Leave the opening picks in place to prevent the adhesive from resealing.
-
-
-
Insert a third opening pick at the bottom left corner.
-
Slide the opening pick along the left edge of the phone to slice the rear glass adhesive.
-
Leave the opening pick in its place at the top left corner to prevent the adhesive from resealing.
-
-
-
Insert a fourth opening pick under the top left corner of the rear glass.
-
Slide the opening pick along the top edge of the phone to slice the rear glass adhesive.
-
Leave the opening pick in the top right corner to prevent the adhesive from resealing.
-
-
-
Insert a fifth opening pick at the top right corner of the phone.
-
Slide the opening pick along the right edge to slice the remaining adhesive.
-
-
-
Carefully fold the rear glass to the left side of the phone assembly like you'd open the front cover of a book.
-
-
-
Use a Phillips screw driver to remove the three 3.3 mm-long screws securing the connector cover to the midframe.
-
-
-
-
-
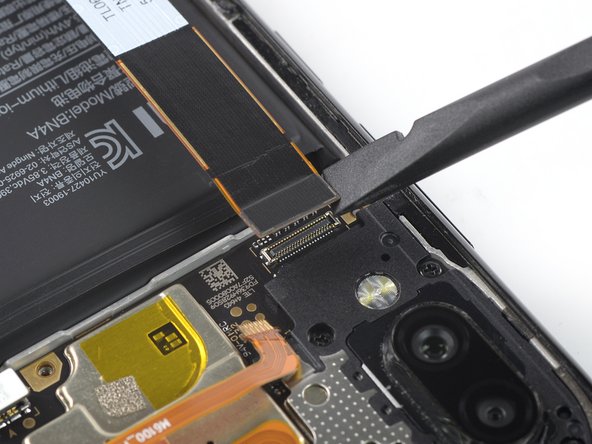
Use the flat end of a spudger to pry up and disconnect the battery flex cable from the motherboard.
-
-
-
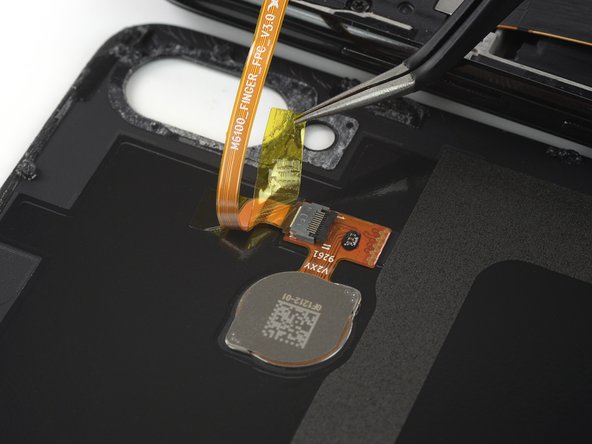
Use a pair of tweezers to carefully peel the yellow protective foil off the ZIF connector.
-
-
-
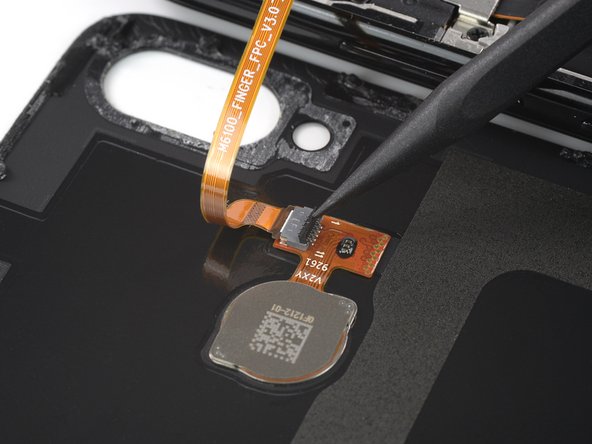
Use the pointed end of a spudger to open the ZIF connector by bringing its black flap in an upright position.
-
-
-
Disconnect the fingerprint flex cable by pulling it straight out off the ZIF connector using a pair of tweezers.
-
-
-
Use a Phillips screw driver to remove the eight 3.3 mm-long screws securing the loudspeaker assembly.
-
-
-
Slide an opening pick underneath the right edge of the loudspeaker assembly.
-
Use the opening pick to pry up the loudspeaker assembly.
-
Remove the loudspeaker assembly.
-
-
-
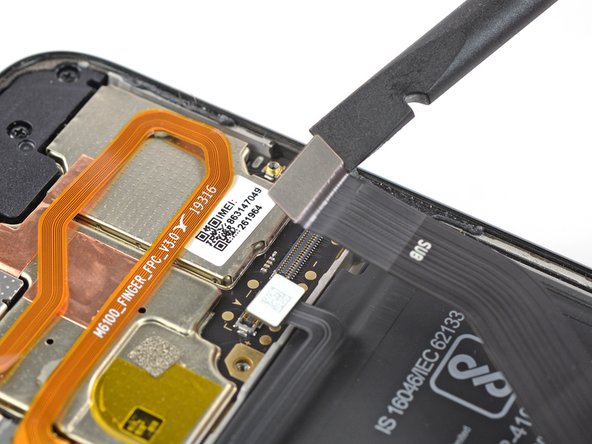
Use the flat end of a spudger to pry up and disconnect the main flex cable.
-
-
-
Use a Phillips screw driver to remove the 3.3 mm-long screw securing the display connector cover to the midframe.
-
-
-
-
Use the flat end of a spudger to pry up and disconnect the display flex cable.
-
-
-
Use the flat end of a a spudger to pry up and disconnect the main flex cable.
-
Remove the main flex cable.
-
-
-
Fold the display flex cable towards the bottom edge of the phone and secure it to your working surface with a small piece of tape.
-
-
-
Use a pair of blunt nose tweezers to peel the black colored end of the left pull tab off the battery.
-
Grab the pull tab with your tweezers and slowly pull it away from the battery, toward the bottom of the Redmi Note 7.
-
Pull hard enough to maintain tension on the strip, but don't force it. Give it plenty of time to stretch and detach from the battery.
-
Don't press down on the battery. Hold the Redmi Note 7 firmly by its sides.
-
Pull at a low angle so the strip doesn't snag on the edge of the battery.
-
If the adhesive strip breaks off, try to retrieve it using your fingers or blunt tweezers, and continue pulling—but do not pry under the battery.
-


If possible, turn on your device and test your repair before installing new adhesive and resealing.
Secure the new battery with pre-cut adhesive or double-sided adhesive tape. In order to position it correctly, apply the new adhesive into the device at the places where the old adhesive was located, not directly onto the battery. Press the new battery firmly into place.
To reassemble your device, follow the above steps in reverse order. Apply new adhesive where necessary after cleaning the relevant areas with isopropyl alcohol (>90%).
For optimal performance, after completing this guide, calibrate your newly installed battery.
Take your e-waste to an R2 or e-Stewards certified recycler.
Repair didn’t go as planned? Try some basic troubleshooting, or ask our Answers community for help.
20等其他人完成本指南。


6条评论
Thanks for the guide. Do you think it's possible to use the phone without gluing the back on again? But instead using a case to hold the back on. My rubber case reaches around to the front of the phone, and seems like it would hold the flat back glass on quite well, while also keeping out dust. Or is this just a bad idea?
Hi Evocativekitsune,
I wouldn't advise to do that. It happens often that dust finds its way underneath the phone case and therefore straight into your phone. I suggest to use at least some regular double sided tape (you can cut it in small strips by yourself) to glue the back cover selectively back onto the midframe. It's still not the best protection however it's better than a completely loose cover. Don't forget to remove the old adhesive backings before applying new adhesive!
Thanks for the detailed guide!
Unfortunately I wasn't carefully enough when wedging the first opening pick below the glass back cover, and it cracked. I was still able to follow the guide and replace the battery successfully. I will order a new back, which does not cost a lot and should hopefully come with new adhesives as well.
One thing to note though when reassembling the device:
The main flex cable has the same connector on both sides and can therefore be plugged in incorrectly. I didn't pay close enough attention to the orientation and after reassembling, the phone didn't turn on, as something seemed to short out. Fortunately nothing got damaged, but be careful to connect the cable the right way round.
The flex cable has printed markings "MB" and "SUB". Connect the side marked with "MB" to the Motherboard on top of the phone and the side marked with "SUB" to the daughterboard below with the charging circuitry.
I did this exercise today with my redmi 7. But the internal anatomy looks different.
1. Xiomi has been very liberal with the glue. Just to make repair hell?
2. There is no need to remove the speaker assembly. Just fold back the two fat cables.
3. Use rubber cement to seal back. Apply a very thin layer on the body and let it dry for 5 mins. The press the back firmly and keep it under several books to apply pressure evenly.