简介
本指南用于更换或升级 Steam Deck LCD 中的 SSD。Steam Deck 的 SSD 为单面 M.2 2230 型号。
如需更换或升级 Steam Deck OLED 中的 SSD,请参考此指南。
请记住:在维修设备时,务必遵守静电放电 (ESD) 安全规程。
这些步骤仅介绍如何物理拆卸和更换 SSD。您还需要其他软件工具和步骤来安装操作系统并使更换后的 SSD 正常工作。
请按照 Valve 的说明 Steam Deck 恢复指南 恢复、修复或使用 SteamOS 重装 Steam Deck 的 SSD 系统。 如需安装 Windows 系统,请参考官方资源 此处。
注意: 重装 SSD 系统后,Steam Deck 的按钮、摇杆和触摸板可能最初无法响应。请使用触摸屏完成 SteamOS 的初始设置,并允许设备下载更新。Steam Deck 重启后,功能应该会恢复正常。
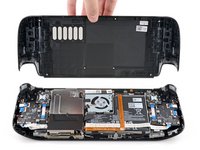
注意: Valve 于 2023 年初开始发售内部设计有所更新的 Steam Deck。您的 Steam Deck 外观可能与图片所示有所不同,但操作步骤相同。 拆下后盖 查看您的 Steam Deck 版本。初代 Steam Deck 配备金属主板挡板和方形风扇,如图所示此处可见。升级版 Steam Deck 配备黑色主板挡板和弧形风扇,如图所示此处可见。
你所需要的
视频概述
-
在这个步骤中使用的工具:Magnetic Project Mat$19.95
-
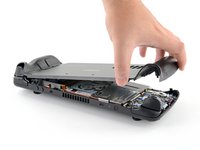
用十字螺丝刀拆卸固定后盖的 8 颗螺丝:
-
四个 9.5 毫米长的粗螺纹螺丝
-
四个 5.8 毫米长的细螺纹螺丝
-
-
-
-
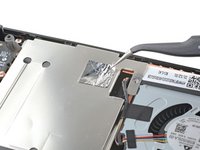
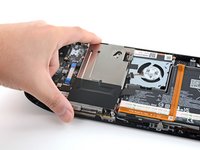
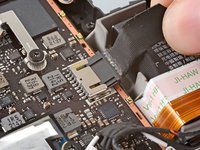
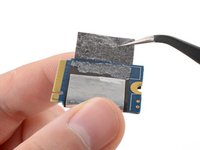
将屏蔽罩从 SSD 上滑下来。
-
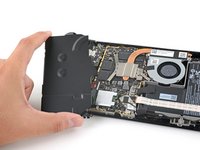
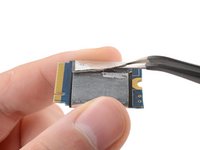
如果感觉屏蔽层不好拆,就用镊子将屏蔽层剥开并取下。若你还想重复使用,请注意尽可能使其保持其最佳状态。
-
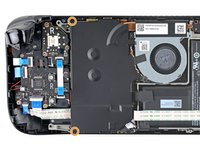
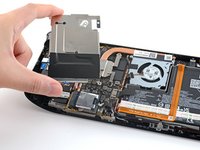
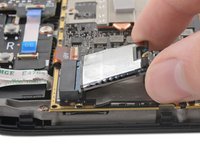
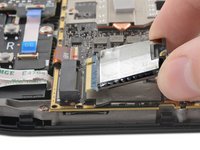
现在就只剩下SSD了。
-


若要重新装回您的设备,请按倒序重新进行此指南
要使用SteamOS恢复、修复或重新映像Steam Deck的SSD,请遵循Valve的官方指引
Steam Deck recovery instructions.
请将你的电子垃圾带到R2或e- steward认证的回收商.
维修过程不顺利?看看这些简单的除错指南, 或者到我们的Steam Deck 问题社区 寻找解答.
352等其他人完成本指南。


74指南评论
idk why valve couldn't have just made the m.2 slot a 2230/2242/2260 & 2280 m.2 NVMe SSDs support??/ they could have done it! im hoping someone out there can make a new back shell that includes the nvme. m2 adapter riser cable extender that moves the nvme ssd to the back case somewhere else with more room and to also not only allow for better cooling of the SSD but also allows us to use any size m.2 nvme SSDs like 2230 up to 2280 m.2 size ssds as i have tons of gen3 x4 2280 nvme ssd lying around from all my AMD ryzen machines from my 1800X X370 all way up to X570 and 5700X / 5800X & 5800X3D etc..
I think it has to do with power draw... The Steam Deck isn't designed to cope with a incredibly fast (and power hungry) 2280 drive. I learned this the hard way on my laptop. I changed the drive myself to a 5500MB/s one and I could tell that not only did the SSD run hotter but also the components surrounding the SSD, it completely changed the thermal characteristics of the device. I added this drive to my desktop computer instead and bought a low powered one for the laptop. By having a 2230 drive on the Steam Deck, Valve forces users to choose drives that are typically designed for small and low powered devices.
Why are you complaining about the specs of a Steam Deck on an ifixit guide comment section? If there's a moderator around feel free to remove my and this person's comment.
and possibly even a m.2 door/cover to allow easier m.2 ssd removal W/O having to disassemble our steam deck! if the battery needs unplugged then a battery "KILLSWITCH" or "BATTERY DISCONNECT" Switch be also added to the decks after market backplate/cover to allow the steam decks battery to be disconnected from the unit with a toggle of a switch? allows for safter disassembly and m.2 SSD replacement with out having to repeatedly disassemble the steam deck....(SSD nand flash memory can fail) if i had the tools and capabilities to do this myself i would/ but i still dont even have my steam deck yet (Q3 July -Sept. 2022 ;( my friend just got his (ordered on same day) so WTF is mine valve!?????