-
-
我们先来看看蒸汽手柄的相关参数:
-
高精度震动反馈
-
双触控板
-
通过 Micro-USB 连接的 USB 2.0 接口
-
6轴组合的陀螺仪-加速度传感器
-
具有10°行程的两段式扳机,磁通量传感器,触摸开关
-
一对可更换的AA电池将提供最多80小时的续航
-
5米的无线连接范围
-
-
-
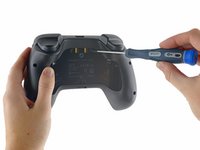
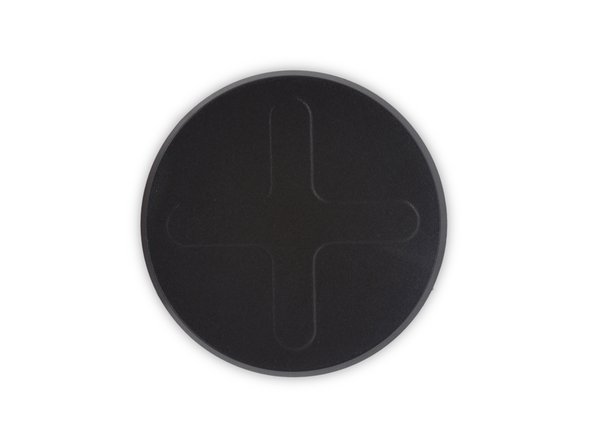
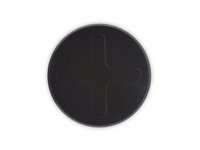
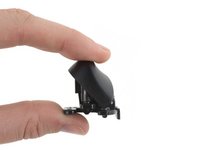
我们捅开手柄背面电池盒附近的贴纸,将能发现三个T6 Torx螺丝。
-
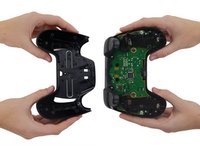
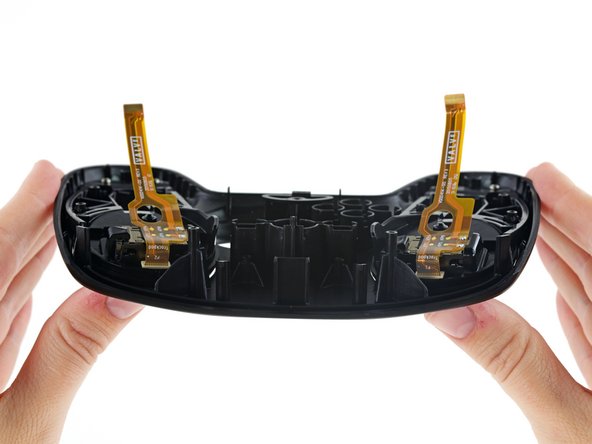
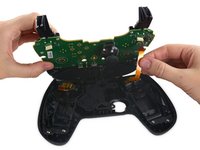
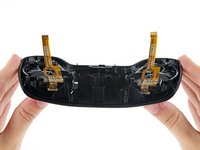
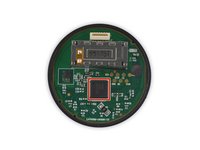
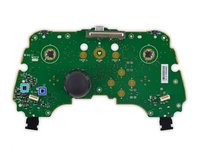
拆下光滑的黑色后壳之后,我们首先能看到的是绿色的PCB。
I bought mine about 10 months ago and it does not have those additional srews under the paddle/battery cover. After unscrewing those 4 Torx on the handles I cannot remove the bottom of the cover without having to worry - it feels as if it rather breaks than become loose. Especially the areas under the usb port and around the release slider of the paddle do not seem to become loose at all. It seems as if they made minor changes to the design. Mine became a bit sticky while carrying it around and the steam button would get stuck when pressed. I wanted to clean the buttons but I really worry to break the thing. It is insanely tight even with those 4 Torx removed.
The info decal under the rear cover is extremely heavy-duty and makes it hard to see where the screws are, but rub your fingernail in the three spots shown. You should begin to see the indentations of the screw wells underneath the decal. Then, punch through the decal to access the screws.
Those two top T6 screws are too deep for my screwdriver to reach, I have the 64-bit set from ifixit. Kind of a shame..
Cas Eliëns - 回复
Doesn't come apart after removing screws
-
-
-
-
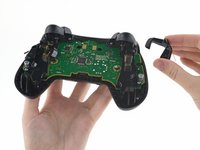
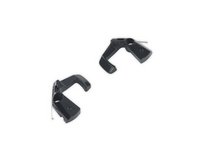
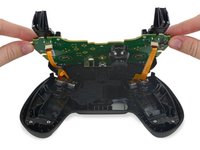
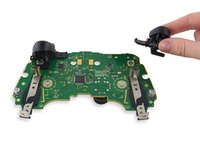
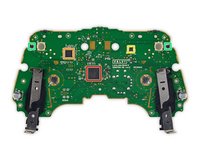
在后壳下面,我们发现了一对漂亮的电池弹出杆 - 这是我们在其他手柄中没有看到过的。
-
虽然电池弹出杆的设计很优秀,但我们真正感兴趣的是 Valve 决定不再使用集成电池。
-
这种设计移除了易坏的组件,延长了 Steam 手柄的使用寿命,并为用户提供了选择:一次性电池或可充电电池。地球的未来(确切地)掌握在你的手里。
They mention battery eject levers, how do you normally hit these levers to get the batteries out? Or do you just push them down and the levers are on a spring?
You press them up from the bottom. There are arrows below the release levers that should show what I mean.
This step forgets about 4 screws holding the motherboard in place.
Hi Mårten, as the banner at the top of this page states, this is a teardown meant for entertainment purposes. It is not meant to be followed as a repair guide.
Use this it is far more useful than this crappy guide. https://www.coloredcontrollers.com/blog/...
if its possible please go in to more detail with the battery eject levers I fix it
-
-
It would have been nice if you told us about the two T6 screws holding the motherboard in place… or are there more? Because I can’t proceed beyond this step
Hi Mårten, as the banner at the top of this page states, this is a teardown meant for entertainment purposes. It is not meant to be followed as a repair guide.
-
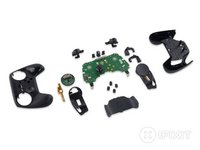
在这个步骤中使用的工具:Pro Tech Toolkit$74.95
-
我们终于拿出了我们最喜欢的工具,把触摸板从支架后面撬开。这次,我们使用了Pro Tech Toolkit里的一个塑料撬棒。
-
触摸板的子板上有排线接口,并焊有提供触觉回馈的装置,这使得触摸板模块有点冗余。
-
整个组件是由Cirque提供的触摸板解决方案,可能是GlidePoint TM040040 。
-
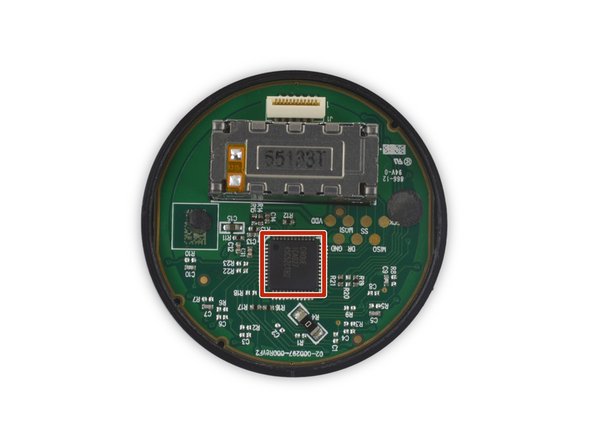
触摸板由Cirque 1CA027和MCU联合驱动。
-
与此同时我们在子板的下面发现了我们最不喜欢的东西:胶。这两个黑色球体是一种粘合剂,用于将触摸板固定在支架上。
-
-
-
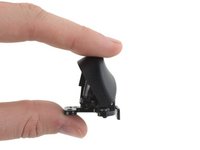
我们巧妙地拧下了一些螺丝,然后就取下了两段式扳机。
-
令我们惊讶的是,它们只是插在主板上,而并没有使用粘合剂或其他机械卡扣!
-
两段式扳机可以拆解成两部分:
-
第一部分是扳机进行线性平滑运动的模块。它使用磁通量传感器,基于时间变化来测量扳机的位置和按压速度。
-
第二部分是扳机的物理按键,实际上是按压了一个主板上的按键。
The triggers can actually be further disassembled- there is a small screw hidden underneath that separates the trigger from the actual mechanical frame. This means that all external faces of the controller can be separated from mechanical or electrical components, which will make Counter Strike-esque paint jobs a breeze!
I've just lost the spring to the right trigger does anyone know what size it is. I'd greatly appreciate your help. My email is Dallasjames2001@yahoo.com
The spring for the trigger is 19 mm long with about 14 coils
-
-
It's worth noting that there are spots for Tag Connect connectors for interfacing with the wireless radio chip and the main controller. The radio's is marked radio right underneath it, and the main controller's is marked debug, and is down to the left. Hopefully valve releases a more open source firmware soon so we can have the open controller of our dreams!
-
-
Steam 手柄的可修复性评分:8/10(10为最易修理)
-
唯一发现的粘合剂是在触控板那里。其他的所有机械连接均使用了螺丝。
-
整个手柄相对较模块化的设计意味着更换一个部件会很轻松。
-
尽管我们总是说螺丝比胶水好,但是这个手柄中使用了非磁性螺丝,而且很容易放错位置。
-
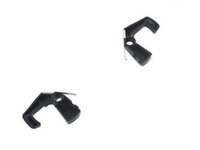
最易坏的组件 - 摇杆是直接焊在主板上的。
Most likely to fail component is actually the small, thin and uniquely shaped flange that activate the right and left bumpers. They are slightly paddle shaped and extend out from the oddly shaped bracket they are a part of on a narrow neck that appears extremely fragile. Their known longevity is a testament to the design of the whole controller as they seem to last far beyond what one would assume. When they DO break however, the bumper is totally useless and since they are only a piece sticking out of a larger whole (and Valve no longer makes these controllers or parts) to replace it is an exercise involving more parts and areas than necessary, cannibalizing another Steam controller, or desperately searching for an improbable find online. Crafting a replacement is far more likely an option and this has its own issues.. There is a youtube video where a guy uses a tape measure for its type of metal material as the source for the creation of a replacement... I recommend it if this is wha you are dealing with.
I don't agree, I think it's the upper shoulder buttons, which I just have to fix. It's just a small plastic-part with a thin bridge used as a spring-like, so an obvious breakpoint.
The other one was also already cracked. I just superglued them back now, seems to work, how long is the question though.
Otherwise I've seen there's also 3D-printing manuals on thingiverse, next time I will try printing them myself, maybe with a thicker bridge then.
lornlynx -
-


40条评论
Does swapping the touchpads and reconnecting them work?
In theory yes in practice no, if you swap them you will end up with an off angle dpad. shape almost like an X Same goes for A B X Y, I tried to do the original nintendo layout but they where angled so it did not work well.
It doesn't work in theory or in practice. I mean it can work. But the effects wouldn't be what you would think. You would actually have to mod the chassis itself which takes patience and artistic craftsmanship. But it can be done just not as easy as one would think. I tried this last night. No cigar. You can always attempt a cross wire and play without the top chassis but it would be uncomfortable and exposed.
So the thumbstick potentiometer is soldered, that's normal, but can the stick itself be replaced? My DS4 has 3rd party metal sticks.
Frank Zhao - 回复
I'd like to know this as well, if I get one of these I'd want to replace it with an Xbox One thumbstick if possible.
Yes, actually, I think the XBOne's analog sticks can be used as drop in replacements, I've seen one person replace it with an anodized steel stick, so it can be done.
Might want to check out the steam controler subreddit (/r/steamcontroller) and the steam controller mods subreddit (/r/steamcontrollermods)
Well yeah? Anything that is soldered can be unsoldered with a soldering wick and iron. Its roughly the same size. So it should fit through the plastic case. I may be wrong though. It can definitely be replaced though the only problem would be how big the hole in the case is. If it's big enough you should be fine. If not, just do what you do and play without the case. I seen some people do this, you would need to modify everything to make it comfortable though. Personally I think the sticks are fine. Its probably the thumb pad itself you don't like. THAT is easily replaceable, just carefully rip one off an x bone then carefully hot glue it to the top
How big are ds4 thumb sticks, pretty small right? If so. It can be done. Well the ds4 sticks would fit onto the steam Controller, but.vice versa? Maybe not.. the steam stick is small but is it that small? Idk. But they ARe third party like you said. So you should definitely try it and let us know. I'd try it but I don't have a DS. You ARE talking about the Nintendo ds right? Lol
Yes, it just pops off once the front cover is no longer holding it back.
I answered a question about replacing the stick over here.
I'm surprised you guys didn't post the exploded diagram of the controller that you can find on the inside of the retail box! From the looks of it, it appears to be fairly accurate.
My retail box didn't have one, then again my controller is from the first batch of those produced. I noticed a few differences between mine and theirs. I think they either got an earlu proto type or from a later more recent batch
Those 2 pads on the back of the PCB look like "connections" for a yet to be announced battery-pack, or "play and charge kit"
Any confirmation? I don't want to open mine yet...
What is the polarity of these? I suspect the right one would be +5V and the one on the left to be GND - That would make sense because of how the USB connector is laid out
Measured the pads. Both pads are 0 Ohm to GND.
Guess it's just to ground it then as the other guy said it's both on zero.
lornlynx -
I think that would be interesting to have a plastic covering similar to the xbox one design but with the touch pad sensors included and the feedback motor.
That IS what the steam Controller is. Actually the case.is superior to the x bone controller. Its handles bend in a way that makes it more comfortable. But the layout is essentially the same. Keep in mind this controller isn't really for fps games. Keep a keyboard and mouse for fps but the steam Controller is good for most anything else. I use it for third person shooters and turn based games.
I'm considering a tear-down of mine I just got- I think one of this would look FRESH with a custom paintjob. Especially since (if I read it correctly) I won't have to deal with the hard parts of this controller if I just want to paint the casing- not even the touchpads, just the outer casing.
You should still take it apart. Remove the chassis (plastic covering) and separate the innards including buttons and thumbtack. Anything can be easily soldered or snapped back. Don't risk getting pain on your PCB you will regret it. It should be fairly easy if you use the right paint. There is paint specifically for plastic. Get that, you can find it at any craft store. I'm doing the same soon, I scratched the original paint on accident during a removal procedure.
ATTENTION modders: this guide is perfect but has one is single flaw. It seems most stram controllers have hidden screws on the back panel. This guide doesn't mention they are hidden. But they are exactly where the guide says they are. When you open the panel it looks like they are not there. But you can feel them under the sticker. Cut a hole with a box cutter, its just really thick paper, and you will find the three screws. You can even feel em with your hand if you press down your finger hard enough, it will leave an indent where to cut. All the screws are size t6. They can be unlocked with torque 6 security screwdrivers.
My left touchpad makes a REALLY loud noise when I press it, like something isn't working right. What part could be causing this and how hard is it to fix? A little percussive maintenance temporarily fixes it but I'd like a permanent solution (and unfortunately live outside the US, meaning getting it fixed officially is out of question)
It may be that the weight inside the haptic motor is improperly attached? Does this happen consistently or only when experiencing haptic feedback?
I've had my Steam controller for about 1 year and at the 6 month mark the left flipper broke. Since it is all configurable I just made left flipper now left grip.
Then a month ago the battery compartment cover / left and right grip, had one of the two plastic prongs break off so of course I got out the duct tape xD
It's electronically sound so far but the molded plastic is giving out !!
The left joystick takes a lot of abuse and is holding up fine so far.
I'll comment again should anything else fail.
Oh I didn't mention that it is used daily for 8 plus hours.
The bumper buttons are weak af.. I broke them within two months of daily Rocket League (air roll on LB). This is the third time I've managed to do it. So there's definitely a manufacturing/engineering issue here. The mechanism broke so that the LB button is permanently pressed down and cannot be lifted up. Pressing it elicits no LB button response any more. And I can also hear rattling parts inside the controller now. Just to reiterate, this is the third steam controller that I've encountered the exact same problem. Luckily I've broken it so fast I've been able to get warranty replacements. As a result, I don't have any info on the repairing of the LB button mechanisms inside
I’ve busted 2 LB’s playing Warframe (both out of warranty, of course) There is a plastic plate under the front cover, it has a left and right sort of tab that flexes when pushing the LB and RB. The LB pushes the tab the tab pushes the switch on the edge of the PCB. The thinner flex part of the tab is what breaks, it then rattles around inside.
Just for posteriority, this is what I just fixed on mine. It's just a small plastic-part with a thin bridge used as a spring-like, so an obvious breakpoint.
The other one was also already cracked. I just superglued them back now, seems to work, how long is the question though.
Otherwise I've seen there's also 3D-printing manuals on thingiverse, next time I will try printing them myself, maybe with a thicker bridge then..
lornlynx -
My r 1 button has broken, and I don't really want to open it up, but I will if I have to. If I shake it slightly it rattles, and it doesn't click anymore, it's more or less just detached in some way. The thing I am afraid of is that the button is completely broken, or detached from the motherboard, because I would rather not solder it. This is my favorite controller, and I don't have a lot of money to spend on fixing it. I really appreciate any help, than you.
I’ve busted 2 LB’s playing Warframe (both out of warranty, of course) There is a plastic plate under the front cover, it has a left and right sort of tab that flexes when pushing the LB and RB. The LB pushes the tab the tab pushes the switch on the edge of the PCB. The thinner flex part of the tab is what breaks, it then rattles around inside.
Just for posteriority, this is what I just fixed on mine. It's just a small plastic-part with a thin bridge used as a spring-like, so an obvious breakpoint.
The other one was also already cracked. I just superglued them back now, seems to work, how long is the question though.
Otherwise I've seen there's also 3D-printing manuals on thingiverse, next time I will try printing them myself, maybe with a thicker bridge then.
lornlynx -
i had a battery leaking acid onto the motherboard which caused problems with he right touch-pad.
I tried cleaning the residue from the MB and the touch-pad ribbon cable but i think i made it all worse.
does anyone know of a website where i can purchase a replacement touch-pad ribbon cable?
i dropped my steam controller and now one of the grip buttons doesnt have proper haptics. the plastic on the backplate looks fine, and the dome switches look fine to my untrained eye. what do i do?
Is there an ifixit location I can send this to for repair?
Hallo, ich danke für die Deutsche Übersetzung. ich muss nur noch schauen wo ich ein neuen Analog Stick her bekomme.
Hi, I would like to know what size the screws are for the initial back plate? (Corners) The screw threads have snapped off on my device and I plan to replace them with a nut glued to the plastic
Mykie Merc - 回复
I know its obvious but it would be nice if this guide included how many screws were needed to take out.
Just for posteriority, because I also forget to check it and had to figure our in hindsight.
The first seven are 6 small ones and a long one in the middle under the sticker.
The next four long ones are what holds the board to the upper part, two are at the top near the shoulder buttons on the inside, and the other two are left and right at the bottom, they are also part of the battery holding cases.
The rest are small ones, but I didn't remove the ones holding the touchpads so I can't say for sure.
lornlynx -
Good guide. I was already at a loss of figuring out that the screws are torx, I wondered why my imbus didn't work despite fitting. Also that it's actually a sticker and under it are more screws lol
Should have also mentioned where which screws fit, one is in the middle under the sticker, and four are fixing the board.
And after you unscrewed the first seven, I suggest turning it around, otherwise you can easily loose one of the springs and also the battery hinges fall out.
Reason for repair was one of my shoulderbuttons broke. After I opened it and removed the shoulderbuttons, the other one also broke off as it was already cracked. They don't use any springs for those, just two plastic pieces and using a small plastic bridge as a spring-like. It's an obvious breakpoint that way though.
I know just superglued them back, next time they break I probably need a full part replace, but there's already a 3D-printing manual I've seen.
Too bad that the stick is soldered, mine still works but the rubber is nearly gone now
I broke the component that's below the usb connector, does anyone know how to change it? What component is?