简介
This guide shows how to remove and replace the battery for the Samsung Galaxy S20 Plus.
The battery is held in place with strong adhesive. High concentration (over 90%) isopropyl alcohol is necessary to loosen and release this adhesive.
If your battery is swollen, take appropriate precautions and do not heat your phone.
For your safety, discharge your battery below 25% before disassembling your phone. This reduces the risk of a dangerous thermal event if the battery is accidentally damaged during the repair.
You'll need replacement adhesive in order to complete this repair.
你所需要的
-
-
Heat an iOpener and apply it to the back cover's bottom edge for two minutes.
-
-
-
Apply a suction cup to the back of the phone, as close to the center of the bottom edge as possible.
-
Pull on the suction cup with strong, steady force to create a gap between the back cover and the frame.
-
Insert the point of an opening pick into the gap.
-
-
-
Apply a heated iOpener to the left edge of the back cover for two minutes.
-
-
-
Apply a suction cup to the back of the phone, as close to the center of the left edge as possible.
-
Pull on the suction cup with strong, steady force to create a gap between the back cover and the frame.
-
Insert the point of an opening pick into the gap.
-
You can try also applying a few drops of high concentration (over 90%) isopropyl alcohol into the seam to help loosen the adhesive.
-
-
-
Apply a heated iOpener to the right edge of the back cover for two minutes.
-
-
-
Apply a suction cup to the back of the phone, as close to the center of the right edge as possible.
-
Pull on the suction cup with strong, steady force to create a gap between the back cover and the frame.
-
Insert the point of an opening pick into the gap.
-
-
-
Apply a heated iOpener to the top edge of the back cover for two minutes.
-
-
-
-
Gradually slide the pick from the right edge of the device around the top right corner.
-
Continue slicing along the top edge all the way around to the left edge to fully separate the back cover adhesive.
-
-
-
Lift the back cover slowly. Use opening picks to slice any remaining adhesive.
-
Remove the back cover.
-
This is a good point to power on your phone and test all functions before sealing it up. Be sure to power your phone back down completely before you continue working.
-
Remove any adhesive chunks with a pair of tweezers or your fingers. Apply heat if you're having trouble separating the adhesive.
-
If you're using custom-cut adhesives, follow this guide.
-
If you're using double-sided tape, follow this guide.
-
-
-
Use a Phillips #00 screwdriver to remove the six 4 mm-long screws securing the motherboard bracket.
-
-
-
Use a pair of tweezers to gently pull up and unclip the motherboard bracket from the plastic midframe.
-
-
-
Use a spudger to pry up and disconnect the wireless charging coil connector.
-
-
-
Use a pair of tweezers to gently peel the wireless charging coil away from the device.
-
Remove the wireless charging coil.
-
-
-
Use a Phillips #00 screwdriver to remove the five 4 mm-long screws securing the loudspeaker and lower midframe.
-
-
-
Insert the point of a spudger or a pair of tweezers into the notch in the top left corner of the midframe and pry up to release the clips holding it in place.
-
Remove the loudspeaker and lower midframe.
-
-
-
Use a spudger to pry up and disconnect the main and auxiliary flex cables from the daughterboard near the bottom of the device.
-
-
-
Use a spudger to pry up and disconnect the main and auxiliary flex cables from the motherboard.
-
-
-
Pry up and disconnect the left 5G antenna cable from the motherboard.
-
-
-
Use a spudger to pry up and disconnect the main display flex cable from the motherboard.
-
-
-
Gently peel up and bend the display and left 5G antenna flex cables out of the way of the motherboard and battery.
-
-
-
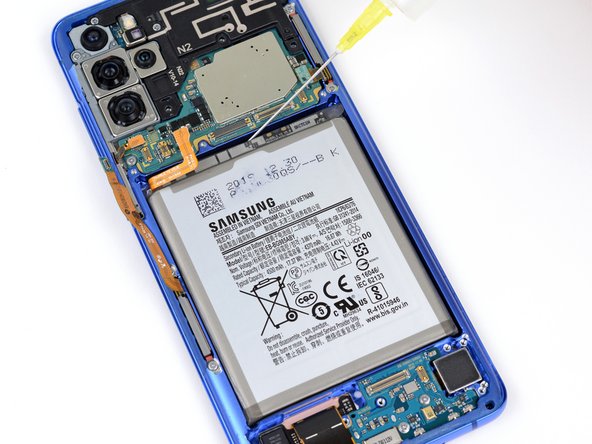
Apply high concentration (over 90%) isopropyl alcohol to the gaps in between the frame and the edges of the battery.
-
Tilt the device as you apply the alcohol help it penetrate the adhesive underneath the battery.
-
After you apply the alcohol, continue tilting the phone in all directions for two to three minutes to help the alcohol penetrate further.
-
-
-
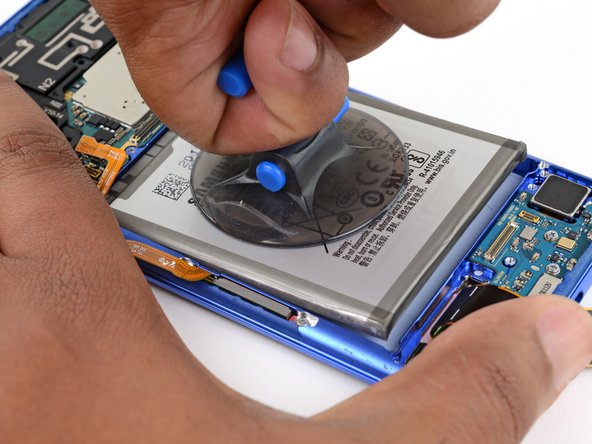
Apply a suction handle to the center of the battery.
-
Brace the top and bottom of the device against your work surface with one hand and firmly pull up on the suction handle with the other.
-
When the battery begins to lift from the device, proceed to the next step.
-
-
-
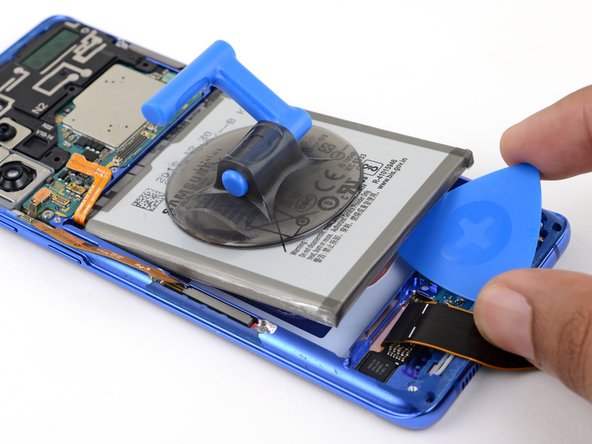
Insert an opening pick underneath the bottom edge of the battery and twist to loosen the battery adhesive.
-
-
-
Remove the battery.
-
Peel up and/or scrape away any remaining battery adhesive before cleaning the battery well surface with isopropyl alcohol and a lint free cloth.
-


Compare your new replacement part to the original part—you may need to transfer remaining components or remove adhesive backings from the new part before installing.
To reassemble your device, follow the above steps in reverse order.
Follow this guide to perform a battery cycle reset, and calibrate your newly-installed battery.
Take your e-waste to an R2 or e-Stewards certified recycler.
Repair didn’t go as planned? Check out our Answers community for troubleshooting help.
14等其他人完成本指南。

11条评论
Do you need new adhesive to glue the front and back of the phone itself back together after replacing the battery?
That is insane !!! I am replacing my Note 4 with an S20+. With the Note 4, one just opens the back, lifts the battery out and clicks in the new one. 10 seconds or less. I will NOT be trying to perform this 31 step, 30-60 minute replacement if the battery on my S20 needs replacing. Cheaper to replace the %#*@ phone. WTF were Samsung thinking???
I don't know if the overseas version is different from the Korean model I have (it's probably the same), but I've heard stories from repair shops that the liquid crystal died because they used alcohol to remove the battery. In fact, after the replacement, the liquid crystal was slowly dying and then completely dead the next day. The only thing they said to do to remove the battery was to apply a lot of heat. Other than that, the rest of the steps seem to be fine. I just changed my phone to an S21+ because the liquid crystal was expensive. I signed up to try this. I hope everyone else has no problems replacing it...(it's not hard, except for the back plate and battery removal, which is a pain).
This happened to me unfortunately
Jean m -