跳转到主内容

Samsung Galaxy Note10 Battery Replacement

你所需要的

  1. Samsung Galaxy Note10 Battery Replacement, Heat the back panel: 步骤 1 中的图像 1,1
    • Completely power off your phone before you begin disassembly.

    • Prepare an iOpener and apply it to the left edge of the back panel for one minute.

    • A hair dryer, heat gun, or hot plate may also be used, but be careful not to overheat the phone—the display and internal battery are both susceptible to heat damage.

  2. Samsung Galaxy Note10 Battery Replacement, Insert an opening pick: 步骤 2 中的图像 1,3 Samsung Galaxy Note10 Battery Replacement, Insert an opening pick: 步骤 2 中的图像 2,3 Samsung Galaxy Note10 Battery Replacement, Insert an opening pick: 步骤 2 中的图像 3,3
    • Apply a suction cup to the heated edge of the back panel, as close to the edge as possible.

    • If your back glass is badly cracked, covering it with a layer of clear packing tape may allow the suction cup to adhere. Alternatively, very strong tape may be used instead of the suction cup. If all else fails, you can superglue the suction cup to the broken panel.

    • Pull up on the suction cup with strong, steady force to create a gap between the back panel and the frame.

    • Depending on the age of your phone, this may be difficult. If you are having trouble, apply more heat to the edge and try again.

    • Insert the point of an opening pick into the gap.

  3. Samsung Galaxy Note10 Battery Replacement, Begin to slice the adhesive: 步骤 3 中的图像 1,3 Samsung Galaxy Note10 Battery Replacement, Begin to slice the adhesive: 步骤 3 中的图像 2,3 Samsung Galaxy Note10 Battery Replacement, Begin to slice the adhesive: 步骤 3 中的图像 3,3
    • Slide the opening pick along the left edge towards the bottom left corner to slice the adhesive.

    • Do not insert the opening pick more than halfway into the phone or you risk damaging internal components.

    • Leave the pick inserted in the bottom left corner to prevent the adhesive from re-sealing.

  4. Samsung Galaxy Note10 Battery Replacement, Slice the left side adhesive: 步骤 4 中的图像 1,3 Samsung Galaxy Note10 Battery Replacement, Slice the left side adhesive: 步骤 4 中的图像 2,3 Samsung Galaxy Note10 Battery Replacement, Slice the left side adhesive: 步骤 4 中的图像 3,3
    • Insert a second opening pick and slide it across the left side towards the top left corner to slice the adhesive.

    • Leave the pick inserted in the top left corner to prevent the adhesive from re-sealing.

  5. Samsung Galaxy Note10 Battery Replacement, Slice the top side adhesive: 步骤 5 中的图像 1,1
    • Prepare an iOpener and apply it to the top edge of the phone for one minute.

  6. Samsung Galaxy Note10 Battery Replacement: 步骤 6 中的图像 1,3 Samsung Galaxy Note10 Battery Replacement: 步骤 6 中的图像 2,3 Samsung Galaxy Note10 Battery Replacement: 步骤 6 中的图像 3,3
    • Insert a third opening pick into the gap on the top edge of the phone.

    • Slide the opening pick to the top right corner, slicing the adhesive.

    • Leave the pick inserted in the top right corner to prevent the adhesive from re-sealing.

  7. Samsung Galaxy Note10 Battery Replacement, Slice the right side adhesive: 步骤 7 中的图像 1,1
    • Prepare an iOpener and apply it to the right edge of the phone for one minute.

  8. Samsung Galaxy Note10 Battery Replacement: 步骤 8 中的图像 1,2 Samsung Galaxy Note10 Battery Replacement: 步骤 8 中的图像 2,2
    • Insert a fourth and final opening pick into the gap on the right side of the phone, sliding it down towards the bottom right corner of the phone to slice the adhesive.

    • The back panel will begin to separate from the phone as you get closer to the bottom edge.

    • Slide an opening pick back and forth around the entire perimeter of the phone to release any missed adhesive, reheating if you find any extra-stubborn adhesive.

  9. Samsung Galaxy Note10 Battery Replacement, Lift off the back panel: 步骤 9 中的图像 1,3 Samsung Galaxy Note10 Battery Replacement, Lift off the back panel: 步骤 9 中的图像 2,3 Samsung Galaxy Note10 Battery Replacement, Lift off the back panel: 步骤 9 中的图像 3,3
    • Lift up and remove the back panel.

  10. Samsung Galaxy Note10 Battery Replacement, Lift up the metal cover: 步骤 10 中的图像 1,1
    • Use a Phillips screwdriver to remove the five 4 mm screws securing the wireless charging coil.

  11. Samsung Galaxy Note10 Battery Replacement: 步骤 11 中的图像 1,3 Samsung Galaxy Note10 Battery Replacement: 步骤 11 中的图像 2,3 Samsung Galaxy Note10 Battery Replacement: 步骤 11 中的图像 3,3
    • Use a pair of tweezers to lift up and flip back the metal shield covering the battery connector.

  12. Samsung Galaxy Note10 Battery Replacement, Disconnect the battery: 步骤 12 中的图像 1,2 Samsung Galaxy Note10 Battery Replacement, Disconnect the battery: 步骤 12 中的图像 2,2
    • While holding the metal shield up and out of the way, use the pointed end of a spudger to pry up the battery connector to disconnect it.

  13. Samsung Galaxy Note10 Battery Replacement, Disconnect the wireless charging coil: 步骤 13 中的图像 1,2 Samsung Galaxy Note10 Battery Replacement, Disconnect the wireless charging coil: 步骤 13 中的图像 2,2
    • Use the pointed end of a spudger to disconnect the wireless charging coil connector from the motherboard.

  14. Samsung Galaxy Note10 Battery Replacement, Remove the wireless charging coil: 步骤 14 中的图像 1,3 Samsung Galaxy Note10 Battery Replacement, Remove the wireless charging coil: 步骤 14 中的图像 2,3 Samsung Galaxy Note10 Battery Replacement, Remove the wireless charging coil: 步骤 14 中的图像 3,3
    • Tilt the metal shielding up so you can grip it with your fingers.

    • Peel the wireless charging coil up and away from the device.

    • The wireless charging coil is secured to the phone with some light adhesive.

    • Remove the wireless charging coil.

  15. Samsung Galaxy Note10 Battery Replacement, Remove the loudspeaker screws: 步骤 15 中的图像 1,1
    • Use a Phillips screwdriver to remove the five 4 mm screws securing the loudspeaker.

  16. Samsung Galaxy Note10 Battery Replacement, Remove the loudspeaker: 步骤 16 中的图像 1,3 Samsung Galaxy Note10 Battery Replacement, Remove the loudspeaker: 步骤 16 中的图像 2,3 Samsung Galaxy Note10 Battery Replacement, Remove the loudspeaker: 步骤 16 中的图像 3,3
    • Use a pair of tweezers to remove the loudspeaker.

  17. Samsung Galaxy Note10 Battery Replacement, Remove the interconnect cables: 步骤 17 中的图像 1,3 Samsung Galaxy Note10 Battery Replacement, Remove the interconnect cables: 步骤 17 中的图像 2,3 Samsung Galaxy Note10 Battery Replacement, Remove the interconnect cables: 步骤 17 中的图像 3,3
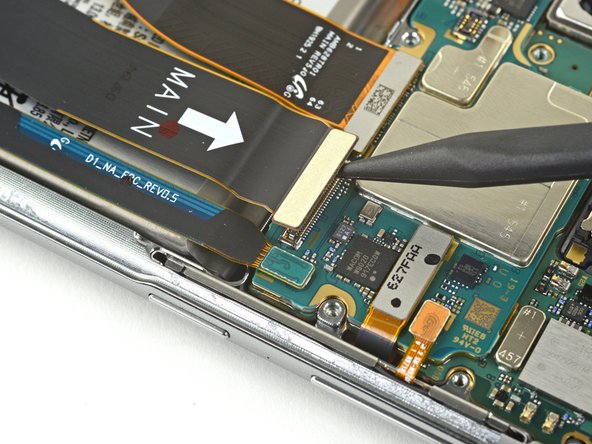
    • Use the pointed end of a spudger to disconnect the main interconnect cable from the motherboard.

    • Disconnect the secondary interconnect cable from the motherboard.

  18. Samsung Galaxy Note10 Battery Replacement: 步骤 18 中的图像 1,3 Samsung Galaxy Note10 Battery Replacement: 步骤 18 中的图像 2,3 Samsung Galaxy Note10 Battery Replacement: 步骤 18 中的图像 3,3
    • Use the pointed end of a spudger to disconnect the main interconnect cable from the daughterboard.

    • Disconnect the secondary interconnect cable from the daughterboard.

  19. Samsung Galaxy Note10 Battery Replacement: 步骤 19 中的图像 1,2 Samsung Galaxy Note10 Battery Replacement: 步骤 19 中的图像 2,2
    • Remove both interconnect cables.

  20. Samsung Galaxy Note10 Battery Replacement, Disconnect the display cable: 步骤 20 中的图像 1,2 Samsung Galaxy Note10 Battery Replacement, Disconnect the display cable: 步骤 20 中的图像 2,2
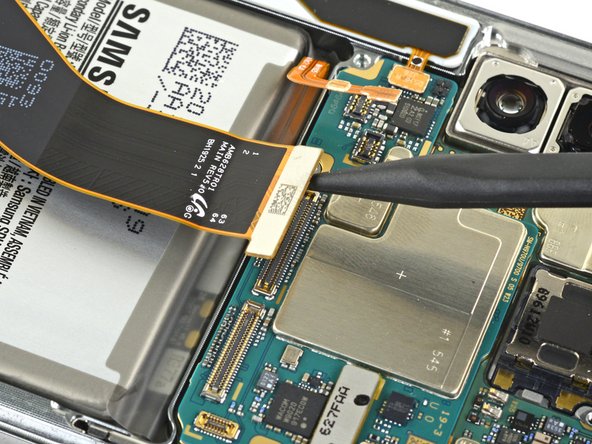
    • Use the pointed end of a spudger to disconnect the display cable connector from the motherboard.

  21. Samsung Galaxy Note10 Battery Replacement, Loosen the battery adhesive: 步骤 21 中的图像 1,2 Samsung Galaxy Note10 Battery Replacement, Loosen the battery adhesive: 步骤 21 中的图像 2,2
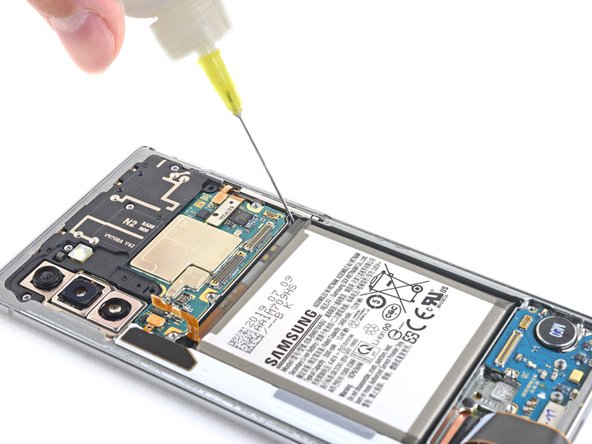
    • Apply a few drops of high concentration (90% or greater) isopropyl alcohol underneath the battery at the tear-shaped indents near the corners of the battery well.

    • Wait about two minutes for the isopropyl alcohol to penetrate and weaken the battery adhesive before you proceed to the next step.

  22. Samsung Galaxy Note10 Battery Replacement, Remove the battery: 步骤 22 中的图像 1,3 Samsung Galaxy Note10 Battery Replacement, Remove the battery: 步骤 22 中的图像 2,3 Samsung Galaxy Note10 Battery Replacement, Remove the battery: 步骤 22 中的图像 3,3
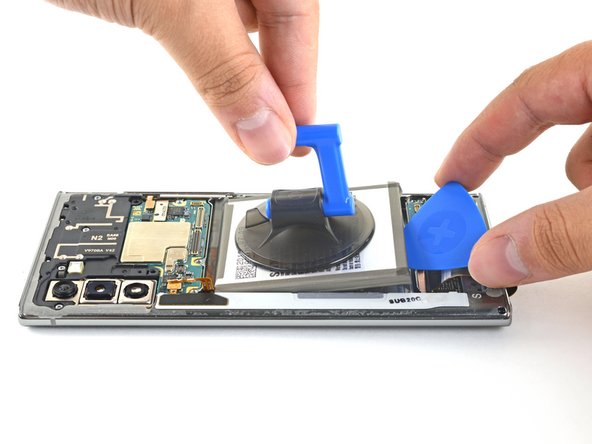
    • Apply a suction cup to the back of the battery.

    • Pull up on the suction cup with strong, steady force to begin to separate the battery from the frame.

    • If this is difficult, apply a few more drops of isopropyl alcohol underneath the battery, let it sit for two minutes, and try again.

    • Insert the point of an opening pick into the gap created between the battery and frame.

    • Don't insert the opening pick more than halfway or you risk damaging the fingerprint sensor underneath.

    • Pull up on the suction cup to remove the battery.

    • The battery will come out without much force once the isopropyl alcohol has adequately penetrated the battery adhesive.

    • When you're reassembling your phone, apply stretch release adhesive strips, double sided adhesive tape, or pre-cut adhesive to secure the new battery.

结论

For optimal performance, calibrate your newly installed battery after completing this guide.

Compare your new replacement part to the original part—you may need to transfer remaining components or remove adhesive backings from the new part before installing.

To reassemble your device, follow the above steps in reverse order.

Take your e-waste to an R2 or e-Stewards certified recycler.

Repair didn’t go as planned? Try some basic troubleshooting, or ask our Answers community for help.

13等其他人完成本指南。

Carsten Frauenheim

于03/10/20注册

113,751 声望

创作了338篇指南

团队

iFixit iFixit 的会员

Staff

135 名成员

创作了16,820篇指南

5条评论

Is N10+ (4g) identical in battery and steps to change?

Robert F - 回复

Here is the Galaxy Note 10+ battery replacement guide!

Carsten Frauenheim -

I just wanted to add that after swapping in the new battery, apparently the only way to reset the battery cycle count is by rooting the phone. There doesn't seem to be any way to get the phone to recognize the new battery as new, otherwise.

transam grrl - 回复

Are you sure about that? I mean, can't just we use the classic calibration with Samsung ?

Federico -

Good instructions. Per iFixit, I am supposed to do "Battery Calibration" which consists of charging and keeping on charger for +2 hours, then using it until it dies, then recharging to 100%. Simple.

Apparently, I messed up the fingerprint sensor because it wouldn't work, but the phone was working great. Chaulk that up to learning experience. Was looking for a reason to upgrade anyway.

I set it up to play YouTube shorts, which loop until the phone dies. The phone dies while I'm asleep. I wake up. I plug it in. NOTHING. I flip the charger. NOTHING. I try a different charger. NOTHING. GREAT.

I swap back to my old battery in hopes I got a bad NEW battery. Get that all swapped and still nothing, but SOMETHING. It vibes when I plug it in but the screen is totally black. Try soft reset. Try reversing through all the steps to see if I forgot a cable or had one unseated. No problems at all.

Something happened to the SCREEN when the BATTERY DIED during recalibration. PROCEED WITH CAUTION

Roy Cohee - 回复

添加评论

浏览统计数据:

过去 24 小时: 34

过去 7 天: 292

过去 30 天: 1,345

总计 45,047