跳转到主内容

当前版本的文档还未经巡查,您可以查看最新的已查核版本

你所需要的

  1. , 禁用自动重启: 步骤 1 中的图像 1,3 , 禁用自动重启: 步骤 1 中的图像 2,3 , 禁用自动重启: 步骤 1 中的图像 3,3
    • 在开始此步骤之前,你必须禁用 Mac 的自动重启功能。自动重启功能会让 MacBook 在掀开盖子时自动开机。这个功能在拆卸过程中也可能会被意外触发。使用本指南或按照下面的简要说明来禁用自动启动。这项指令可能并不适用于所有 Mac。

    • 开机,并打开终端

    • 将以下命令复制粘贴到(或完全键入)终端窗口中:

    • sudo nvram AutoBoot=%00

    • [回车]。如果出现钥匙提示,请输入管理员密码(开机密码)并再次按[回车]。注意:您的回车键也可能标有「⏎」或 return

    • 你现在可以安全地关闭Mac电脑,并打开底壳,它不会再意外启动了。

    • 当修理完成、成功组装复原Mac电脑后,在「终端」中使用以下命令来启用「自动启动」功能:

    • sudo nvram AutoBoot=%03

  2. , 松开底壳: 步骤 2 中的图像 1,1
    在这个步骤中使用的工具:
    Magnetic Project Mat
    $19.95
    购买
    • 在开始之前,请拔掉电源并关闭您的MacBook。关闭显示屏,并将其置于柔软的表面上,屏幕朝下。

    • 拆除八颗固定底壳的螺丝:

    • 两颗1.8毫米P5五星形螺丝

    • 四颗2.9毫米P5五星形螺丝

    • 两颗6.1毫米P5五星形螺丝

    • 注意在拆卸螺丝时的方向——重新安装时需要将其稍微倾斜。

    • 在整个修理过程中, 请保管好每一个螺丝 ,并确保将其准确地放回原位,以避免损坏您的设备。

  3. : 步骤 3 中的图像 1,3 : 步骤 3 中的图像 2,3 : 步骤 3 中的图像 3,3
    • 将你的手指从MacBook的铰链后部开始,插入上壳和下壳之间。

    • 只轻微地抬起下壳,以避免损坏连接下壳和上壳的电缆。

    • 紧紧握住,稳定地提起,直到下壳与上壳略微分离。

    • 在抬起下壳时,你可能会遇到很大的阻力。如有必要,可以沿着下壳的侧边滑动一个开启工具或其他防静电撬棒,以弹开两个隐藏的保持夹。

    • 在重新组装时,为了重新固定夹子,需要在下壳的两侧边缘(靠近第三张图片中插入撬棒的地方)用力按压,直到听到夹子咔嗒一声卡入位。

  4. : 步骤 4 中的图像 1,1
    • 在固定住下壳的同时,小心地将MacBook翻转过来,使苹果标志朝上。

  5. : 步骤 5 中的图像 1,2 : 步骤 5 中的图像 2,2
    • 从正面将上壳和显示屏一起抬起,将其提升到大约45度。

    • 将MacBook撑开保持在这个位置,以便进行下一步。

  6. : 步骤 6 中的图像 1,3 : 步骤 6 中的图像 2,3 : 步骤 6 中的图像 3,3
    • 使用撬棒的平头端,保持按压金色的“battery disconnect”按钮,不要松开。

    • 如果电源灯亮了,则继续按压该按钮,直到电源灯熄灭即可松开。整个过程最多可能需要10秒钟。

    • 如果电源灯一直没有亮,则在按压该按钮的5-10秒后松开。重复3次该操作。

    • 这一步是为了确保Macbook彻底断电以便进行后续操作。

  7. : 步骤 7 中的图像 1,1
    • 合上Macbook,然后小心的翻到底面

  8. : 步骤 8 中的图像 1,1
    • 从正面抬起底壳至大约45度的位置。

    • 小心不要扯掉连接在底壳的排线。

  9. : 步骤 9 中的图像 1,2 : 步骤 9 中的图像 2,2
    • 用镊子掀开覆盖在触控板ZIF接口处的胶布。

  10. : 步骤 10 中的图像 1,3 : 步骤 10 中的图像 2,3 : 步骤 10 中的图像 3,3
    • 用撬棒小心的把ZIF接口处的排线固定锁向上掀起。

  11. : 步骤 11 中的图像 1,2 : 步骤 11 中的图像 2,2
    • 小心的,慢慢的把排线向后拉出来。

  12. : 步骤 12 中的图像 1,3 : 步骤 12 中的图像 2,3 : 步骤 12 中的图像 3,3
    • 小心合上Macbook,然后苹果logo朝上地翻回来。

    • 从正面,连同屏幕和上壳一起,翻起至90度。找个结实的东西挨住,不然你的手要一直扶着。

    • 最好用胶纸在触控板位置将其与后面的支撑物固定住。

    • 非常不建议你把整个屏幕和上壳翻开至平放的状态,这样排线会很容易损坏。

  13. : 步骤 13 中的图像 1,1
    • 拆除固定电池连接器和主板的唯一一颗2.9毫米T5 Torx螺丝。

  14. : 步骤 14 中的图像 1,2 : 步骤 14 中的图像 2,2
    在这个步骤中使用的工具:
    Battery Blocker
    $3.99
    购买
    • 作为额外的预防措施,你可以通过在主板和电池接口之间插入一块 电池隔离工具来物理断开电池的连接。

  15. 这个步骤还没有翻译 帮忙翻译一下

    : 步骤 15 中的图像 1,1
    • Remove the two screws securing the USB-C port cable bracket:

    • 1.1 mm Phillips #00 screw

    • Some variations of this model may use a Tri-point Y00 screw.

    • 3.5 mm T5 Torx screw

  16. 这个步骤还没有翻译 帮忙翻译一下

    : 步骤 16 中的图像 1,2 : 步骤 16 中的图像 2,2
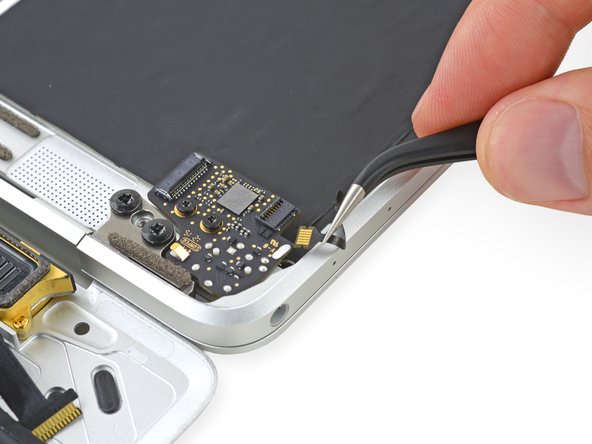
    • Use the flat end of a spudger to disconnect the USB-C port cable bracket by prying it straight up from the logic board.

    • To reconnect this cable, first line up the metal bracket over the screw holes, then press down on the middle of the bracket. Make sure it's aligned correctly, or you may damage the connector.

  17. 这个步骤还没有翻译 帮忙翻译一下

    : 步骤 17 中的图像 1,2 : 步骤 17 中的图像 2,2
    • Use a spudger to flip open the retaining flap on the audio jack board cable ZIF connector.

  18. 这个步骤还没有翻译 帮忙翻译一下

    : 步骤 18 中的图像 1,2 : 步骤 18 中的图像 2,2
    • Disconnect the audio jack board ribbon cable by pulling it straight back out of the ZIF connector.

    • During reassembly, orient the ribbon cable so the white stripe faces you. Insert the cable until the white line disappears under the socket.

    • At this point it is possible to open the macbook all the way and to lay it flat on a table without causing any damage to the flex cables.

  19. 这个步骤还没有翻译 帮忙翻译一下

    : 步骤 19 中的图像 1,2 : 步骤 19 中的图像 2,2
    • Use tweezers to peel back the tape covering the display cable connector.

  20. 这个步骤还没有翻译 帮忙翻译一下

    : 步骤 20 中的图像 1,2 : 步骤 20 中的图像 2,2
    • It's possible the metal retaining flap on the display cable connector may flip open, remaining stuck to the tape.

    • If so, use the flat end of a spudger to hold down the retaining flap while peeling the tape away with the tweezers.

  21. 这个步骤还没有翻译 帮忙翻译一下

    : 步骤 21 中的图像 1,1
    • Use the flat end of a spudger to flip open the retaining flap on the display cable connector.

    • Try to keep it clear of the tape, or it may re-adhere and make cable removal difficult.

  22. 这个步骤还没有翻译 帮忙翻译一下

    : 步骤 22 中的图像 1,3 : 步骤 22 中的图像 2,3 : 步骤 22 中的图像 3,3
    在这个步骤中使用的工具:
    iOpener
    $12.99
    购买
    • Carefully slide the flat end of a spudger underneath the display cable to separate the adhesive holding it to the lower case.

    • Take care not to damage the cable. If the adhesive is very strong, heat the case directly beneath the cable with an iOpener to soften the adhesive, and then try again.

  23. 这个步骤还没有翻译 帮忙翻译一下

    : 步骤 23 中的图像 1,3 : 步骤 23 中的图像 2,3 : 步骤 23 中的图像 3,3
    • Hold the retaining flap open.

    • Disconnect the display cable by gently pulling it straight out of its connector.

    • Immediately close the retaining flap. Keep it closed throughout your repair.

    • During reassembly, keep the flap closed while you insert the display cable. Remember to orient the cable so its gold contacts face down, making sure not to crimp or fold it—it'll click into place when it's connected.

  24. 这个步骤还没有翻译 帮忙翻译一下

    : 步骤 24 中的图像 1,1
    • Separate the upper case assembly from the lower case assembly.

  25. 这个步骤还没有翻译 帮忙翻译一下

    : 步骤 25 中的图像 1,2 : 步骤 25 中的图像 2,2
    • Use a spudger to flip open the ZIF connector retaining flap for the dual microphone assembly ribbon cable.

  26. 这个步骤还没有翻译 帮忙翻译一下

    : 步骤 26 中的图像 1,2 : 步骤 26 中的图像 2,2
    • Disconnect the microphone assembly ribbon cable by pulling it straight out of its connector.

  27. 这个步骤还没有翻译 帮忙翻译一下

    : 步骤 27 中的图像 1,1
    • Remove the two 3.2 mm T5 Torx screws securing the audio jack board to the case.

  28. 这个步骤还没有翻译 帮忙翻译一下

    : 步骤 28 中的图像 1,1
    • Remove the audio jack board.

  29. 这个步骤还没有翻译 帮忙翻译一下

    : 步骤 29 中的图像 1,1
    • Remove two 2.5 mm Phillips #00 screws securing the USB-C port.

  30. 这个步骤还没有翻译 帮忙翻译一下

    : 步骤 30 中的图像 1,3 : 步骤 30 中的图像 2,3 : 步骤 30 中的图像 3,3
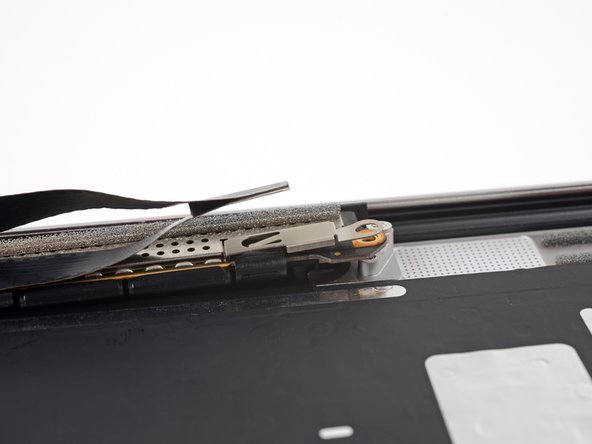
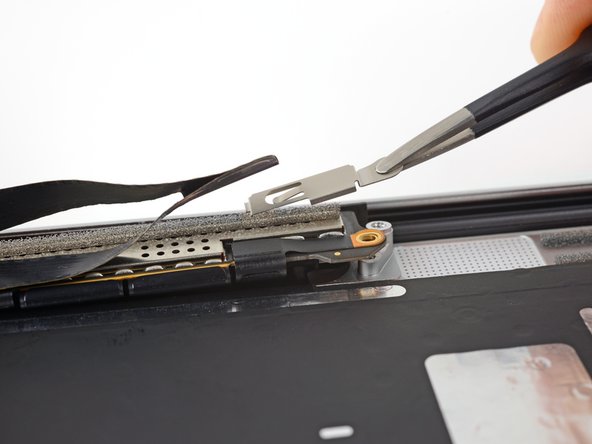
    • Use tweezers to lift the USB-C port just over the hinge screws.

    • Slide the port out and up over the display hinge to remove it.

    • There's very little clearance when removing and installing the USB-C port. If there's not enough room, don't force it. Try removing the display hinge screws and moving the hinges for additional clearance, if necessary.

  31. 这个步骤还没有翻译 帮忙翻译一下

    : 步骤 31 中的图像 1,3 : 步骤 31 中的图像 2,3 : 步骤 31 中的图像 3,3
    • Remove the two 3.3 mm T5 Torx screws securing the display cable assembly.

    • Take care not to lose the small retaining bracket located under the right screw. If it comes loose, note the orientation shown here for reassembly. The small tab on the outer left edge should be hooked under the perforated metal shield.

  32. 这个步骤还没有翻译 帮忙翻译一下

    : 步骤 32 中的图像 1,1
    • Fully open the display.

    • Set the MacBook down on its right edge with the display facing away from you, as shown.

  33. 这个步骤还没有翻译 帮忙翻译一下

    : 步骤 33 中的图像 1,2 : 步骤 33 中的图像 2,2
    • Remove the four 4.8 mm T8 Torx screws securing the display hinges.

    • There may be a rubber cover on the hinge screws. Remove this before removing the screws and replace it during reassembly.

  34. 这个步骤还没有翻译 帮忙翻译一下

    : 步骤 34 中的图像 1,3 : 步骤 34 中的图像 2,3 : 步骤 34 中的图像 3,3
    • Holding the display assembly with one hand and the upper case with the other, push them together slightly to move the hinges out of their recesses in the the upper case.

    • There are only a few millimeters of play between the hinges and the case, so you won't need to push far.

    • Push the upper case forward while pulling back gently on the display.

    • Once the two display hinges have cleared the upper case, remove the display and set it aside.

终点

16等其他人完成本指南。

Tobias Isakeit

于03/31/14注册

117,726 声望

创作了188篇指南

团队

Master Techs Master Techs 的会员

Community

322 名成员

创作了2,539篇指南

4条评论

Does anyone know the cross year compatibility of these screens. Some vendors list them as 2017 specific, some as 2016-17 and some as 2015-17?

andrew - 回复

I have a 2017 macbook upgraded to i7 etc and i love it, today i fitted an adhesive cover top and bottom but tried to trim excess where I hadn’t done a good fit with a craft knife AND I appear to have sliced into a cable joining top to bottom, it appears to be 1 of 4 around the centre of the mac, been quoted £600 to replace complete top ,is this necessary? , all advice gratefully appreciated.

guerdeval - 回复

This doesn't seem to be the 2017 a1708 model.

Ricardo Varela - 回复

No, it's the 12" MacBook, A1534. The A1708 is the 13" MacBook Pro.

rogerh -

添加评论

浏览统计数据:

过去 24 小时: 9

过去 7 天: 75

过去 30 天: 289

总计 23,389