跳转到主内容

OnePlus 9 5G Daughterboard Replacement

你所需要的

  1. OnePlus 9 5G Daughterboard Replacement, Eject the SIM card tray: 步骤 1 中的图像 1,3 OnePlus 9 5G Daughterboard Replacement, Eject the SIM card tray: 步骤 1 中的图像 2,3 OnePlus 9 5G Daughterboard Replacement, Eject the SIM card tray: 步骤 1 中的图像 3,3
    • Insert a SIM eject tool, bit, or straightened paper clip into the SIM card tray hole on the bottom edge of the phone.

    • Press firmly to eject the tray.

  2. OnePlus 9 5G Daughterboard Replacement, Remove the SIM card tray: 步骤 2 中的图像 1,2 OnePlus 9 5G Daughterboard Replacement, Remove the SIM card tray: 步骤 2 中的图像 2,2
    • Remove the SIM card tray from the phone.

    • When reinserting the SIM card, make sure it's in the proper orientation inside the tray.

    • A thin rubber gasket around the SIM tray provides water and dust protection. If this gasket is damaged or missing, replace the gasket or the entire SIM tray to protect your phone's internal components.

  3. OnePlus 9 5G Daughterboard Replacement, Loosen the rear glass: 步骤 3 中的图像 1,1
    • Completely power off your phone before you begin.

    • Prepare an iOpener and apply it to the rear glass for at least three minutes to loosen the adhesive underneath.

    • A hair dryer, heat gun, or hot plate may also be used, but be careful not to overheat the phone—the display and internal battery are both susceptible to heat damage.

  4. OnePlus 9 5G Daughterboard Replacement, Insert an opening pick: 步骤 4 中的图像 1,3 OnePlus 9 5G Daughterboard Replacement, Insert an opening pick: 步骤 4 中的图像 2,3 OnePlus 9 5G Daughterboard Replacement, Insert an opening pick: 步骤 4 中的图像 3,3
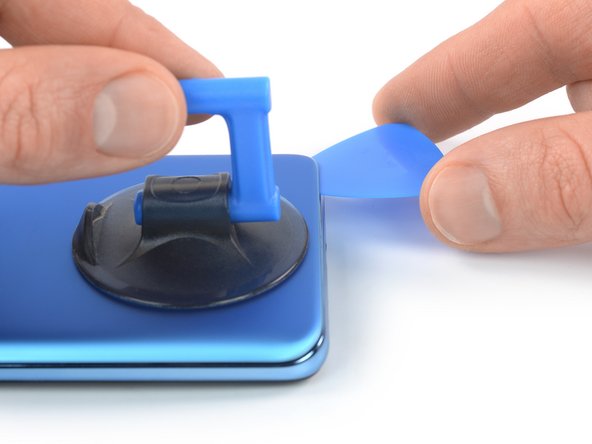
    • Apply a suction handle to the rear glass, as close to the bottom edge as possible.

    • If your rear glass is badly cracked, covering it with a layer of clear packing tape may allow the suction handle to adhere. Alternatively, very strong tape may be used instead of the suction handle. If all else fails, you can superglue the suction handle to the broken rear glass.

    • Pull up on the suction handle with strong, steady force to create a gap between the glass and the frame.

    • If you have trouble creating a gap, apply more heat to further soften the adhesive.

    • Insert an opening pick into the gap.

  5. OnePlus 9 5G Daughterboard Replacement, Slice the bottom edge adhesive: 步骤 5 中的图像 1,2 OnePlus 9 5G Daughterboard Replacement, Slice the bottom edge adhesive: 步骤 5 中的图像 2,2
    • Slide the opening pick to the bottom right corner to slice the adhesive.

    • Leave the opening pick in place to prevent the adhesive from resealing.

  6. OnePlus 9 5G Daughterboard Replacement, Insert a second opening pick: 步骤 6 中的图像 1,2 OnePlus 9 5G Daughterboard Replacement, Insert a second opening pick: 步骤 6 中的图像 2,2
    • Insert a second opening pick underneath the bottom edge of the rear glass.

    • Slide the opening pick to the bottom left corner to slice the adhesive.

    • Leave the opening picks in place to prevent the adhesive from resealing.

  7. OnePlus 9 5G Daughterboard Replacement, Slice the left edge adhesive: 步骤 7 中的图像 1,3 OnePlus 9 5G Daughterboard Replacement, Slice the left edge adhesive: 步骤 7 中的图像 2,3 OnePlus 9 5G Daughterboard Replacement, Slice the left edge adhesive: 步骤 7 中的图像 3,3
    • If the adhesive becomes hard to cut, it has most likely cooled down. Use your iOpener to reheat it.

    • Insert a third opening pick underneath the bottom left corner of the rear glass.

    • Slide the opening pick along the left edge of your phone to slice the adhesive.

    • Leave the opening pick in the top left corner to prevent the adhesive from resealing.

  8. OnePlus 9 5G Daughterboard Replacement, Slice the top edge adhesive: 步骤 8 中的图像 1,2 OnePlus 9 5G Daughterboard Replacement, Slice the top edge adhesive: 步骤 8 中的图像 2,2
    • Insert a fourth opening pick underneath the top left corner of the rear glass.

    • Slide the opening pick along the top edge to slice the adhesive.

    • Leave the opening pick in the top right corner to prevent the adhesive from resealing.

  9. OnePlus 9 5G Daughterboard Replacement, Slice the right edge adhesive: 步骤 9 中的图像 1,2 OnePlus 9 5G Daughterboard Replacement, Slice the right edge adhesive: 步骤 9 中的图像 2,2
    • Insert a fifth and final opening pick underneath the top right corner of the rear glass.

    • Slide the opening pick along the right edge of the back cover to slice the remaining adhesive.

  10. OnePlus 9 5G Daughterboard Replacement, Remove the rear glass: 步骤 10 中的图像 1,2 OnePlus 9 5G Daughterboard Replacement, Remove the rear glass: 步骤 10 中的图像 2,2
    • Remove the rear glass.

    • If the rear glass is still stuck to the frame, slide an opening pick around the entire perimeter until the rear glass separates completely.

    • During reassembly secure the rear glass with pre-cut adhesive or double-sided adhesive tape. After installing the rear glass, apply strong, steady pressure to your phone for several minutes to help the adhesive form a good bond—a stack of heavy books works well.

  11. OnePlus 9 5G Daughterboard Replacement, Peel off the tape: 步骤 11 中的图像 1,3 OnePlus 9 5G Daughterboard Replacement, Peel off the tape: 步骤 11 中的图像 2,3 OnePlus 9 5G Daughterboard Replacement, Peel off the tape: 步骤 11 中的图像 3,3
    • Use a pair of tweezers to carefully peel the bottom right corner of the charging coil tape off of the daughterboard cover.

  12. OnePlus 9 5G Daughterboard Replacement: 步骤 12 中的图像 1,2 OnePlus 9 5G Daughterboard Replacement: 步骤 12 中的图像 2,2
    • Use a pair of tweezers to carefully peel the bottom left corner of the charging coil tape off of the loudspeaker.

  13. OnePlus 9 5G Daughterboard Replacement, Pry up the flash assembly: 步骤 13 中的图像 1,2 OnePlus 9 5G Daughterboard Replacement, Pry up the flash assembly: 步骤 13 中的图像 2,2
    • The flash assembly is held in place by mild adhesive and covers a motherboard cover screw.

    • Carefully slide an opening pick underneath the bottom edge of the flash assembly.

    • Use your opening pick to pry up the flash assembly.

    • Don't try to remove the flash assembly all the way during this procedure. Its cable is adhered to the backside of the motherboard cover.

  14. OnePlus 9 5G Daughterboard Replacement, Unfasten the motherboard cover: 步骤 14 中的图像 1,1
    • Use a Phillips screwdriver to remove the ten 3.8 mm-long screws securing the motherboard cover.

    • One of the motherboard cover screws is covered by a white water ingress sticker. To unfasten the screw you can puncture the sticker with your screwdriver.

  15. OnePlus 9 5G Daughterboard Replacement, Pry up the motherboard cover: 步骤 15 中的图像 1,2 OnePlus 9 5G Daughterboard Replacement, Pry up the motherboard cover: 步骤 15 中的图像 2,2
    • The motherboard cover is further held in place by tight plastic clips.

    • Insert a spudger underneath the bottom right edge of the motherboard cover.

    • Pry upwards to loosen the motherboard cover and create a gap.

  16. OnePlus 9 5G Daughterboard Replacement: 步骤 16 中的图像 1,3 OnePlus 9 5G Daughterboard Replacement: 步骤 16 中的图像 2,3 OnePlus 9 5G Daughterboard Replacement: 步骤 16 中的图像 3,3
    • Insert an opening pick underneath the bottom right edge of the motherboard cover.

    • Slide the opening pick up along the right edge of the motherboard cover.

    • Twist the opening pick to release the plastic clips and pry up the motherboard cover.

  17. OnePlus 9 5G Daughterboard Replacement, Remove the motherboard cover: 步骤 17 中的图像 1,2 OnePlus 9 5G Daughterboard Replacement, Remove the motherboard cover: 步骤 17 中的图像 2,2
    • Use a pair of tweezers or your fingers to remove the motherboard cover.

    • The charging coil is attached to the motherboard cover and will lift up at the same time.

  18. OnePlus 9 5G Daughterboard Replacement, Disconnect the battery cable: 步骤 18 中的图像 1,2 OnePlus 9 5G Daughterboard Replacement, Disconnect the battery cable: 步骤 18 中的图像 2,2
    • Use a spudger to disconnect the battery cable by prying the connector straight up from its socket on the bottom left corner of the motherboard.

    • To re-attach press connectors like this one, carefully align and press down on one side until it clicks into place, then repeat on the other side. Do not press down on the middle. If the connector is misaligned, the pins can bend and cause permanent damage.

  19. OnePlus 9 5G Daughterboard Replacement, Unfasten the daughterboard cover: 步骤 19 中的图像 1,1
    • Use a Phillips screwdriver to remove the five 3.8 mm-long screws securing the daugtherboard cover.

    • One of the daughterboard cover screws is covered by a white water ingress sticker. To unfasten the screw you can puncture the sticker with your screwdriver.

  20. OnePlus 9 5G Daughterboard Replacement, Pry up the daughterboard cover: 步骤 20 中的图像 1,2 OnePlus 9 5G Daughterboard Replacement, Pry up the daughterboard cover: 步骤 20 中的图像 2,2
    • Insert the point of a spudger underneath the top right edge of the daughterboard cover.

    • Pry upwards to loosen the daughterboard cover.

  21. OnePlus 9 5G Daughterboard Replacement, Remove the daughterboard cover: 步骤 21 中的图像 1,2 OnePlus 9 5G Daughterboard Replacement, Remove the daughterboard cover: 步骤 21 中的图像 2,2
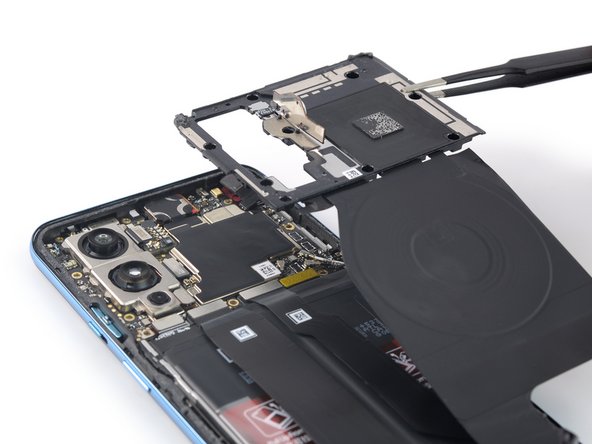
    • Use a pair of tweezers or your fingers to remove the daughterboard cover.

  22. OnePlus 9 5G Daughterboard Replacement, Disconnect the interconnect cable: 步骤 22 中的图像 1,2 OnePlus 9 5G Daughterboard Replacement, Disconnect the interconnect cable: 步骤 22 中的图像 2,2
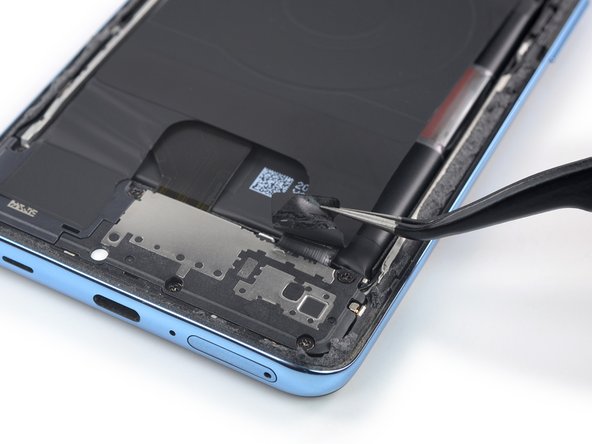
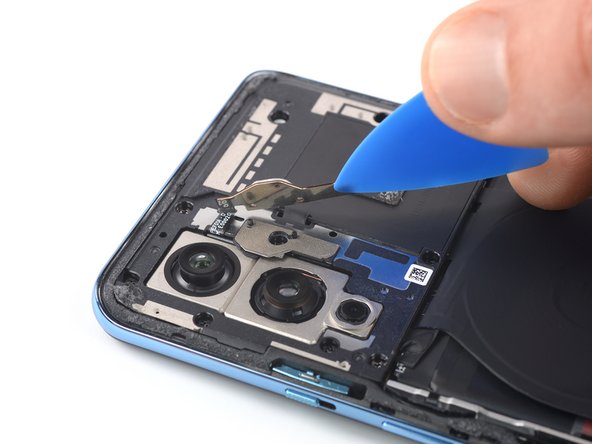
    • Use a spudger to disconnect the interconnect cable from the motherboard by prying the connector straight up from its socket.

  23. OnePlus 9 5G Daughterboard Replacement, Remove the metal bracket: 步骤 23 中的图像 1,3 OnePlus 9 5G Daughterboard Replacement, Remove the metal bracket: 步骤 23 中的图像 2,3 OnePlus 9 5G Daughterboard Replacement, Remove the metal bracket: 步骤 23 中的图像 3,3
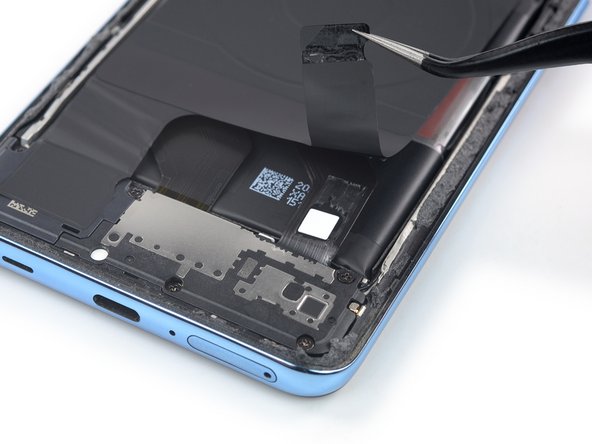
    • Slide one arm of a pair of tweezers underneath the metal bracket covering the interconnect cable.

    • Use your tweezers to lift and unhinge the metal bracket.

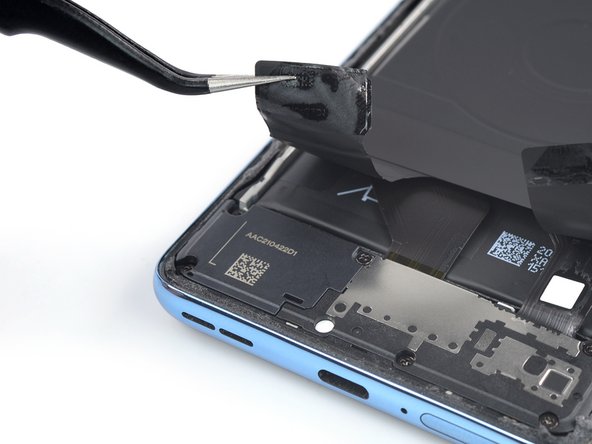
    • Remove the metal bracket.

  24. OnePlus 9 5G Daughterboard Replacement, Disconnect the interconnect cable: 步骤 24 中的图像 1,2 OnePlus 9 5G Daughterboard Replacement, Disconnect the interconnect cable: 步骤 24 中的图像 2,2
    • Use a spudger to disconnect the interconnect cable from the daughterboard by prying the connector straight up from its socket.

  25. OnePlus 9 5G Daughterboard Replacement, Remove the interconnect cable: 步骤 25 中的图像 1,1
    • Use a pair of tweezers or your fingers to remove the interconnect cable.

  26. OnePlus 9 5G Daughterboard Replacement, Disconnect the antenna board and fingerprint cables: 步骤 26 中的图像 1,3 OnePlus 9 5G Daughterboard Replacement, Disconnect the antenna board and fingerprint cables: 步骤 26 中的图像 2,3 OnePlus 9 5G Daughterboard Replacement, Disconnect the antenna board and fingerprint cables: 步骤 26 中的图像 3,3
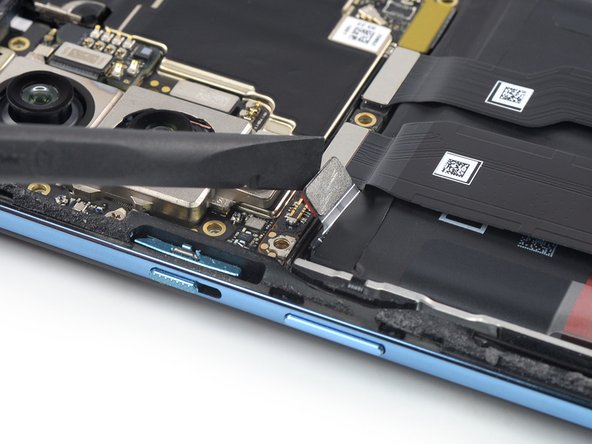
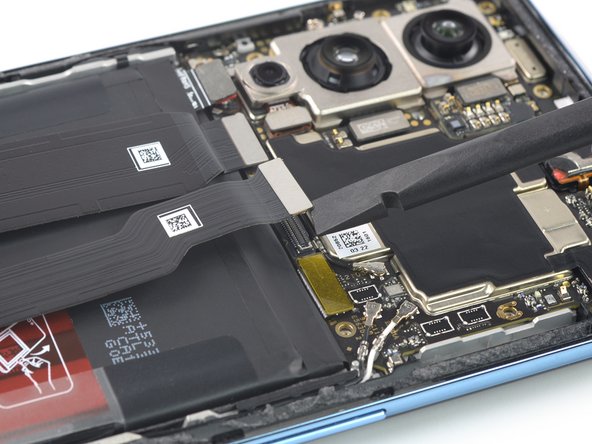
    • Use a spudger to disconnect the antenna board cable and the fingerprints sensor from the daughterboard by prying the connectors straight up from their sockets.

  27. OnePlus 9 5G Daughterboard Replacement, Disconnect the black coaxial cable: 步骤 27 中的图像 1,3 OnePlus 9 5G Daughterboard Replacement, Disconnect the black coaxial cable: 步骤 27 中的图像 2,3 OnePlus 9 5G Daughterboard Replacement, Disconnect the black coaxial cable: 步骤 27 中的图像 3,3
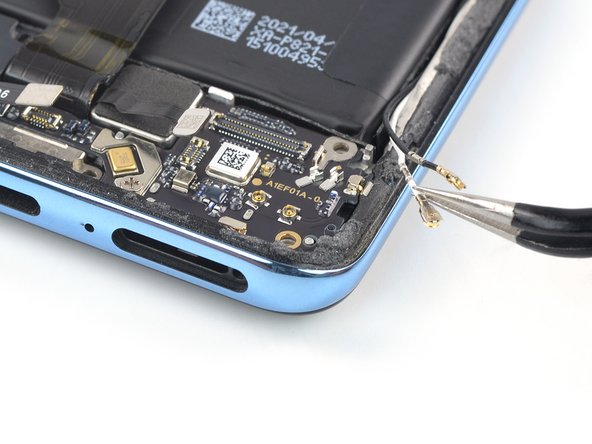
    • Slide one arm of a pair of tweezers under the black antenna cable until it‘s snug against the metal connector.

    • Disconnect the antenna cable by prying the connector straight up from the daughterboard.

  28. OnePlus 9 5G Daughterboard Replacement, Disconnect the white coaxial cable: 步骤 28 中的图像 1,3 OnePlus 9 5G Daughterboard Replacement, Disconnect the white coaxial cable: 步骤 28 中的图像 2,3 OnePlus 9 5G Daughterboard Replacement, Disconnect the white coaxial cable: 步骤 28 中的图像 3,3
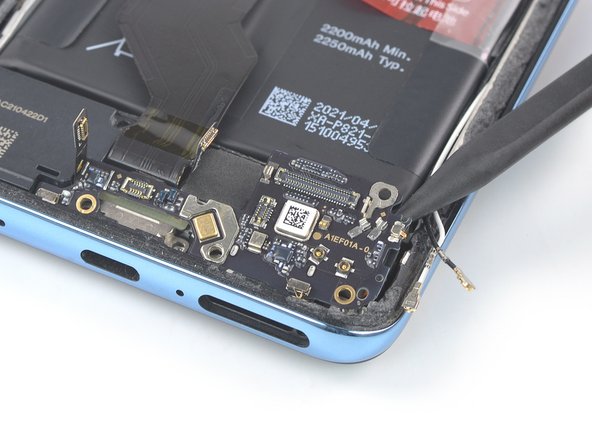
    • Slide one arm of a pair of tweezers under the white antenna cable until it‘s snug against the metal connector.

    • Disconnect the antenna cable by prying the connector straight up from the daughterboard.

  29. OnePlus 9 5G Daughterboard Replacement, Unfasten the daughterboard: 步骤 29 中的图像 1,1
    • Use a Phillips driver to remove the 2.8 mm-long screw securing the daughterboard.

  30. OnePlus 9 5G Daughterboard Replacement, Pry up the daughterboard: 步骤 30 中的图像 1,2 OnePlus 9 5G Daughterboard Replacement, Pry up the daughterboard: 步骤 30 中的图像 2,2
    • Insert the point of a spudger underneath the top right corner of the daughterboard.

    • Pry upwards to loosen the daughterboard.

  31. OnePlus 9 5G Daughterboard Replacement, Remove the daughterboard: 步骤 31 中的图像 1,2 OnePlus 9 5G Daughterboard Replacement, Remove the daughterboard: 步骤 31 中的图像 2,2
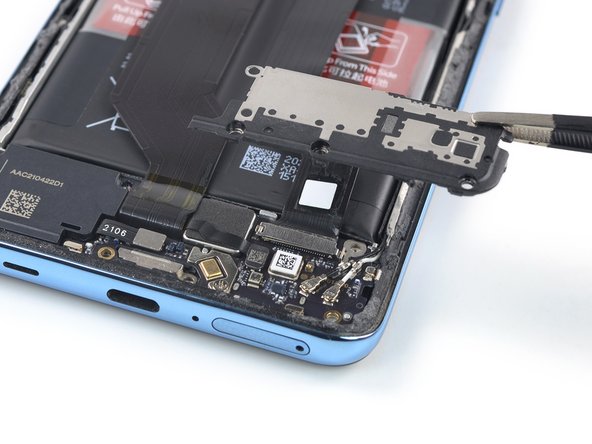
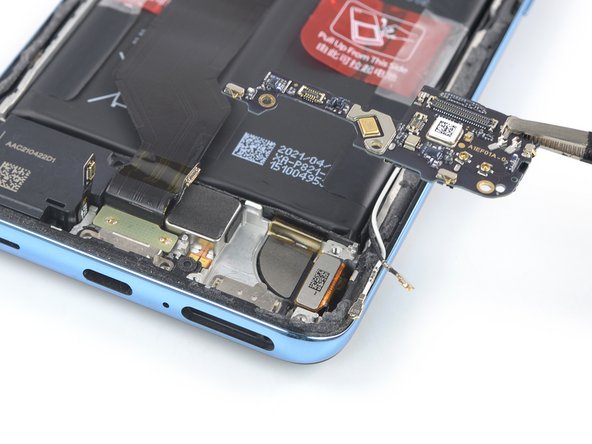
    • Use a pair of blunt nose tweezers or your fingers to remove the daughterboard.

    • Before reinserting the daughterboard, make sure all cables that connect to it are out of the way.

结论

Compare your new replacement part to the original part—you may need to transfer remaining components or remove adhesive backings from the new part before you install it.

To reassemble your device, follow these instructions in reverse order.

During reassembly, apply new adhesive where it's necessary after cleaning the relevant areas with isopropyl alcohol (>90%).

Take your e-waste to an R2 or e-Stewards certified recycler.

Repair didn’t go as planned? Try some basic troubleshooting, or ask our OnePlus 9 5G answers community for help.

Dominik Schnabelrauch

于11/23/16注册

202,809 声望

创作了682篇指南

团队

iFixit iFixit 的会员

Staff

135 名成员

创作了16,732篇指南

0条评论

添加评论

浏览统计数据:

过去 24 小时: 3

过去 7 天: 15

过去 30 天: 60

总计 692