跳转到主内容

Nintendo Switch Lite Left Joystick Replacement

你所需要的

  1. Nintendo Switch Lite Left Joystick Replacement, Remove the back panel screws: 步骤 1 中的图像 1,1
    在这个步骤中使用的工具:
    Magnetic Project Mat
    $19.95
    购买
    • Before beginning this repair, make sure that the device is completely turned off.

    • Use a Y00 screwdriver to remove the four 6.3 mm-long screws securing the back panel.

    • Throughout this repair, keep track of each screw and make sure it goes back exactly where it came from.

  2. Nintendo Switch Lite Left Joystick Replacement, Remove the top and bottom back panel screws: 步骤 2 中的图像 1,2 Nintendo Switch Lite Left Joystick Replacement, Remove the top and bottom back panel screws: 步骤 2 中的图像 2,2
    • Use a JIS 000 driver or an official iFixit PH 000 driver to remove the following screws securing the back panel:

    • Two 3.6 mm-long screws on the top of the device

    • Two 3.6 mm-long screws on the bottom of the device

    • To prevent these tight screws from stripping, apply firm downward force, work slowly and try a different screwdriver if the screws won't come out.

  3. Nintendo Switch Lite Left Joystick Replacement, Release the clips securing the back panel: 步骤 3 中的图像 1,2 Nintendo Switch Lite Left Joystick Replacement, Release the clips securing the back panel: 步骤 3 中的图像 2,2
    • Insert an opening tool into the left speaker grille on the bottom of the device.

    • Twist the opening tool to release the clips securing the back panel.

    • Avoid inserting the opening tool further than required to prevent damage to the speaker module.

  4. Nintendo Switch Lite Left Joystick Replacement, Continue releasing the clips around the device: 步骤 4 中的图像 1,2 Nintendo Switch Lite Left Joystick Replacement, Continue releasing the clips around the device: 步骤 4 中的图像 2,2
    • Slide the opening tool around the bottom-left corner to release the clips on the left side of the device.

  5. Nintendo Switch Lite Left Joystick Replacement, Twist to release the clips: 步骤 5 中的图像 1,2 Nintendo Switch Lite Left Joystick Replacement, Twist to release the clips: 步骤 5 中的图像 2,2
    • Insert an opening tool into the right speaker grille on the bottom of the device.

    • Twist the opening tool to release the clips.

    • Avoid inserting the opening tool further than required to prevent damage to the speaker module.

  6. Nintendo Switch Lite Left Joystick Replacement, Slide and pry around the corners: 步骤 6 中的图像 1,2 Nintendo Switch Lite Left Joystick Replacement, Slide and pry around the corners: 步骤 6 中的图像 2,2
    • Slide and pry the opening tool around the bottom-right corner to release the clips on the right side of the device.

  7. Nintendo Switch Lite Left Joystick Replacement: 步骤 7 中的图像 1,2 Nintendo Switch Lite Left Joystick Replacement: 步骤 7 中的图像 2,2
    • Continue sliding and prying the opening tool along the gap on the top of the device to release the clips.

  8. Nintendo Switch Lite Left Joystick Replacement, Remove the back panel: 步骤 8 中的图像 1,3 Nintendo Switch Lite Left Joystick Replacement, Remove the back panel: 步骤 8 中的图像 2,3 Nintendo Switch Lite Left Joystick Replacement, Remove the back panel: 步骤 8 中的图像 3,3
    • Lift the bottom edge of the back panel, opening it like a book.

    • Remove the back panel.

  9. Nintendo Switch Lite Left Joystick Replacement, Remove the shield plate: 步骤 9 中的图像 1,1
    • Use a JIS 000 driver or an official iFixit PH 000 driver to remove the following four screws:

    • Three 3.1 mm screws

    • One 4.5 mm screw

  10. Nintendo Switch Lite Left Joystick Replacement: 步骤 10 中的图像 1,3 Nintendo Switch Lite Left Joystick Replacement: 步骤 10 中的图像 2,3 Nintendo Switch Lite Left Joystick Replacement: 步骤 10 中的图像 3,3
    • Use a spudger or your fingers to lift the shield plate up and out of the device.

    • You may feel a bit of resistance. This is normal, since the shield plate is slightly bonded to the heat sink with thermal paste.

    • Remove the shield plate.

    • Clean off the old thermal paste from the shield plate and heat sink using isopropyl alcohol and a microfiber cloth. Apply new thermal paste to the heat sink before reassembly.

  11. Nintendo Switch Lite Left Joystick Replacement, Disconnect the battery: 步骤 11 中的图像 1,2 Nintendo Switch Lite Left Joystick Replacement, Disconnect the battery: 步骤 11 中的图像 2,2
    • Use an opening tool or your fingernail to flip up the small, hinged locking flap on the motherboard interconnect cable's ZIF connector.

  12. Nintendo Switch Lite Left Joystick Replacement: 步骤 12 中的图像 1,2 Nintendo Switch Lite Left Joystick Replacement: 步骤 12 中的图像 2,2
    • Do Not Use Metal Tweezers! Some fixers state that metallic tweezers can short circuit the ribbon cable/connector. It might be safer to just use nylon-tipped or ceramic-tipped tweezers.

    • Use a pair of tweezers to slide the interconnect cable out of its connector on the motherboard.

  13. Nintendo Switch Lite Left Joystick Replacement: 步骤 13 中的图像 1,2 Nintendo Switch Lite Left Joystick Replacement: 步骤 13 中的图像 2,2
    • Use the point of a spudger to pry the battery connector straight up and out of its socket on the motherboard.

  14. Nintendo Switch Lite Left Joystick Replacement, Remove the left speaker module: 步骤 14 中的图像 1,2 Nintendo Switch Lite Left Joystick Replacement, Remove the left speaker module: 步骤 14 中的图像 2,2
    • Use a pair of tweezers or your fingers to pull the left speaker cable straight up and out of its socket on the daughterboard.

    • Do not pull from the wires, or else you risk ripping the wires off the connector.

  15. Nintendo Switch Lite Left Joystick Replacement: 步骤 15 中的图像 1,1
    • Use a JIS 000 driver or an official iFixit PH 000 driver to remove the 4.5 mm screw securing the left speaker module.

  16. Nintendo Switch Lite Left Joystick Replacement: 步骤 16 中的图像 1,3 Nintendo Switch Lite Left Joystick Replacement: 步骤 16 中的图像 2,3 Nintendo Switch Lite Left Joystick Replacement: 步骤 16 中的图像 3,3
    • Use your fingers to lift the speaker module up and out of its recess to remove it.

    • Part of the speaker module sits underneath a delicate ribbon cable. Take care not to snag the speaker module on the cable as you remove it.

  17. Nintendo Switch Lite Left Joystick Replacement, Disconnect the motherboard interconnect cable: 步骤 17 中的图像 1,2 Nintendo Switch Lite Left Joystick Replacement, Disconnect the motherboard interconnect cable: 步骤 17 中的图像 2,2
    • Use an opening tool or your fingernail to flip up the small, hinged locking flap on the motherboard interconnect cable's ZIF connector.

  18. Nintendo Switch Lite Left Joystick Replacement: 步骤 18 中的图像 1,2 Nintendo Switch Lite Left Joystick Replacement: 步骤 18 中的图像 2,2
    • Use a pair of tweezers to slide the motherboard interconnect cable out of its connector on the daughterboard.

  19. Nintendo Switch Lite Left Joystick Replacement, Disconnect the screen and volume button cables: 步骤 19 中的图像 1,2 Nintendo Switch Lite Left Joystick Replacement, Disconnect the screen and volume button cables: 步骤 19 中的图像 2,2
    • Use an opening tool or your fingernail to flip up the small, hinged locking flaps on the two ribbon cable ZIF connectors.

  20. Nintendo Switch Lite Left Joystick Replacement: 步骤 20 中的图像 1,3 Nintendo Switch Lite Left Joystick Replacement: 步骤 20 中的图像 2,3 Nintendo Switch Lite Left Joystick Replacement: 步骤 20 中的图像 3,3
    • Use a pair of tweezers to slide the daughterboard screen cable out of its connector on the motherboard.

    • Repeat this procedure for the volume buttons cable.

  21. Nintendo Switch Lite Left Joystick Replacement, Remove the volume buttons: 步骤 21 中的图像 1,2 Nintendo Switch Lite Left Joystick Replacement, Remove the volume buttons: 步骤 21 中的图像 2,2
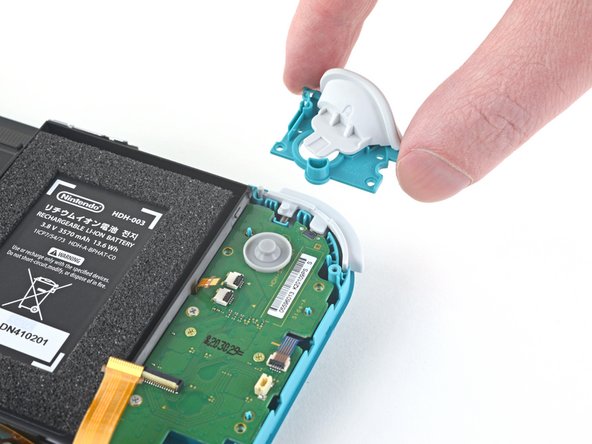
    • Use a pair of tweezers or your fingers to remove the volume buttons.

  22. Nintendo Switch Lite Left Joystick Replacement, Disconnect the joystick cable: 步骤 22 中的图像 1,2 Nintendo Switch Lite Left Joystick Replacement, Disconnect the joystick cable: 步骤 22 中的图像 2,2
    • Use an opening tool or your fingernail to flip up the small, hinged locking flap on the left joystick cable's ZIF connector.

  23. Nintendo Switch Lite Left Joystick Replacement: 步骤 23 中的图像 1,2 Nintendo Switch Lite Left Joystick Replacement: 步骤 23 中的图像 2,2
    • Use a pair of tweezers to slide the left joystick cable out of its connector on the daughterboard.

  24. Nintendo Switch Lite Left Joystick Replacement, Remove the left trigger button assembly: 步骤 24 中的图像 1,1
    • Use a JIS 000 driver or an official iFixit PH 000 driver to remove the two 4.5 mm screws securing the left trigger button assembly.

  25. Nintendo Switch Lite Left Joystick Replacement: 步骤 25 中的图像 1,2 Nintendo Switch Lite Left Joystick Replacement: 步骤 25 中的图像 2,2
    • Remove the left trigger button assembly.

  26. Nintendo Switch Lite Left Joystick Replacement, Remove the daughterboard: 步骤 26 中的图像 1,1
    • Use a JIS 000 driver or an official iFixit PH 000 driver to remove the following four screws:

    • Two 4.5 mm screws

    • Two 6 mm screws

  27. Nintendo Switch Lite Left Joystick Replacement: 步骤 27 中的图像 1,2 Nintendo Switch Lite Left Joystick Replacement: 步骤 27 中的图像 2,2
    • Use your fingers to lift the daughterboard up and out of its recess to remove it.

  28. Nintendo Switch Lite Left Joystick Replacement, Remove the left joystick: 步骤 28 中的图像 1,1
    • Use a JIS 000 driver or an official iFixit PH 000 driver to remove the two 3.5 mm screws securing the left joystick.

  29. Nintendo Switch Lite Left Joystick Replacement: 步骤 29 中的图像 1,3 Nintendo Switch Lite Left Joystick Replacement: 步骤 29 中的图像 2,3 Nintendo Switch Lite Left Joystick Replacement: 步骤 29 中的图像 3,3
    • Use the flat end of a spudger to lift the joystick up and out of its recess.

    • Use your fingers to remove the joystick.

    • There is a thin black gasket around the hole where the joystick pokes through the frame. Try not to disturb this gasket as you remove the joystick.

结论

To reassemble your device, follow these instructions in reverse order.

Take your e-waste to an R2 or e-Stewards certified recycler.

Repair didn’t go as planned? Try some basic troubleshooting, or ask our Nintendo Switch Lite Answers community for help.

95等其他人完成本指南。

Craig Lloyd

于02/10/16注册

35,354 声望

创作了82篇指南

35条评论

Really appreciate the detailed pictures.

ALLEN COLLINS - 回复

Great guide! Circling the screws really helped as went backwards for the reassembly. Not a bad repair just very delicate components. Best of all no adhesive removal required!

lee - 回复

This was great, I love how every step was so simply broken down and had pictures. Thank you, my son is very happy to have his switch back in action.

Louise Perkins - 回复

I followed this guide, bought the tools and replacement part, after successfully doing the replacement, my switch light now won’t power on at all, how can I fix this? any help please…

lczleal - 回复

Hi Iczleal I had the same issue when I first did it and then I went back step by step. Turns out I didn’t plug the battery back in correctly, I recommend just repeating the steps and checking to see if everything is connected properly. Hope this helps :)

Moon Poppy -

添加评论

浏览统计数据:

过去 24 小时: 160

过去 7 天: 1,130

过去 30 天: 6,005

总计 180,832