跳转到主内容
加入维修社区 - 创建账户

MacBook Air Models A1237 and A1304 Display Assembly Replacement

你所需要的

视频概述

    1. MacBook Air Models A1237 and A1304 Display Assembly Replacement, Lower Case: 步骤 1 中的图像 1,1
      • Unplug your MacBook Air and power it off before you proceed.

      • Remove ten Phillips screws securing the lower case to the MacBook Air:

      • Six 2.8 mm screws

      • Two 3.8 mm screws

      • Two 5.4 mm screws

      询问修复机器人

      添加评论

    2. MacBook Air Models A1237 and A1304 Display Assembly Replacement: 步骤 2 中的图像 1,2 MacBook Air Models A1237 and A1304 Display Assembly Replacement: 步骤 2 中的图像 2,2
      • Slightly lift the lower case near the vents and push it toward the rear of the computer to free the mounting tabs.

      询问修复机器人

      添加评论

    1. MacBook Air Models A1237 and A1304 Display Assembly Replacement, Battery: 步骤 3 中的图像 1,1
      • Disconnect the battery connector by pulling it straight out of its socket.

      询问修复机器人

      添加评论

    2. MacBook Air Models A1237 and A1304 Display Assembly Replacement: 步骤 4 中的图像 1,1
      • Remove the following nine screws securing the battery to the Air:

      • Four 2.9 mm Phillips.

      • Four 3.8 mm Phillips.

      • One 7.2 mm Phillips.

      询问修复机器人

      添加评论

    3. MacBook Air Models A1237 and A1304 Display Assembly Replacement: 步骤 5 中的图像 1,1
      • Lift the battery out of the Air.

      • If you're installing a new battery, you should calibrate it after installation:

      • Charge it to 100%, and then keep charging it for at least 2 more hours. Then, unplug and use it normally to drain the battery. When you see the low battery warning, save your work, and keep your laptop on until it goes to sleep due to low battery. Wait at least 5 hours, then charge your laptop uninterrupted to 100%.

      • If you notice any unusual behavior or problems after installing your new battery, you may need to reset your MacBook's SMC.

      询问修复机器人

      添加评论

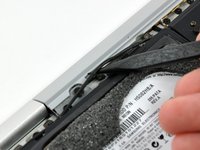
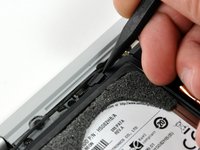
    1. MacBook Air Models A1237 and A1304 Display Assembly Replacement, Hard Drive: 步骤 6 中的图像 1,3 MacBook Air Models A1237 and A1304 Display Assembly Replacement, Hard Drive: 步骤 6 中的图像 2,3 MacBook Air Models A1237 and A1304 Display Assembly Replacement, Hard Drive: 步骤 6 中的图像 3,3
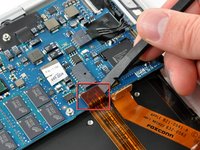
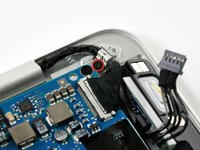
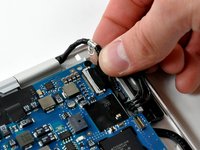
      • Disconnect the port hatch ribbon cable from the logic board by pulling it straight up by its black pull tab.

      • Pull the audio out ribbon cable off the adhesive securing it to the upper case.

      • Use a spudger to pry the audio out ribbon cable connector board off the hard drive bracket.

      添加评论

    2. MacBook Air Models A1237 and A1304 Display Assembly Replacement: 步骤 7 中的图像 1,1
      • Disconnect the audio out cable from its socket on the port hatch ribbon cable.

      添加评论

    3. MacBook Air Models A1237 and A1304 Display Assembly Replacement: 步骤 8 中的图像 1,1
      • Use a spudger to pry the hard drive cable connector up off the logic board.

      添加评论

    4. MacBook Air Models A1237 and A1304 Display Assembly Replacement: 步骤 9 中的图像 1,2 MacBook Air Models A1237 and A1304 Display Assembly Replacement: 步骤 9 中的图像 2,2
      • Use the sharp end of a spudger to de-route the microphone cable from the hard drive bracket.

      • Remove the cosmetic screw cover from the adhesive securing it to the hard drive bracket.

      询问修复机器人

      添加评论

    5. MacBook Air Models A1237 and A1304 Display Assembly Replacement: 步骤 10 中的图像 1,1
      • Remove the four Phillips screws securing the hard drive assembly to the upper case:

      • Two 4.7 mm screws.

      • Two 3.9 mm screws.

      添加评论

    6. MacBook Air Models A1237 and A1304 Display Assembly Replacement: 步骤 11 中的图像 1,1
      • Lift the hard drive assembly out of the upper case.

      添加评论

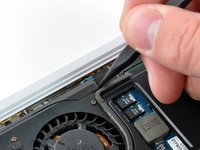
    1. MacBook Air Models A1237 and A1304 Display Assembly Replacement, Heat Sink: 步骤 12 中的图像 1,1
      • Use the tip of a spudger to pull the fan cable connector straight away from its connector on the logic board.

      询问修复机器人

      添加评论

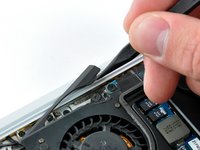
    2. MacBook Air Models A1237 and A1304 Display Assembly Replacement: 步骤 13 中的图像 1,2 MacBook Air Models A1237 and A1304 Display Assembly Replacement: 步骤 13 中的图像 2,2
      • Use the tip of a spudger to move the cosmetic fan cover aside.

      询问修复机器人

      添加评论

    3. MacBook Air Models A1237 and A1304 Display Assembly Replacement: 步骤 14 中的图像 1,2 MacBook Air Models A1237 and A1304 Display Assembly Replacement: 步骤 14 中的图像 2,2
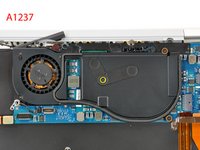
      • If you have the original version of the MacBook Air (A1237), refer to picture 1. Remove the following screws securing the heat sink to the logic board:

      • One 5.9 mm Phillips screw.

      • Two 1.9 mm Phillips screws.

      • One 1.9 mm Phillips screw.

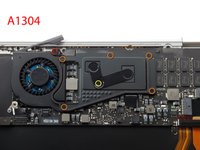
      • If you have the A1304 version of MacBook Air, refer to picture 2. Remove the following screws securing the heat sink to the logic board:

      • One 5.0 mm Phillips screw

      • Five 1.9 mm Philips screws.

      • One 2.5 mm Phillips screw.

      添加评论

    4. MacBook Air Models A1237 and A1304 Display Assembly Replacement: 步骤 15 中的图像 1,1
      • Lift the processor clamp off the heat sink.

      询问修复机器人

      添加评论

    5. MacBook Air Models A1237 and A1304 Display Assembly Replacement: 步骤 16 中的图像 1,1
      • Deroute the microphone cable away from the channel in the fan.

      询问修复机器人

      添加评论

    6. MacBook Air Models A1237 and A1304 Display Assembly Replacement: 步骤 17 中的图像 1,1
      • Lift the heat sink up off the logic board.

      • Be mindful of the microphone cable when lifting the heat sink, as it can get tangled on the top edge of the fan.

      • When you mount the heat sink back onto the logic board, be sure to apply a new layer of thermal paste. We have a guide that makes replacing the thermal paste easy.

      添加评论

    1. MacBook Air Models A1237 and A1304 Display Assembly Replacement, Logic Board: 步骤 18 中的图像 1,1
      • Use a spudger to pry the audio cable connector up off the logic board.

      询问修复机器人

      添加评论

    2. MacBook Air Models A1237 and A1304 Display Assembly Replacement: 步骤 19 中的图像 1,1
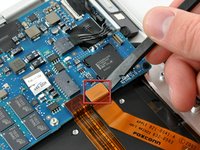
      • If present, remove the small piece of black tape covering the microphone cable connector.

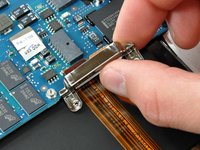
      • Disconnect the microphone cable by pulling its connector straight away from the socket on the logic board.

      询问修复机器人

      添加评论

    3. MacBook Air Models A1237 and A1304 Display Assembly Replacement: 步骤 20 中的图像 1,2 MacBook Air Models A1237 and A1304 Display Assembly Replacement: 步骤 20 中的图像 2,2
      • Remove the two small Phillips screws securing the logic board bracket to the upper case.

      • Lift the logic board bracket out of the upper case.

      询问修复机器人

      添加评论

    4. MacBook Air Models A1237 and A1304 Display Assembly Replacement: 步骤 21 中的图像 1,2 MacBook Air Models A1237 and A1304 Display Assembly Replacement: 步骤 21 中的图像 2,2
      • Use a spudger to pry the AirPort/Bluetooth and trackpad control cable connectors up off the logic board.

      询问修复机器人

      添加评论

    5. MacBook Air Models A1237 and A1304 Display Assembly Replacement: 步骤 22 中的图像 1,1
      • Disconnect the DC-In cable by pulling its connector straight away from the socket on the logic board.

      询问修复机器人

      添加评论

    6. MacBook Air Models A1237 and A1304 Display Assembly Replacement: 步骤 23 中的图像 1,2 MacBook Air Models A1237 and A1304 Display Assembly Replacement: 步骤 23 中的图像 2,2
      • Remove the small Phillips screw securing the display data cable ground loop to the upper case.

      • Disconnect the display data cable by pulling its connector straight away from the socket on the logic board.

      询问修复机器人

      添加评论

    7. MacBook Air Models A1237 and A1304 Display Assembly Replacement: 步骤 24 中的图像 1,1
      • Remove the three Phillips screws securing the logic board to the upper case.

      询问修复机器人

      添加评论

    8. MacBook Air Models A1237 and A1304 Display Assembly Replacement: 步骤 25 中的图像 1,1
      • Lift the logic board out of the upper case.

      询问修复机器人

      添加评论

    1. MacBook Air Models A1237 and A1304 Display Assembly Replacement, Display Assembly: 步骤 26 中的图像 1,1
      • Remove the two following screws securing the AirPort/Bluetooth board bracket to the upper case:

      • One 4.7 mm Phillips.

      • One 3.9 mm Phillips.

      添加评论

    2. MacBook Air Models A1237 and A1304 Display Assembly Replacement: 步骤 27 中的图像 1,1
      • Lift the AirPort/Bluetooth bracket out of the upper case.

      询问修复机器人

      添加评论

    3. MacBook Air Models A1237 and A1304 Display Assembly Replacement: 步骤 28 中的图像 1,1
      • Use a spudger to pry the three antenna cables up off the AirPort/Bluetooth board.

      添加评论

    4. MacBook Air Models A1237 and A1304 Display Assembly Replacement: 步骤 29 中的图像 1,1
      • Peel the antenna cables up off the adhesive securing them to the upper case.

      询问修复机器人

      添加评论

    5. MacBook Air Models A1237 and A1304 Display Assembly Replacement: 步骤 30 中的图像 1,1
      • Remove the single Phillips screw securing the microphone cable ground loop to the upper case.

      询问修复机器人

      添加评论

    6. MacBook Air Models A1237 and A1304 Display Assembly Replacement: 步骤 31 中的图像 1,1
      • Remove the following 15 screws:

      • Thirteen 2.3 mm Phillips.

      • Two T6 Torx.

      • Leave one T6 Torx screw in each side of the display bracket.

      询问修复机器人

      添加评论

    7. MacBook Air Models A1237 and A1304 Display Assembly Replacement: 步骤 32 中的图像 1,1
      • Open the Air so the display is perpendicular to the upper case and place it on a table as shown.

      • While holding the top of the Air with one hand, remove the T6 Torx screw from the lower display bracket.

      询问修复机器人

      添加评论

    8. MacBook Air Models A1237 and A1304 Display Assembly Replacement: 步骤 33 中的图像 1,1
      • Be sure to hold the Air together while you remove the last Torx screw. Failure to do so may cause the display/upper case to fall, potentially damaging both components.

      • Remove the T6 Torx screw from the upper display bracket.

      询问修复机器人

      添加评论

    9. MacBook Air Models A1237 and A1304 Display Assembly Replacement: 步骤 34 中的图像 1,1
      • Pull the upper case straight away from the display, minding any cables that may get caught.

      询问修复机器人

      添加评论

结论

To reassemble your device, follow these instructions in reverse order.

取消:我没有完成这个指南。

118等其他人完成本指南。

8指南评论

Great guide. I was able to remove the components without any trouble. Be sure to label your screws, as there are so many.

Steven Hanlon - 回复 分享
Do you have a guide to put that macbook back togerher?

Antonio Korts - 回复 分享

I was able to replace broken hinges without replacing the whole display. It takes patience and a bit of courage but it's doable (except if you are blonde and cute I guess ;)

Alfredo Sola - 回复 分享

Buenas tardes Alberto. Tengo necesidad de sustituir una bisagra de este modelo y no sé donde puedo adquirirla. Le agradecería que me dijera donde puedo comprarla. muchas gracias por adelantado

jose enrique guijarro martinez - 回复 分享

Thanks for the guide. My internal microphone stopped working but unfortunately I was not able to fix it. Still, very helpful guide.

pentzini - 回复 分享

添加评论

浏览统计数据:

过去 24 小时: 3

过去 7 天: 20

过去 30 天: 76

总计 185,139