
HP ElitePad 900 Volume Control Buttons Replacement

简介
转到步骤 1Use this guide to replace the volume control buttons in your HP ElitePad tablet (Model 900). If the buttons on your tablet are not working properly or seem to be getting jammed consistently, they may need to be replaced. The volume buttons control the volume within the device and function by being pressed on from the sides of the tablet. The functionality of these buttons should be able to move back and forth in order to increase or decrease volume. Volume control buttons that are unable to be pressed all the way down or feel loose or have no response when being pressed down need to be replaced. Before using this guide ensure that nothing is in the way of the buttons preventing them from working. Prior to beginning the process of replacing the buttons it is important that the device is fully turned off and disconnected from any external power sources.


-
-
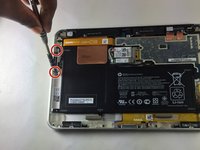
Using the Phillips screwdriver remove the two 2.4mm #000 screws that are securing the volume control buttons to the device.
-
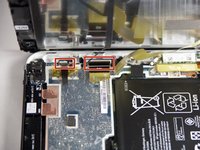
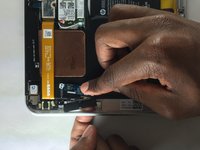
Lift up the silver panel, removing it completely from the device
-
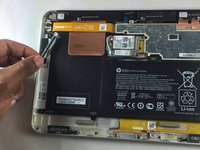
Push the buttons through the slot to remove them from the device
-


To reassemble your device, follow these instructions in reverse order.
To reassemble your device, follow these instructions in reverse order.

团队

USF Tampa, Team 12-4, Blackwell Fall 2015 USF Tampa, Team 12-4, Blackwell Fall 2015 的会员
USFT-BLACKWELL-F15S12G4
4 名成员
创作了6篇指南