跳转到主内容
HP Deskjet 1055 Power and Various Buttons Replacement

HP Deskjet 1055 Power and Various Buttons Replacement

Matt

Matt6 其他贡献者

最后更新于 March 16, 2025

20 - 35 分钟
中等
令人困惑的文字
详尽分析
更好的介绍
正在学习的学生

This guide provides step-by-step instructions to remove and replace the button circuit board on an HP Deskjet 1055 printer using basic tools. This repair may be necessary if the power or function buttons stop responding. Only basic tools, including a Torx T-10 screwdriver, are required.

你所需要的

工具

  1. HP Deskjet 1055 Power and Various Buttons Replacement, Power and Various Buttons: 步骤 1 中的图像 1,1
    • Press your thumb firmly on the center of the button plate on the left side of the printer.

    • Hook your fingers under the front edge of the button plate and pull upward while maintaining pressure in the center with your thumb.

    • To avoid breaking the rear tab, keep your thumb pressed firmly on the plate and lift the front edge carefully as you pull up.

  2. HP Deskjet 1055 Power and Various Buttons Replacement: 步骤 2 中的图像 1,3 HP Deskjet 1055 Power and Various Buttons Replacement: 步骤 2 中的图像 2,3 HP Deskjet 1055 Power and Various Buttons Replacement: 步骤 2 中的图像 3,3
    • Once the front of the plate is loose, lift it up a few inches making sure to hold the back (paper feeding side) of the plate down.

    • Slide the plate towards the back of the printer and then lift up on the back of the plate.

    • The plate should now be disconnected from the tabs on the printer.

  3. HP Deskjet 1055 Power and Various Buttons Replacement: 步骤 3 中的图像 1,3 HP Deskjet 1055 Power and Various Buttons Replacement: 步骤 3 中的图像 2,3 HP Deskjet 1055 Power and Various Buttons Replacement: 步骤 3 中的图像 3,3
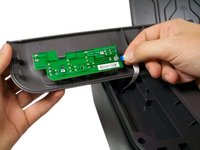
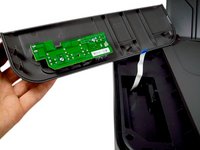
    • Flip the plate over to reveal the white ribbon cable that connects it to the printer.

    • Locate where the white ribbon cable is attached to the green button circuit board (circled in red).

    • Hold the ribbon cable near the connection point and gently pull it straight out from the circuit board to avoid damage.

  4. HP Deskjet 1055 Power and Various Buttons Replacement: 步骤 4 中的图像 1,1
    • Place the plate down on a flat surface with the button circuit board facing up.

    • Remove the three(3) T-10 Torx Screws from the circuit board.

  5. HP Deskjet 1055 Power and Various Buttons Replacement: 步骤 5 中的图像 1,1
    • Lift the button circuit board up and off of the button plate.

    • To install a new button plate follow these directions in reverse order.

结论

To reassemble your device, follow these instructions in reverse order.

2等其他人完成本指南。

Matt

于10/09/12注册

88 声望

创作了2篇指南

团队

Cal Poly, Team 9-18, Amido Fall 2012 Cal Poly, Team 9-18, Amido Fall 2012 的会员

CPSU-AMIDO-F12S9G18

4 名成员

创作了10篇指南

0条评论

添加评论

浏览统计数据:

过去 24 小时: 4

过去 7 天: 7

过去 30 天: 15

总计 1,843