跳转到主内容
加入维修社区 - 创建账户

Evercade EXP Battery Replacement

你所需要的

  1. Evercade EXP Battery Replacement, Faceplate: 步骤 1 中的图像 1,3 Evercade EXP Battery Replacement, Faceplate: 步骤 1 中的图像 2,3 Evercade EXP Battery Replacement, Faceplate: 步骤 1 中的图像 3,3
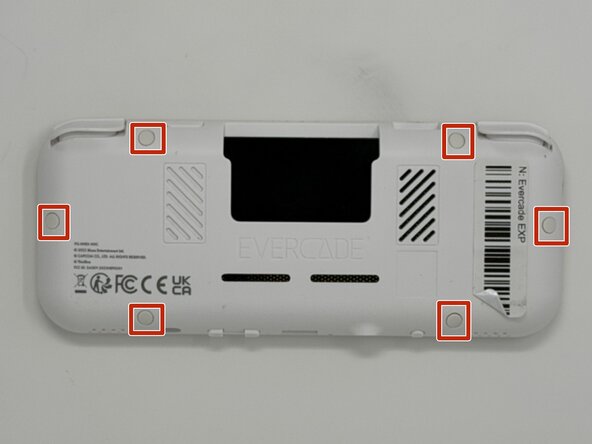
    • Lay the device on a flat surface, with the screen facing the sufrace.

    • Using angled tweezers, remove the six rubber screw covers from the sockets.

    • The covers are all identical, so they do not need to be stored separately from one another.

    询问修复机器人

    添加评论

  2. Evercade EXP Battery Replacement: 步骤 2 中的图像 1,3 Evercade EXP Battery Replacement: 步骤 2 中的图像 2,3 Evercade EXP Battery Replacement: 步骤 2 中的图像 3,3
    • Using a Phillips #00 screwdriver, remove the six 8 mm screws on the lower case.

    询问修复机器人

    添加评论

  3. Evercade EXP Battery Replacement: 步骤 3 中的图像 1,2 Evercade EXP Battery Replacement: 步骤 3 中的图像 2,2
    • Flip the device so the screen is facing you.

    • Four hidden retaining clips hold the pieces together even near each corner of the screen.

    • Insert a Jimmy into the seam located between the faceplate and the shell.

    • Move the a Jimmy toward the screen until you find the first clasp. Move the handle of the jimmy tool up to pop the faceplate free from the clasp.

    • Repeat until for each of the four clasps to fully release the faceplate from the shell.

    • Do not use excessive force when moving the Jimmy. The plastic may shear if too much force is applied horizontally, and it may snap if too much vertical force is applied.

    询问修复机器人

    添加评论

  4. Evercade EXP Battery Replacement: 步骤 4 中的图像 1,3 Evercade EXP Battery Replacement: 步骤 4 中的图像 2,3 Evercade EXP Battery Replacement: 步骤 4 中的图像 3,3
    • Flip the faceplate away from the shell carefully. The faceplate is still connected to the motherboard via a ribbon cable.

    • Flip up the locking flap securing the display ribbon cable, then use tweezers to disconnect the ribbon cable.

    • Be careful when separating the faceplate from the shell, the buttons are held in place by the connection, so they may fall out when opening the device.

    询问修复机器人

    添加评论

  5. Evercade EXP Battery Replacement, Motherboard: 步骤 5 中的图像 1,3 Evercade EXP Battery Replacement, Motherboard: 步骤 5 中的图像 2,3 Evercade EXP Battery Replacement, Motherboard: 步骤 5 中的图像 3,3
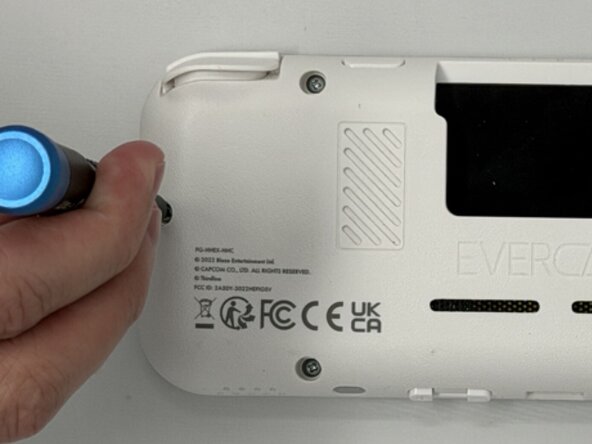
    • Use a Phillips #00 screwdriver to remove all ten 8 mm screws securing the motherboard.

    询问修复机器人

    添加评论

  6. Evercade EXP Battery Replacement: 步骤 6 中的图像 1,1
    • Using angled tweezers, gently lift both speakers from the cavities they rest in.

    • Don't attempt to fully remove the speakers from the motherboard. They're still secured with soldered connections.

    • The speakers are held in place by a weak adhesive. Apply force when removing speakers. Be careful not to damage the surrounding frame and speakers.

    询问修复机器人

    添加评论

  7. Evercade EXP Battery Replacement: 步骤 7 中的图像 1,3 Evercade EXP Battery Replacement: 步骤 7 中的图像 2,3 Evercade EXP Battery Replacement: 步骤 7 中的图像 3,3
    • The battery is wired to the motherboard via a connector inserted into a socket.

    • Flip the motherboard to the outside of the console.

    • The side boards are connected to the center board by a ribbon cable and a soldered wire, when removing the entire motherboard, keep them connected.

    • Remove the connector from the socket attached to the motherboard. The piece is held in place near the back of the socket. Apply downward pressure while pulling out to make the removal easier.

    • When removing the connector, it may require a significant amount of force. If too much force is applied, the plastic connector may compress or snap.

    询问修复机器人

    添加评论

  8. Evercade EXP Battery Replacement, Battery: 步骤 8 中的图像 1,3 Evercade EXP Battery Replacement, Battery: 步骤 8 中的图像 2,3 Evercade EXP Battery Replacement, Battery: 步骤 8 中的图像 3,3
    • The battery is connected to the case with a strong adhesive. To remove the battery, you will need to use a heat source to loosen then adhesive.

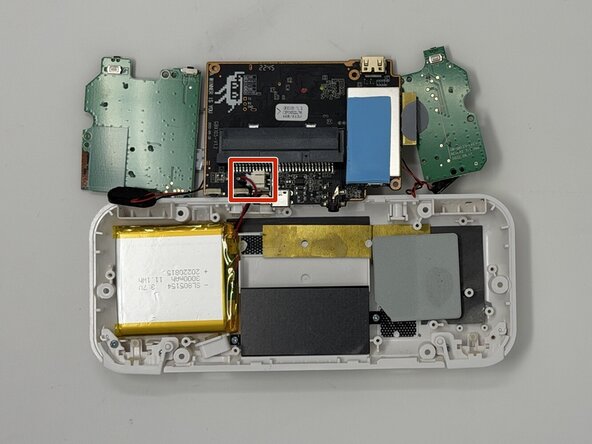
    • Use a hair dryer or a heat gun on low to apply heat to the back of the case while gently prying the battery out with an opening tool.

    • Take care not to bend, warp, twist, or puncture the battery during removal. Avoid using tweezers or metal pry tools to remove batteries unless absolutely necessary. Metal tools can easily puncture batteries and cause the release of noxious chemicals or even start a fire.

    • Set the battery aside for recycling.

    询问修复机器人

    添加评论

结论

To reassemble your device, follow the above steps in reverse order.
For optimal performance, after completing this guide, calibrate your newly installed battery.
Take your e-waste to an R2 or e-Stewards certified recycler.
Repair didn’t go as planned? Try some basic troubleshooting or ask our Answers community for help.

取消:我没有完成这个指南。

Ariana Travis

于02/03/26注册

295 声望

创作了2篇指南

团队

0指南评论

添加评论

浏览统计数据:

过去 24 小时: 2

过去 7 天: 13

过去 30 天: 23

总计 57