跳转到主内容
Braun Oral-B Sonic Complete 4729 Battery Replacement

Braun Oral-B Sonic Complete 4729 Battery Replacement

TheFixaholic

TheFixaholic6 其他贡献者

最后更新于 June 24, 2024

30分钟
中等
社区贡献指南

The device has to be opened and partly disassembled. The battery has to be unsoldered from the logic board and can then be replaced.

  1. Braun Oral-B Sonic Complete 4729 Battery Replacement, Opening the bottom lid: 步骤 1 中的图像 1,3 Braun Oral-B Sonic Complete 4729 Battery Replacement, Opening the bottom lid: 步骤 1 中的图像 2,3 Braun Oral-B Sonic Complete 4729 Battery Replacement, Opening the bottom lid: 步骤 1 中的图像 3,3
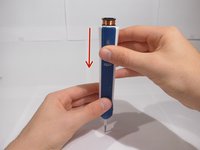
    • Take the device and place it on top of its charger.

    • Now hold down firmly the charger and pull the top of the toothbrush backwards.

    • Just above the lid there is the induction coil, so don't pull too much, or it could get damaged!

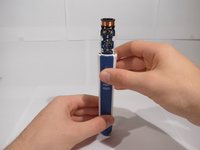
    • When the lid at the bottom opens, stop pulling and take it off manually

  2. Braun Oral-B Sonic Complete 4729 Battery Replacement, Pull of the water protection ring: 步骤 2 中的图像 1,3 Braun Oral-B Sonic Complete 4729 Battery Replacement, Pull of the water protection ring: 步骤 2 中的图像 2,3 Braun Oral-B Sonic Complete 4729 Battery Replacement, Pull of the water protection ring: 步骤 2 中的图像 3,3
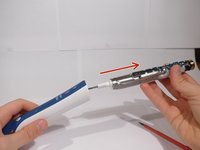
    • Take the screwdriver (or the plastic opening tool) and go under the ring at the top of the gummed area.

    • Now rotate it slightly so the ring comes loose.

    • Be careful not to damage the gum under the ring, as it assures that no water gets inside!

  3. Braun Oral-B Sonic Complete 4729 Battery Replacement, Take out the interior: 步骤 3 中的图像 1,3 Braun Oral-B Sonic Complete 4729 Battery Replacement, Take out the interior: 步骤 3 中的图像 2,3 Braun Oral-B Sonic Complete 4729 Battery Replacement, Take out the interior: 步骤 3 中的图像 3,3
    • Push the point of the device down onto the table and take out the inside.

  4. Braun Oral-B Sonic Complete 4729 Battery Replacement, Clearing the way for the battery (Part 1): 步骤 4 中的图像 1,3 Braun Oral-B Sonic Complete 4729 Battery Replacement, Clearing the way for the battery (Part 1): 步骤 4 中的图像 2,3 Braun Oral-B Sonic Complete 4729 Battery Replacement, Clearing the way for the battery (Part 1): 步骤 4 中的图像 3,3
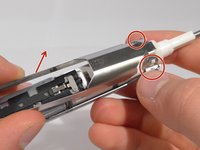
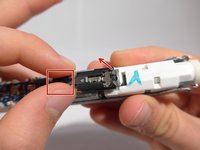
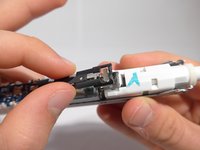
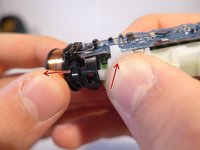
    • First take away the metal sheet of the start/stop button.

    • Then pull the center of the black metal connection of the pressure sensor slightly upwards until the hook holding it to the sensor comes loose.

    • Now it has to be desoldered from the logic board.

  5. Braun Oral-B Sonic Complete 4729 Battery Replacement, Clearing the way for the battery (Part 2): 步骤 5 中的图像 1,3 Braun Oral-B Sonic Complete 4729 Battery Replacement, Clearing the way for the battery (Part 2): 步骤 5 中的图像 2,3 Braun Oral-B Sonic Complete 4729 Battery Replacement, Clearing the way for the battery (Part 2): 步骤 5 中的图像 3,3
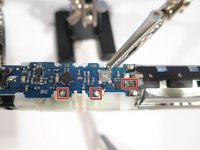
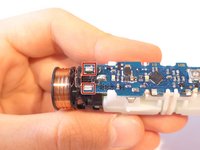
    • Now you have to desolder the sensor connection and both the connections to the red led at the top.

    • The white plastic pins left and right to the led connections can easily melt!

    • Then desolder the connections to the charging coil.

    • Be careful not to touch nearby electronic components, as they could get damaged!

    • And keep the soldering time short and remove the soldering iron as soon as the solder has become liquid, so there is no overheating risk!

  6. Braun Oral-B Sonic Complete 4729 Battery Replacement, Clearing the way for the battery (Part 3): 步骤 6 中的图像 1,3 Braun Oral-B Sonic Complete 4729 Battery Replacement, Clearing the way for the battery (Part 3): 步骤 6 中的图像 2,3 Braun Oral-B Sonic Complete 4729 Battery Replacement, Clearing the way for the battery (Part 3): 步骤 6 中的图像 3,3
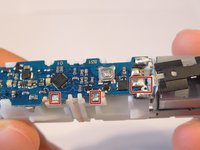
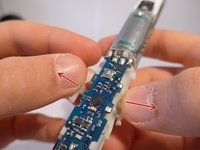
    • First pull off the white plastic support for the red led.

    • Then push the plastic casing of the battery together to pull of the coil.

  7. Braun Oral-B Sonic Complete 4729 Battery Replacement, Clearing the way for the battery (Part 3): 步骤 7 中的图像 1,1
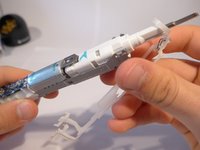
    • Now the connections to the motor have to be desoldered to take the battery casing of.

结论

To reassemble your device, follow these instructions in reverse order.

5等其他人完成本指南。

TheFixaholic

于04/27/15注册

600 声望

创作了3篇指南

2指南评论

A good guide but I found removing the bottom quite troublesome. Levering against the charging base felt like it would break the base. I needed to lever it in stages, wedge it and grab and pull it with mole grips. This damaged the plastic a little, but I got it off.

Cone - 回复

Hmm, maybe they changed the construction. When I created the guide the bottoms (of the 2 toothbrushes I repaired) opened quite easily, but that's good to know.
Also I do not think you need to worry about breaking the base: as most chargers that you plug in the mains, it should be completely filled with a hard resin, and thus be almost indestructible.

TheFixaholic -

添加评论

浏览统计数据:

过去 24 小时: 6

过去 7 天: 20

过去 30 天: 94

总计 8,559