跳转到主内容
加入维修社区 - 创建账户

Asus ROG G20CB RAM Replacement

你所需要的

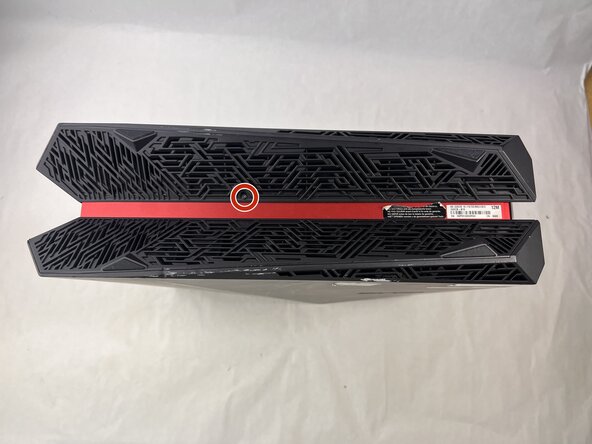
    1. Asus ROG G20CB  RAM Replacement, Fan: 步骤 1 中的图像 1,2 Asus ROG G20CB  RAM Replacement, Fan: 步骤 1 中的图像 2,2
      • Remove each of the two 4.6 mm Phillips screws on the top and bottom of the tower.

      询问修复机器人

      添加评论

    2. Asus ROG G20CB  RAM Replacement: 步骤 2 中的图像 1,1
      • Slide the front panel to the left and lift gently.

      • There is a cable connecting the panel to the computer. Handle it gently and avoid straining the connected panel.

      询问修复机器人

      添加评论

    3. Asus ROG G20CB  RAM Replacement: 步骤 3 中的图像 1,1
      • Disconnect the cable carefully by pulling gently on both sides of the connector.

      询问修复机器人

      添加评论

    4. Asus ROG G20CB  RAM Replacement: 步骤 4 中的图像 1,1
      • Remove the five 4.6 mm Phillips screws holding down the fan tray and then pull the fan tray out of the system.

      • The fans are connected by a thin cable, be gentle when removing tray.

      询问修复机器人

      添加评论

    5. Asus ROG G20CB  RAM Replacement: 步骤 5 中的图像 1,1
      • Carefully unplug the two fan cables from the motherboard by pulling straight up from the base of the connector.

      询问修复机器人

      添加评论

    6. Asus ROG G20CB  RAM Replacement: 步骤 6 中的图像 1,1
      • Remove the six 4.6 mm Phillips screws connecting the fans to the fan tray.

      询问修复机器人

      添加评论

    1. Asus ROG G20CB  RAM Replacement, CPU Cooler: 步骤 7 中的图像 1,1
      • Remove the 4.6 mm Phillips screw that secures the optical drive.

      询问修复机器人

      添加评论

    2. Asus ROG G20CB  RAM Replacement: 步骤 8 中的图像 1,1
      • Push the optical drive out of the chassis.

      询问修复机器人

      添加评论

    3. Asus ROG G20CB  RAM Replacement: 步骤 9 中的图像 1,1
      • Pull back the tape on the heat sink and use a long-neck Phillips screwdriver to remove the four screws securing the heat sink.

      • There is a number next to each screw, when taking the cooler off, loosen in descending order (4-3-2-1). When installing a cooler, tighten in ascending order.

      询问修复机器人

      添加评论

    4. Asus ROG G20CB  RAM Replacement: 步骤 10 中的图像 1,1
      • Remove the 4.6 mm Phillips screw from the heatsink at the top of the case.

      • Lift the CPU cooler out of the system.

      • Be sure to apply fresh thermal paste before reinstalling a cooler.

      询问修复机器人

      添加评论

    1. Asus ROG G20CB  RAM Replacement, RAM: 步骤 11 中的图像 1,1
      • Gently push outward on the two retaining clips on either side of the RAM stick.

      询问修复机器人

      添加评论

    2. Asus ROG G20CB  RAM Replacement: 步骤 12 中的图像 1,1
      • The RAM module should pop up at an angle.

      • Pull the RAM stick out carefully by grasping it by the edges.

      • Avoid touching gold contacts.

      询问修复机器人

      添加评论

结论

To reassemble your device, follow the above steps in reverse order.
Take your e-waste to an R2 or e-Stewards certified recycler.
Repair didn’t go as planned? Try some basic troubleshooting or ask our Answers community for help.

取消:我没有完成这个指南。

另外一个人完成了本指南。

Kimber-Starr

于03/21/25注册

361 声望

创作了3篇指南

团队

UMass Dartmouth, Team 3-3, Botvin Spring 2025 UMass Dartmouth, Team 3-3, Botvin Spring 2025 的会员

UMASSD-BOTVIN-S25S3G3

3 名成员

创作了44篇指南

0指南评论

添加评论

浏览统计数据:

过去 24 小时: 5

过去 7 天: 23

过去 30 天: 72

总计 704