跳转到主内容

此翻译可能不反映源指南的最新更新。 帮助更新翻译查看源指南

Apple Watch Series 3 电池更换

你所需要的

  1. Apple Watch Series 3 电池更换, 打开显示屏: 步骤 1 中的图像 1,1
    • 准备iOpener,并加热显示屏以软化粘合剂,将其固定到位。

  2. Apple Watch Series 3 电池更换: 步骤 2 中的图像 1,3 Apple Watch Series 3 电池更换: 步骤 2 中的图像 2,3 Apple Watch Series 3 电池更换: 步骤 2 中的图像 3,3
    • 始终保持手指完全远离刀。 千万不要施加太大的压力,因为这可能会导致刀滑动并切割或损坏手表。

    • 仅将刀片的细边插入间隙,然后朝您的方向倾斜刀片以加宽间隙,并将显示屏略微抬起。

    • 将弯曲刀片的边缘放入显示器和外壳之间的薄间隙中。 从显示屏的短边开始,最靠近圆形圈。

    • 不要将刀插入1/16英寸(约2毫米)。

  3. Apple Watch Series 3 电池更换: 步骤 3 中的图像 1,2 Apple Watch Series 3 电池更换: 步骤 3 中的图像 2,2
    • 一旦使用刀片打开了小间隙,请移除刀片并将打开工具的较薄边缘插入间隙中。

    • 在此插入翻译将开口工具推入间隙,用拇指作为支点,将显示屏再打开一点。

    • 现在不要试图完全分离显示屏。 Force Touch垫圈可能会粘在显示器或机身上,如果用力过猛,可能会被撕裂。

  4. Apple Watch Series 3 电池更换: 步骤 4 中的图像 1,3 Apple Watch Series 3 电池更换: 步骤 4 中的图像 2,3 Apple Watch Series 3 电池更换: 步骤 4 中的图像 3,3
    • 在显示屏下方插入一个开口拨片,小心地将Force Touch垫圈与显示屏分开。

    • 确保您找对了位置。 如果在抬起显示屏时把Force Touch垫片分离了,或者您将垫圈层分开,则还需要更换Force Touch垫圈本身。

    • 在显示屏周围滑动拨片以分离Force Touch垫圈和显示屏之间的粘合剂。

    • 不要将开口拨片插入深度超过1/16英寸(~2 mm)。

  5. Apple Watch Series 3 电池更换: 步骤 5 中的图像 1,3 Apple Watch Series 3 电池更换: 步骤 5 中的图像 2,3 Apple Watch Series 3 电池更换: 步骤 5 中的图像 3,3
    • 为避免损坏显示屏电缆,请勿完全打开显示屏。

    • 将显示屏打开约45°角,然后用镊子剥去显示屏和Force Touch垫圈之间的粘合剂。

    • 将粘合剂穿过显示器电缆的周围和后面,使其完全脱落,然后向下按压垫圈以重新粘附到盒子上。

    • 如果Force Touch垫圈本身松动且不会向下弯曲,则应更换垫圈下方和垫圈与显示屏之间的粘合剂。

  6. Apple Watch Series 3 电池更换, 断开电池连接: 步骤 6 中的图像 1,3 Apple Watch Series 3 电池更换, 断开电池连接: 步骤 6 中的图像 2,3 Apple Watch Series 3 电池更换, 断开电池连接: 步骤 6 中的图像 3,3
    • 卸下固定金属盖板的Y型#000螺丝。

    • 用一把镊子取下盖板。

    • 首先打开盖板。

    • 然后将其关闭一半,将其完全取出。

  7. Apple Watch Series 3 电池更换: 步骤 7 中的图像 1,3 Apple Watch Series 3 电池更换: 步骤 7 中的图像 2,3 Apple Watch Series 3 电池更换: 步骤 7 中的图像 3,3
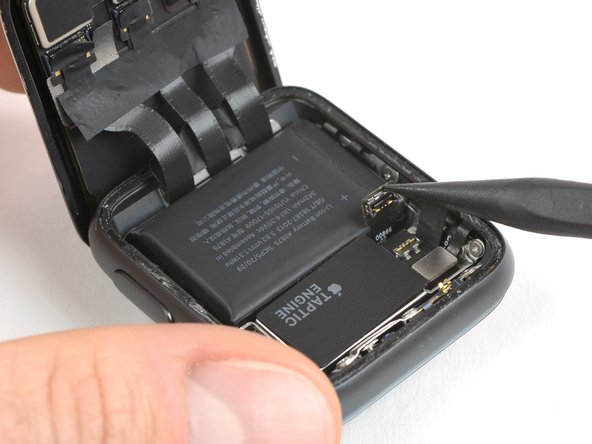
    • 在仅有GPS的版本上,可以在卸下金属板后立即断开电池。 对于LTE版本,你首先需要断开Force Touch垫圈并将其折叠,以便断开电池连接。

    • 使用撬棒的尖端直接向上撬起连接器来断开电池连接。

    • 稍微弯曲连接器,确保它不会意外接触到主板。

  8. Apple Watch Series 3 电池更换, 电池: 步骤 8 中的图像 1,3 Apple Watch Series 3 电池更换, 电池: 步骤 8 中的图像 2,3 Apple Watch Series 3 电池更换, 电池: 步骤 8 中的图像 3,3
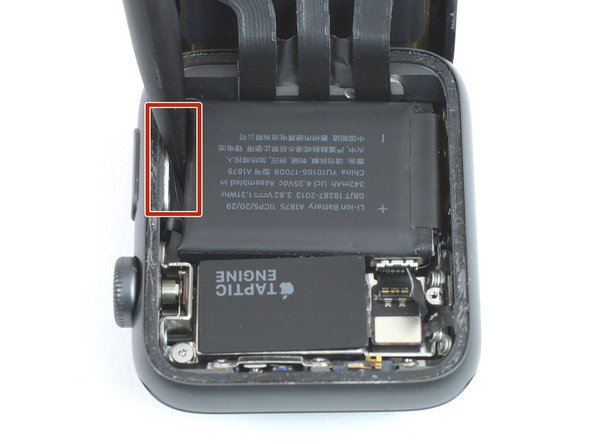
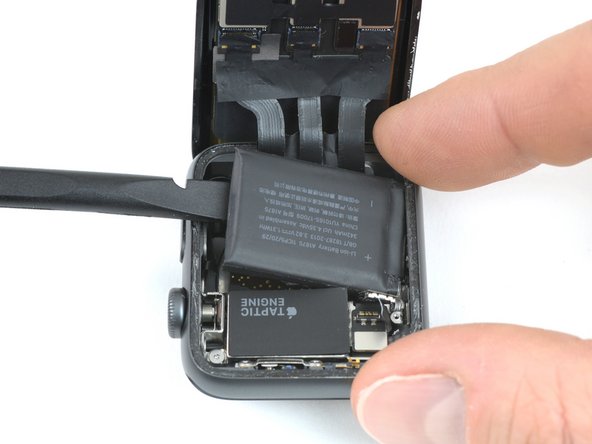
    • 使用撬棒的平端在电池和电源按钮旁边的框架之间撬动。这样,在拉出电池时,不要挤压或折叠任何电缆。

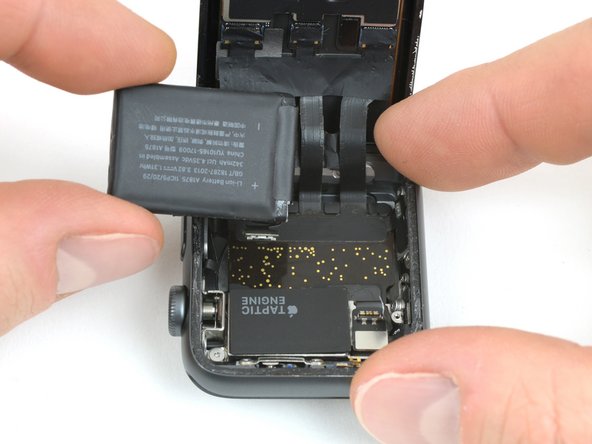
    • 缓慢但稳定地提起电池,使其与下面的粘合剂分离,将其固定到位。

    • 确保不要刺破电池或使电池变形,因为如果电池损坏可能会着火和/或爆炸。

    • 取出电池。

    • 请参阅结论中的粘合剂更换指南,以便在重新组装时使用新的粘合剂。

结论

安装新电池后,你可以打开手表进行测试,然后再将其粘合。要重新组装设备,请将其关闭,然后按逆序执行这些说明。在使用新的粘合剂之前,务必取下显示器背面和垫片顶部的旧粘合剂,如粘合剂更换指南所示。

60等其他人完成本指南。

由衷感谢以下译者:

en zh

83%

这些译者帮助我们修补全世界! 您也想加入吗?
开始翻译 ›

Tobias Isakeit

于03/31/14注册

117,598 声望

创作了188篇指南

团队

Master Techs Master Techs 的会员

Community

322 名成员

创作了2,534篇指南

9条评论

Hi

I’m having problem with my Apple Watch series 3, a red snake shown in the watch, I bought a brand new battery here in ifix and i proceed to install it but I’m having the same problem. Can someone help me.

thanks

educroasdaile - 回复

Have you checked our Apple Watch troubleshooting page for the charging issue?

Tobias Isakeit -

followed all the steps properly. But the Apple watch does not switch on! The new battery does not seem to work.

Karthikeyan Rathinasamy - 回复

After replacing the Battery will the watch be waterproof enough to swim with/ have the same water resistance as when it was new

Gibson White - 回复

If you cleaned both the backside of the lens and the case groove where the adhesive was very well and replaced the adhesive getting it squarely on the case lip just as the original one was installed, I would expect the watch to be as sealed and water resistant as it was when new.

Bill Auerbach -

添加评论

浏览统计数据:

过去 24 小时: 41

过去 7 天: 338

过去 30 天: 1,604

总计 106,727