


-
-
拧下固定排线接口金属盖板上的两个Torx T5螺丝。
-
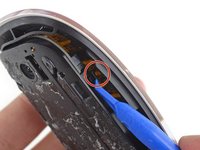
断开排线与主板的连接,取下鼠标的上部机身。
Welcher Depp hat nur die Ladebuchse so eingebaut dass man während des Ladens nicht arbeiten kann? Hätte man die Buchse nach der Seite gelegt könnte man weiterarbeiten.
Schildbürger..
Die Deppen von Apple:( Wie überall, wo Dummheit siegt:(
vjrott -
-
-
-
用撬棒插入电池底部,挑开粘胶,取下电池。
-
取下充电接口。
Ich habe die Unterseite auf einer kleinen Heizplatte auf 60 Grad erwärmt und an den langen Seiten des Akkus isopropanol eingebracht. Ging wunderbar nach 2-3 Minuten ohne den Akku zu stressen, z.B. durch biegen oder Torsion.
Ich bin froh, dass das für dich gut geklappt hat.
-


如要组装你的设备,按照本指南反向顺序操作。
将电子废物带至 R2 或 e-Stewards 认证回收点进行回收。
如要组装你的设备,按照本指南反向顺序操作。
将电子废物带至 R2 或 e-Stewards 认证回收点进行回收。
22等其他人完成本指南。


团队

14条评论
I may be wrong because I don’t own this device, but from what I’ve read from other tutorials, it does not look like it’s necessary to do steps 1 and 2. The tutorials I’ve read just split the mouse in 2 without messing with the bottom of the mouse. Doing so means they don’t need to worry about damaging the bottom or working with the adhesive.
I have fixed it!
Thanks for the note!
Die Anleitung ist leider sehr unvollständig.
Nachdem das Maus Kabel und das Batterie Kabel entfernt wurde, ALLE Schrauben entfernen (4er und 5er Torx), die Platine, den Schalter und die Metall Spange demontieren. Den Ladestecker abschrauben, Achtung! darunter befindet sich eine Metallhülse / Führung für den Ladestecker, gleich mit entfernen.
Jetzt darf nur noch die Batterie zu sehen sein.... Ab in den Backofen und auf 50 Grad Celsius erwärmen, das reicht aus, um die Batterie ohne Schaden am Gehäuse zu entfernen. Die Klebestreifen befinden sich links und rechts auf den langen Seiten. Diese im warmen Zustand sofort ablösen und auf die neue Batterie kleben.
Beim Zusammenbau darauf achten, die etwas längeren Schrauben gehören zum Schalter! Die Stecker vorsichtig ohne Gewalt einstecken, wenn alles richtig ist, gehen sie ganz leicht herein.
So, ich hoffe das ich nichts vergessen habe, Viel Glück
Translation:
Unfortunately, the instructions are very incomplete.
After the mouse cable and the battery cable have been removed, remove ALL screws (4 and 5 Torx), dismantle the board, switch and metal clasps. Unscrew the charging plug, attention! Below it is a metal sleeve / guide for the charging plug, immediately remove it.
Now only the battery can be seen.... Put it in the oven and heat it up to 50 degrees Celsius, that's enough to remove the battery without damaging the housing. The adhesive strips are located on the left and right on the long sides. Remove them immediately when warm and stick them to the new battery.
When assembling, make sure that the slightly longer screws belong to the switch! Gently plug in the plugs without force, if everything is correct, they go in very easily.
So, I hope I haven't forgotten anything, good luck
Thank you very much! This is absolutely correct.
English translation by Google:
Unfortunately, the instructions are very incomplete.
After removing the mouse cable and the battery cable, remove ALL screws (4 and 5 Torx), disassemble the circuit board, the switch and the metal clasp. Unscrew the charging plug, caution! underneath is a metal sleeve / guide for the charging connector, remove it at the same time.
Now only the battery should be visible... Put it in the oven and heat it up to 50 degrees Celsius, that's enough to remove the battery without damaging the housing. The adhesive strips are on the left and right of the long sides. Remove this immediately when warm and stick it on the new battery.
When assembling, make sure that the slightly longer screws belong to the switch! Insert the plugs carefully without force, if everything is correct they will go in quite easily.
Well, I hope I haven't forgotten anything, good luck
Lol we posted the same thing at the time
I did first and passed out
I wanted to go to the doctor because I saw twice... ;-))
Can I use generic battery (can I solder it to the battery connector?)
It's not a wise idea.
whr did i get this ?
Diese Anleitung (nur die erete Hälfte) ist eine Unverschämheit. Und am Ende : Zusammenbauen nach dem Akku Wechsel in umgekährte Reiehenfolge. Warru wurede der Pozes nicht zu Ende gebracht. Warum veblüdelst hier die Menchen. Hör bitte in der Zukuft auf aus sich so peinlich als Ratgeber zu präsentieren.