简介
请按照本指南更换 Nintendo Switch Lite 中的破旧和退化的电池。
Switch Lite 使用 JIS 螺丝,但您可以在紧要关头使用十字螺丝刀。当心不要滑丝。 iFixit 的 Phillips 刀头设计与 JIS 型螺丝相兼容。
为了您的安全,请在拆卸 Switch 之前将电池放电至 25% 以下。 如果电池在维修过程中意外损坏,这会降低发生危险事件的风险。如果您的电池膨胀,采取适当的预防措施。
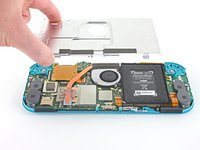
注意:此过程需要卸下屏蔽板,该屏蔽板已通过导热胶粘贴到散热器上。在重新安装屏蔽板之前,需要清除并重新涂上导热膏。
你所需要的
-
-
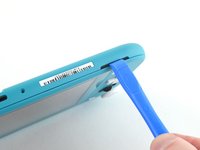
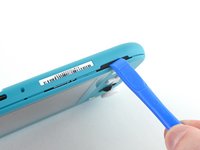
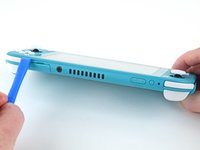
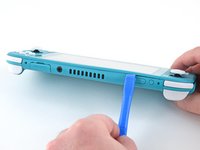
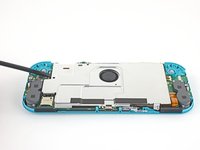
用 JIS 000 螺丝刀或官方 iFixit PH 000 螺丝刀卸下固定后面板的螺丝:
-
设备顶部的两个3.6毫米长的螺丝
-
设备底部的两个3.6毫米长的螺丝
-
为防止这些拧的很紧的螺丝滑丝,请向下用力,缓慢操作,如果螺钉无法卸下,请尝试使用不同的螺丝刀。
-
-
-
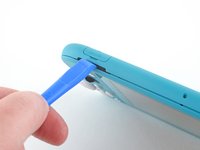
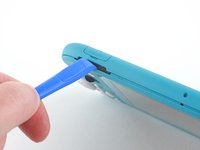
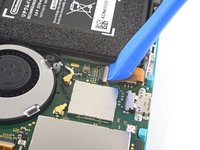
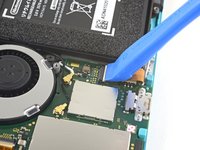
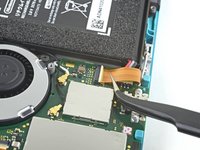
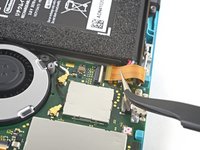
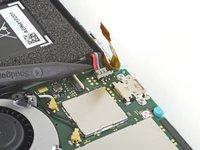
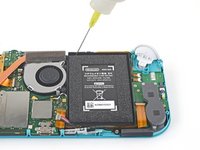
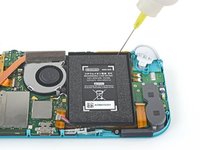
在这个步骤中使用的工具:iFixit Adhesive Remover$19.99
-
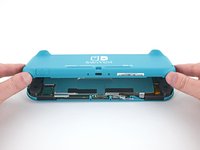
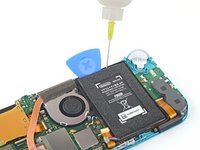
在电池凹槽的顶部边缘上滴几滴脱胶剂或高浓度(90%或更高)的异丙醇,以减弱粘合剂粘度。
-


46等其他人完成本指南。


29指南评论
Hello!
I am preparing to repair my daughters nintendo switch light. It has stopped charging out of no where. I have all the tools, I just can't find the battery anywhere. Where would you recommend buying it from?
If you are still looking Ifixit sells one themselves Nintendo Switch Lite Battery
EJ hett -
Thanks for the guide. Battery replacement kits are now available on Amazon: https://www.amazon.com/Nintendo-HDH-001-... (they weren’t in November! I was also looking for this during that time)
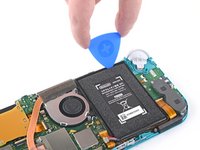
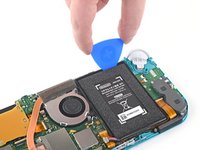
Unfortunately, the battery was much harder to remove than I expected. I did use a lot of isopropyl alcohol, but the adhesive they use really was giving me a lot of trouble. I should’ve wisened up and googled other adhesive removal methods or tried a new approach other than prying with the spudgers.
Well, now the LCD now has what looks like pressure damage in the bottom left where I’d imagine a lot of the prying pressure went. It is much more noticeable when the screen goes all-white, and not too bad with darker colors.
I don’t blame iFixit for my mistake of course, and it is really disappointing that Nintendo used the amount of adhesive that they did. But I hope this comment can serve as a warning to others attempting this repair to be more gentle even if it’s refusing to come off.
Yikes! Sorry to hear this. How did you pry with the spudger exactly? If you kept it around the top edge of the battery well then I would assume it wouldn’t damage the screen, but if you inserted the end of the spudger deeper in the battery well and used that point as the fulcrum, then I could see that putting a lot of pressure on the back of the LCD.
@craiglloyd I did an embarrassing amount of spudger prying pretty much everywhere along the top/bottom of the battery, I actually broke a few spudger tips in the process so that might reveal something about my approach…
But, I’m starting to think it may not be LCD damage after all, but rather some isopropyl alcohol caught behind the screen– During my prying, the Switch case was getting pretty heavily warped, so maybe some of the alcohol (that I definitely used in excess) slipped in and got sandwiched under the screen? I started to notice this since the blotches seem like they’ve moved over time. Here’s an image of the screen now https://imgur.com/DjYmFnJ (and the dark gray blotch along the leftside isn’t a shadow, white spots in bottom left I thought were pressure damage)
It’s still very usable / not noticeable on black colors and thanks again for the guide! I can give the screen more time to see if it improves at all, or maybe try going back in and trying to see it is trapped alcohol that can be released
vmgm -