跳转到主内容

After announcing the discontinuation of the Durango after the 2009 model year, Dodge released an Internet site and teaser photos of the third-generation Dodge Durango on August 16, 2010.

10 个问题 查看全部

Metallic connectors inside key fob not attached to silicone button pad

Block Image

Block Image

Block Image

My metallic connectors inside key fob not attached to silicone button pad & have become detached - so the whole fob is no longer working. What is the best adhesive to try and re-attach the metal connectors to inhibit them from wondering around causing a mess?

回答此问题 我也有这个问题

这是一个好问题吗?

得分 0
4条评论

Can yo post some pics so we can see what you are facing here 在已经存在的问题里加入图片

完成的

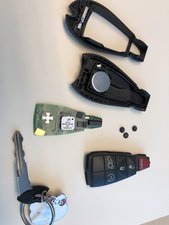
You appear to be missing some of the pads! Correction: I count five here two is still in the key and three on the table. You need seven!

完成的

The key fob only shows 5 buttons on the front. There are 3 on the table and 2 of them still in the key fob. They look pretty dirty and need cleaned to make a good connection with the board.

完成的

All these comments are good, but I had the same problem with my key fob. When the discs become dislodged that particular button will not work. Mr personally,I used Super glue, just a touch...

完成的

添加一条评论

8个答案

最有帮助的答案

as a locksmith, we see this problem often. we clean the board with alcohol pads after removing the battery. remove all discs from the back of the silicone pad. be sure to clean/scrape the contact cement off the back of the discs. once everything is clean, center each disc over the circuit it was intended to touch. get a 3” strip of clear commercial tape. have someone give the “non” sticky side a quick spray with anti static spray. the discs will move if not done. lay the tape over the top of the entire board and cut away any excess around the edges. reinstall your battery and you should be good to go afterwards. there’s no place for those discs to slide around after taping them in place. hope this helped!

这个答案有帮助吗?

得分 2

1条评论:

I actually had taken my fob completely apart before reading this. There were only 3 electrodes, but I removed them, then cleaned them and everything on the fob, inside and out. I taped the electrodes back in place per above, and the fob is working perfectly. - well, the lock/unlock and trunk buttons since I placed the 3 electrode pads over those buttons. I am now hoping that my windows stop going up and down, the lights stop turning on and off, and the trunk stops popping up! I'll report back in a week with an update.

完成的

添加一条评论

Take the fob apart. Careful not to lose the little steel discs.

Remove all the little switch discs and set them to soak in an alcohol bath to remove any contamination.

Use alcohol to clean the surface of the PC board. If needed, use a pencil eraser to remove any contamination or oxidation.

Wipe off and allow the discs and PC board to thoroughly dry.

Carefully place one little steel concave side down over each used switch target. Note: Many fobs do not have all the switches used.

Place a strip of Scotch Magic Tape to cover all the discs and press down to make sure it adheres to the PC board with all the discs in place.

Trim excess tape from around the PC board.

Assemble the fob. Check each switch to ensure it can be heard operating as you push it. Try the fob.

See: https://www.youtube.com/watch?v=dagH0ZN_...

Thank you. Rich Knowles

这个答案有帮助吗?

得分 1
添加一条评论

Clean both the metal buttons and the gold circles with a little bit of rubbing alcohol. You want them to be shiny metal again because that’s how your fob works to close the circuit for each button. You can use a paper towel or a clean cloth. Dry them off and use some clear tape to hold them in place on the circuit board where they need to be for your buttons to work.

这个答案有帮助吗?

得分 0
添加一条评论

@normlscrindy

The bottom two buttons on FOB are not connected. 3 is the right number for a total of 5. Those “pads” are what closes the circuit when you push the button. Clean the contacts on the circuit board, as well as the pads, carefully with an eraser. Than place the buttons on the little nips on the FOB. You can just use a little bit of vaseline or other slightly sticky substance between the pads and the rubber for the FOB. With all 5 of the membrane pads back on the rubber, place the circuit board over it and assemble the FOB in such a way that the little contact pads are always on the bottom (let gravity help you). Once it is assembled the pads are being held in place simply by the board. They got nowhere to go.

Of course, if you are in doubt use a very small amount of super glue on the rim of the contact to glue it to the “silicone button pad  “

这个答案有帮助吗?

得分 0
添加一条评论

I also have this issue on a 2012 Ram key fobs. As a pair of them on ebay & else where are $13 & up, I plan on getting a new pair and swapping out the circuit board only from the old fobs to avoid having to reprogram them or at least till I find a way around the reprogram fee.

这个答案有帮助吗?

得分 0
添加一条评论

I recently had the same issue, I've used silicon adhesive. I figured that super glue would made the connection stiff and would not allow the button to work properly. It's working fine

这个答案有帮助吗?

得分 0
添加一条评论

I suggest taking a look at the following YouTube video I produced in Oct 2016.

https://youtu.be/dagH0ZN_2A0.

这个答案有帮助吗?

得分 0
添加一条评论

My first suggestion is to buy a new button pad that has he connectors attached properly. You can buy them online, I suggest finding your vehicle year, make, and model on this website https://keylessentryremotefob.com

Another suggestion would be to place tin foil as a substitution for the connectors. That should get you by for awhile.

这个答案有帮助吗?

得分 0
添加一条评论

添加你的答案

cindy h 将永远感激不已
浏览统计数据:

过去 24 小时: 18

过去 7 天: 77

过去 30 天: 376

总计 12,236