
iPod Shuffle 4th Generation Control Buttons Replacement

简介
转到步骤 1Replace the electronic portion of the control buttons.


-
-
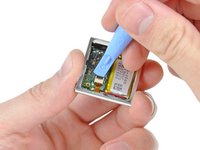
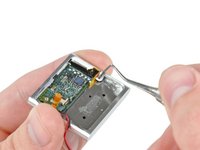
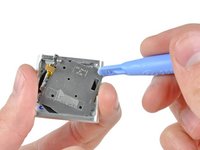
Use a combination of iPod opening tools and metal spudgers to pry the rear panel away from the Shuffle by the seam nearest the ON/OFF switch.
I managed to open mine using no tools at all so without damage. Maybe the glue also weakened over time so might need to use some heat. I didn’t but then again it’s a second hand, old device in my case.
I used the clip on the back as a leverage to (ever so slightly) bend the back piece in the center. Having that bend is enough for the very small clips on the power switch side to detach. Once that side is removed you can slide the complete back out towards the direction of the power switch. I checked on a flat surface and the piece isn’t damaged, still straight. Just don’t keep it bend too long and don’t over bend it. It really shouldn’t take much since those notches are really small.
To close it again just slide the back side in again and then snap the power switch side back in place by lightly pressing it on top. Since the clips aren’t damaged this way it will close up nicely. If the notches got damaged you’ll have to use glue instead (hot glue will do and is easily removable again).
what do you mean by bend the back piece in the center?! How do you do that exactly? Did you stick something in between the back piece and the clip and press in?
I completely agree with Ha ns' comment. I really cannot understand how the author managed to open this device as described. There must be something like a 0.1mm gap between the housing and the cover, impossible to enter a spudger or pry tool. Use a lever on the hinged side of the clip to lift the cover, insert a 0.2mm plastic film or a thin plectrum or spudger on the bent center of the cover. Avoid to push the spudger down, as there are electronic components underneath, only lift the cover, without overbending. Move over to the side of the on/off switch, and release the 3 clips. On the other end an 8mm long nose will avoid lifting off the cover. You will have to slide it out horizontally. Clearly: you have to be very very careful and gifted...
cloclolulu - 回复
-
-
-
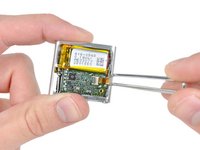
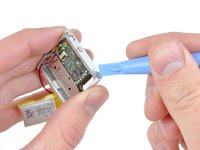
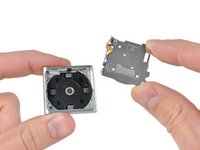
Remove the single 2.1 mm Phillips screw securing the logic board to the front case.
-
-
-
在这个步骤中使用的工具:Tweezers$4.99
-
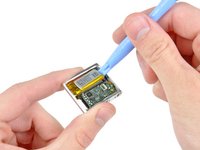
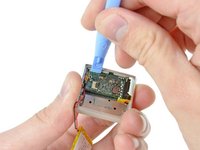
Use the edge of an iPod opening tool to flip up the retaining flap on the control button cable ZIF socket.
-
Use a pair of tweezers to gently pull the control button ribbon cable out of its socket.
I could not get the ribbon cable out with a pair of tweezers. Instead I inserted a needle below the cable, and gently pulled it out by pressing with the finger on the cable (and against the needle). Very difficult!
cloclolulu - 回复
-
-
-
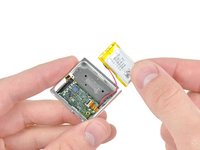
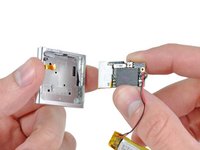
Use an iPod opening tool to gently pry the battery off the adhesive securing it to the front case.
-
Lift the battery out of the front case, being sure not to strain its delicate leads.
Why not simplifying this delicate step by just cutting the wires and soldering the (also cutted) new battery’s wires onto them (without creating a short circuit of course!)
I was going to refer to my comment on step 10, where I am essentially saying this same thing and how to do it.
If you don’t like the prospect of soldering to the logic board if you are new to it this is an easier way to get this job done without the risk of bricking the logic board, and you also wont have to disassemble the iPod any more than the guide has shown up to this point.
-
-
-
Remove the following four screws:
-
Two 1.2 mm Phillips screws with large heads.
-
Two 1.6 mm Phillips screws with small heads.
-


To reassemble your device, follow these instructions in reverse order.
To reassemble your device, follow these instructions in reverse order.
7等其他人完成本指南。

2指南评论
I'm gonna try to remove the back cover with minimal prying to reduce cosmetic defects. The plan is to somehow remove the spring loaded clip by pushing out the lever pin, then drilling holes along the edge of the over wherre the 3 little hooks are (In this image, where the right thumb is touching. https://d3nevzfk7ii3be.cloudfront.net/ig...).
It would be great if someone could provide a closer look at where exactly the hooks are so I can position my 1.5mm drill bit better. Also, if you can to figure out how to remove the spring loaded clip mechanism without going through the 4 screws, that'd be awesome! I suspect the pin is held in place by just adhesive, but don't want to risk pushing too hard and causing defects. :(
Sam Waiban - 回复
just open the clip past where it is suppose to open and it pops right off.