简介
按照本指南中的步骤拆卸,转移和/或更换 iPhone XS Max 中的耳机扬声器和前传感器组件。该组件包括耳机扬声器、麦克风、环境光传感器、泛光照明器和接近传感器。
这个组件在工厂与你的个人 iPhone 配对,因此你必须在更换显示器时将其从旧显示器转移到新的。
泛光照明器是组成生物识别Face ID安全功能的一部分,如果原始组件损坏或安装不正确,Face ID功能将失败。用新零件替换它也会导致Face ID失效,因此在此过程中要特别注意不要损坏任何这些组件。如果损坏,只有苹果可以恢复Face ID功能。
你所需要的
-
-
将蓝色手柄向后拉,解锁反向钳的手臂。
-
将手臂滑过 iPhone 的左边缘或右边缘。
-
将吸盘靠近 iPhone 的底部边缘——一个在前面,一个在后面。
-
将吸盘一起挤压,以向所需区域施加吸力。
-
-
-
加热 iOpener 并将其穿过反向钳的手臂。
-
把 iOpener 折叠起来,放在 iPhone 的底部边缘。
-
等待一分钟,让粘合剂有机会释放,形成一个开口缝隙。
-
将打开工具插入开口缝隙,位于屏幕和塑料边框之下,而不是屏幕本身。
-
跳过接下来的三个步骤。
-
-
-
使用吹风机或加热枪,或者准备一个iOpener,把它涂在iPhone的下边缘大约一分钟,以便软化下面的粘合剂。
besteht da die Gefahr das sich das Displayglas vom lcd löst?
Besteht da die Gefahr das sich der Kleber vom Displayglas löst?
-
-
-
保持相同的力量匀速向上拉动吸盘,使前面板与后壳之间露出微小的缝隙。
-
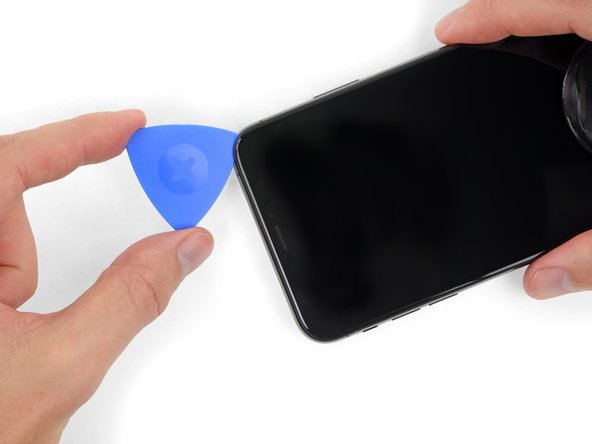
将撬片插入缝隙,位于屏幕和塑料边框之下,而不是屏幕本身。
-
-
-
-
卸下固定顯示器連接器支架的三個Y000螺釘:
-
兩個1.5毫米螺釘
-
一個1.1毫米螺釘
I am replacing the screen for the 2nd time - the first repair was done by someone else, and the first 2 screws are 1.5mm and the last screw is 1.1mm… If I put the screw back in am I risking Long Screw Damage?
Thanks for all your comments! I'll amend this step.
Arthur Shi - 回复
Hi, I just changed the screen on my XS Max and for this bracket I used 2 x 1.1 mm and 1 x 1.5 mm.
Starting from left to right:
- left 1.1 mm (I tried with 1.5 mm like in the above picture but I felt that it didn't wanted to go deeper so I didn't forced and I tried it in the middle and it fit perfectly)
- middle 1.5 mm
- right 1.1 mm
For the two brackets I had 7 screws, I aligned them on the desk by length and I had 2 x 1.5 mm, 4 x 1.1 mm and 1 x 3.7 mm.
Good luck and I hope it will help someone!
-
-
-
移除固定扬声器/传感器组件的三个 Y000号螺丝:
-
一颗1.4 mm 螺丝
-
两颗 1.5 mm 螺丝
Ciao @max94949 Quale lunghezza stai cercando? Il passo menziona che si tratta di una vite Y000 da 1,4 mm e di due vite Y000 da 1,5 mm.
-
-
-
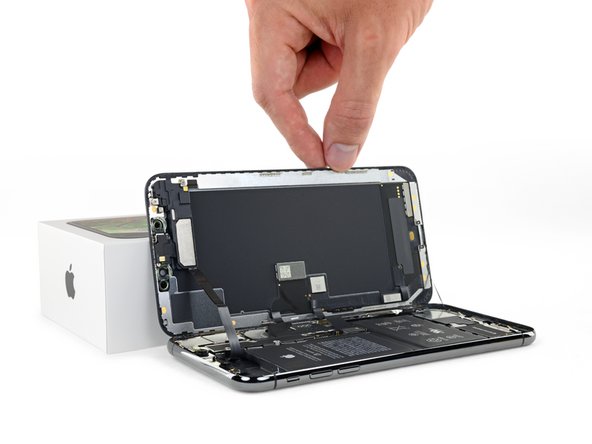
使用撬棒,轻轻撬动扬声器组件的顶部边缘,然后将其翻转并远离显示器的顶部边缘。
If you are using a refurbished display, check for dirt in the earpiece speaker cutout.
If you have poor quality or low sound after changing the display, use a cotton bud and isopropyl alcohol to clean the earpiece cutout.
-
-
-
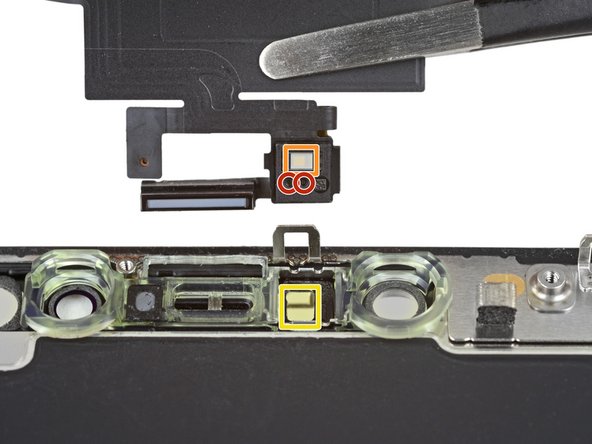
使用镊子摆动环境光传感器并将其从显示屏的凹槽中提起。
This was the most difficult part for me so i erred on the side of caution. I reheated the display in the oven at 85 degrees celsius. Like in the third picture in the next step, i got a razor into the slot below, to get the diffuser a little loose before wiggling the sensor out. I didn't understand the wiggling until i simply rocked it like a boat would side to side like to the top of the display to the bottom on the display, and voila, all came out easy and in one piece with the diffuser still attached.
-
-
-
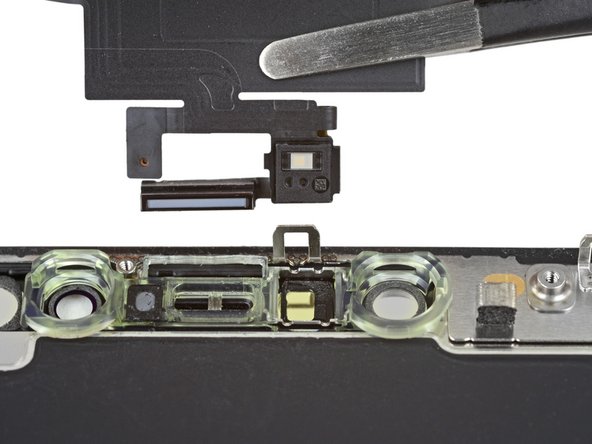
如果你成功移除了整个环境光线传感器,如第一张照片所示,请继续执行下一步骤。
-
如果白色漫射条脱落并嵌入显示屏中,如第二张照片所示,则需要使用薄刀片或撬具工具沿顶部边缘小心地将其拉出。首先重新加热可以使这项任务更容易一些。
I have accidentally damaged flood illuminator will it affect the face id also or if I just replace the Earpiece Speaker and Sensor Assembly it will get fixed.
-
-
-
取下耳机扬声器和前传感器组件。
-
接近传感器
-
泛光照明器
-
必须正确定位这些模块,这样才不会被任何粘合剂阻塞。
Do you have to remove the earpiece speaker and front sensor assembly. If you are taking a screen from another Xs max with it already attached?
The front sensor assembly is part of Face ID, so you must transfer the original assembly to the replacement screen in order to maintain Face ID functionality.
No, you just take the whole unit. Warm it up and remove the glued sensors like described. Handle it carefully, the speaker cable is quite thin. If damaged, you might loose your face-ID functionality.
Does the screen need a reprogamation onto the new screen?
if the pentalope screws are rusted and the driver can’t fit in it to remove them is there any other way to remove them to replace screen?
-


把你的更换零件和原装零件做对比——你可能需要转移一些旧的零件,或者在安装之前把新零件后面的胶带去掉。
请按逆序操作重组你的设备。
把你的电子废料带到 R2 或者 e-Stewards 认证的回收商那里。
维修进展不如意?请查阅我们的问题解答指南 来排除障碍。
把你的更换零件和原装零件做对比——你可能需要转移一些旧的零件,或者在安装之前把新零件后面的胶带去掉。
请按逆序操作重组你的设备。
把你的电子废料带到 R2 或者 e-Stewards 认证的回收商那里。
维修进展不如意?请查阅我们的问题解答指南 来排除障碍。
27等其他人完成本指南。


10条评论
Similar but not identical. You can find instructions for the standard XS model over here.
I’m looking for a replacement earpiece speaker, with the ribbon cable that has all the sensors already on it. Seems that all the sensors aren’t removable, specifically the flood illuminator. Any advice? Thanks
Rewa and HCQS uploaded some videos on YouTube. I’m also looking for the whole assembly and wanted to transplant the flood illuminator. It can be done with some soldering. You need microscope, solder gun, and PCB cleaner paste. The replacement must have the flood illuminator. It can be done, but probably you will end up loosing Face ID. It is hard.
I replaced earpiece speaker assembly.
And the new part works well.
But Face ID is not working.
I can not activate Face ID.
What do i do?
Unfortunately, the original front sensor assembly is paired to the phone. Replacing the part will render Face ID inoperable.
So basically, if you do an “at-home”, normal, speaker repair to the ear speaker, you are going to lose FaceID capabilities, period?
Correct. The entire front sensor assembly is replaced together. You may be able to replace the earpiece speaker alone, but it would require very advanced soldering.