跳转到主内容

iPhone 5s Front Panel Assembly Replacement

仅作为前提条件
本指南仅用作其他指南的先决条件。不能单独食用。

你所需要的

  1. iPhone 5s Front Panel Assembly Replacement, Removing the Pentalobe screws: 步骤 1 中的图像 1,1
    • Before you proceed, discharge your iPhone battery below 25%. A charged lithium-ion battery can catch fire and/or explode if accidentally punctured.

    • Power off your iPhone before beginning disassembly.

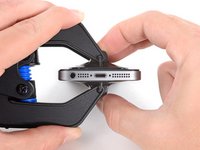
    • Remove the two 3.9 mm Pentalobe screws from either side of Lightning connector.

  2. iPhone 5s Front Panel Assembly Replacement, Taping the display glass: 步骤 2 中的图像 1,3 iPhone 5s Front Panel Assembly Replacement, Taping the display glass: 步骤 2 中的图像 2,3 iPhone 5s Front Panel Assembly Replacement, Taping the display glass: 步骤 2 中的图像 3,3
    • If your display glass is cracked, keep further breakage contained and prevent bodily harm during your repair by taping the glass.

    • Lay overlapping strips of clear packing tape over the iPhone's display until the whole face is covered.

    • This will keep glass shards contained and provide structural integrity when prying and lifting the display.

    • Wear safety glasses to protect your eyes from any glass shaken free during the repair.

  3. iPhone 5s Front Panel Assembly Replacement, Display separation prevention: 步骤 3 中的图像 1,3 iPhone 5s Front Panel Assembly Replacement, Display separation prevention: 步骤 3 中的图像 2,3 iPhone 5s Front Panel Assembly Replacement, Display separation prevention: 步骤 3 中的图像 3,3
    • In the following steps you will be pulling the display up out of the phone body. The display is composed of a glass screen and a plastic bezel with metal clips.

    • Regardless of the tool you use, you need to be sure you pull up the entire display.

    • If the glass begins to separate from the plastic, as shown in the first image, slide a plastic opening tool between the plastic frame and the metal phone body to pry the metal clips out of the case.

    • If you are reassembling a phone with a separated display bezel, you may want to place a thin strip of adhesive between the plastic bezel and the glass to keep the phone closed.

  4. iPhone 5s Front Panel Assembly Replacement, Anti-Clamp instructions: 步骤 4 中的图像 1,3 iPhone 5s Front Panel Assembly Replacement, Anti-Clamp instructions: 步骤 4 中的图像 2,3 iPhone 5s Front Panel Assembly Replacement, Anti-Clamp instructions: 步骤 4 中的图像 3,3
    在这个步骤中使用的工具:
    Anti-Clamp
    $24.95
    购买
    • The next two steps demonstrate the Anti-Clamp, a tool we designed to make the opening procedure easier. If you aren't using the Anti-Clamp, skip down two steps for an alternate method.

    • For complete instructions on how to use the Anti-Clamp, check out this guide.

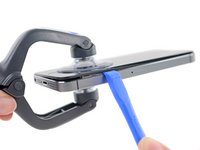
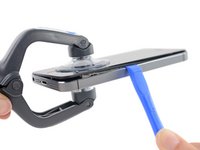
    • Pull the blue handle backwards to unlock the Anti-Clamp's arms.

    • Slide the arms over either the left or right edge of your iPhone.

    • Position the suction cups near the bottom edge of the iPhone just above the home button—one on the front, and one on the back.

    • Squeeze the cups together to apply suction to the desired area.

    • If the surface of your iPhone is too slippery for the Anti-Clamp to hold onto, you can use the included tape pad to create a grippier surface.

  5. iPhone 5s Front Panel Assembly Replacement: 步骤 5 中的图像 1,3 iPhone 5s Front Panel Assembly Replacement: 步骤 5 中的图像 2,3 iPhone 5s Front Panel Assembly Replacement: 步骤 5 中的图像 3,3
    • Pull the blue handle forwards to lock the arms.

    • Turn the handle clockwise 360 degrees or until the cups start to stretch.

    • Make sure the suction cups remain aligned with each other. If they begin to slip out of alignment, loosen the suction cups slightly and realign the arms.

    • Insert an opening pick under the screen when the Anti-Clamp creates a large enough gap.

    • If the Anti-Clamp doesn't create a sufficient gap, rotate the handle a quarter turn.

    • Don't crank more than a quarter turn at a time and wait a few seconds between turns. Let the Anti-Clamp and time do the work for you.

    • Skip the next two steps.

  6. iPhone 5s Front Panel Assembly Replacement, Manual Opening Procedure: 步骤 6 中的图像 1,1
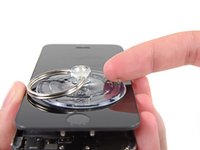
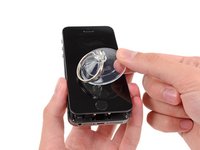
    • If you don't have an Anti-Clamp, use a single suction cup to lift the front panel:

    • Press a suction cup onto the screen, just above the home button.

    • Be sure the cup is completely on the screen to get a tight seal.

  7. iPhone 5s Front Panel Assembly Replacement, Start lifting the front panel assembly: 步骤 7 中的图像 1,1
    • The front panel is attached with clips, and there are several ribbon cables connecting it to the rest of the phone. Your goal here is to release the clips and open the phone only enough to disconnect the cables. Go slowly and carefully to avoid damage.

    • Make sure the suction cup is firmly attached to the front panel assembly near the home button.

    • While holding the iPhone down with one hand, pull up on the suction cup to slightly separate the home button end of the front panel from the rear case.

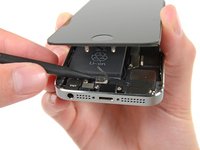
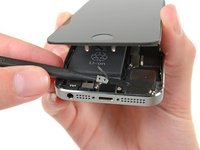
    • With a plastic opening tool, gently pry the edges of the rear case down, away from the front panel assembly, while you pull up with the suction cup.

    • Take your time and apply firm, constant force. The front panel assembly is a much tighter fit than on most other devices.

  8. iPhone 5s Front Panel Assembly Replacement: 步骤 8 中的图像 1,2 iPhone 5s Front Panel Assembly Replacement: 步骤 8 中的图像 2,2
    • Do not try to completely remove the front panel assembly from the rear case, as there are several delicate ribbon cables connecting them.

    • Pull the plastic nub to release the vacuum seal on the suction cup.

    • Remove the suction cup from the screen.

  9. iPhone 5s Front Panel Assembly Replacement, Removing the Touch ID cable bracket: 步骤 9 中的图像 1,3 iPhone 5s Front Panel Assembly Replacement, Removing the Touch ID cable bracket: 步骤 9 中的图像 2,3 iPhone 5s Front Panel Assembly Replacement, Removing the Touch ID cable bracket: 步骤 9 中的图像 3,3
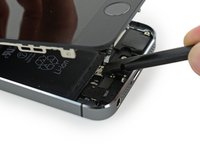
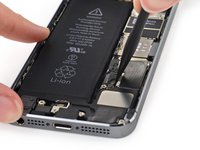
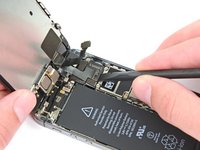
    • Open the phone just enough to reveal the metal bracket covering the home button cable.

    • Do not open the phone too far or you risk damaging the home button cable, or the socket it plugs into. Keep the cable loose—if it is stretched taut, that's too far.

    • Only the phone's original home button assembly will be capable of using the Touch ID functionality. If you rip the cable, installing a new home button will only restore ordinary home button functions, not the Touch ID features.

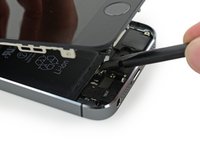
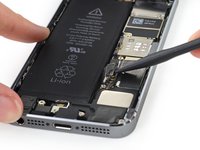
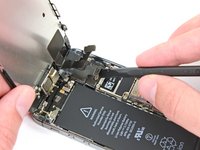
    • Use the tip of a spudger to push the bracket free and remove it with tweezers.

    • The next two steps apply to reassembly. Skip them and continue to Step 12 until reassembly.

  10. iPhone 5s Front Panel Assembly Replacement: 步骤 10 中的图像 1,2 iPhone 5s Front Panel Assembly Replacement: 步骤 10 中的图像 2,2
    • During reassembly, you will need to reinstall the Touch ID cable bracket. The top of the bracket needs to slide between the battery and Touch ID cable connector, in front of the metal tab. The bottom must latch down over the connector.

    • Slide the top of the bracket over the Touch ID cable connector from left to right.

  11. iPhone 5s Front Panel Assembly Replacement: 步骤 11 中的图像 1,2 iPhone 5s Front Panel Assembly Replacement: 步骤 11 中的图像 2,2
    • During reassembly, use the flat end of a spudger to snap the front portion of the Touch ID cable bracket down over the cable connector.

    • If the bracket does not snap down flush, you may need to remove the bracket and slide it over the cable connector again for a better fit.

  12. iPhone 5s Front Panel Assembly Replacement, Disconnecting the home button cable connector: 步骤 12 中的图像 1,2 iPhone 5s Front Panel Assembly Replacement, Disconnecting the home button cable connector: 步骤 12 中的图像 2,2
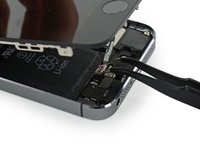
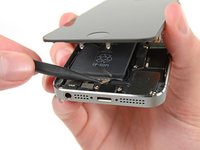
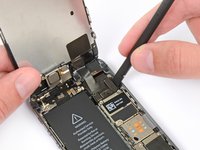
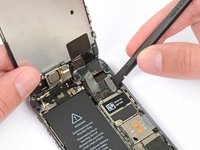
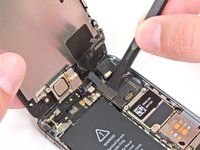
    • Use the tip of a spudger to pry the home button cable connector up out of its socket.

    • Be sure you're separating the cable connector from its socket, and not prying the entire socket up. The socket is on its own glued-down cable that can be pried up if you aren't careful.

  13. iPhone 5s Front Panel Assembly Replacement, Opening up the phone: 步骤 13 中的图像 1,3 iPhone 5s Front Panel Assembly Replacement, Opening up the phone: 步骤 13 中的图像 2,3 iPhone 5s Front Panel Assembly Replacement, Opening up the phone: 步骤 13 中的图像 3,3
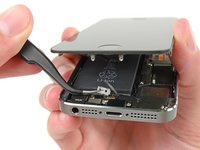
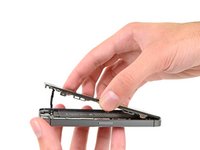
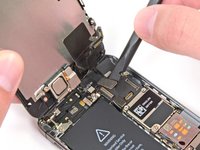
    • Once the connector has been released, pull the home button end of the assembly away from the rear case, using the top of the phone as a hinge.

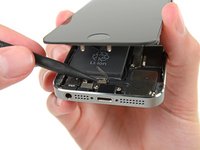
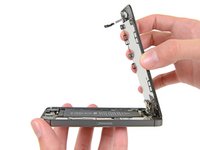
    • Open the display to about a 90º angle, and lean it against something to keep it propped up while you're working on the phone.

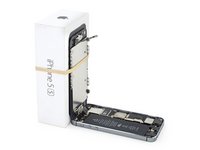
    • Add a rubber band to keep the display securely in place while you work. This prevents undue strain on the display cables.

    • In a pinch, you can use an unopened canned beverage to hold the display.

  14. iPhone 5s Front Panel Assembly Replacement: 步骤 14 中的图像 1,1
    • Remove the two 1.6 mm Phillips #000 screws securing the metal battery connector bracket to the logic board.

  15. iPhone 5s Front Panel Assembly Replacement: 步骤 15 中的图像 1,1
    • Remove the metal battery connector bracket from the iPhone.

  16. iPhone 5s Front Panel Assembly Replacement: 步骤 16 中的图像 1,2 iPhone 5s Front Panel Assembly Replacement: 步骤 16 中的图像 2,2
    • Use the flat end of a spudger to gently pry the battery connector up from its socket on the logic board.

    • Be very careful to only pry up on the battery connector itself and not the socket on the logic board. If you pry up on the logic board socket or the board itself, you may destroy the socket or damage nearby components on the board.

  17. iPhone 5s Front Panel Assembly Replacement: 步骤 17 中的图像 1,1
    • Remove the following screws securing the front panel assembly cable bracket to the logic board:

    • One 1.7 mm Phillips #000 screw

    • One 1.2 mm Phillips #000 screw

    • One 1.3 mm Phillips #000 screw

    • One more 1.7 mm Phillips #000 screw

    • This 1.7 mm screw tends to not be attracted to a magnetized screwdriver. Take care not to lose it when removing.

    • It is especially important to keep track of your screws in this step for reassembly. Accidentally using the 1.3 mm screw or one of the 1.7 mm screws in the bottom right hole will result in significant damage to the logic board causing the phone to no longer boot properly.

    • Be careful not to over-tighten the screws, and don't force them. If they don't fit easily when you are securing them, they may be the wrong size.

  18. iPhone 5s Front Panel Assembly Replacement: 步骤 18 中的图像 1,1
    • Remove the front panel assembly cable bracket from the logic board.

  19. iPhone 5s Front Panel Assembly Replacement: 步骤 19 中的图像 1,2 iPhone 5s Front Panel Assembly Replacement: 步骤 19 中的图像 2,2
    • Use a spudger or a fingernail to disconnect the front-facing camera and sensor cable.

  20. iPhone 5s Front Panel Assembly Replacement: 步骤 20 中的图像 1,2 iPhone 5s Front Panel Assembly Replacement: 步骤 20 中的图像 2,2
    • Make sure the battery is disconnected before you disconnect or reconnect the cable in this step.

    • Disconnect the LCD cable connector.

    • When reassembling your phone, the LCD cable may pop off the connector. This can result in white lines or a blank screen when powering your phone back on. If that happens, simply reconnect the cable and power cycle your phone. The best way to power cycle your phone is to disconnect and reconnect the battery.

  21. iPhone 5s Front Panel Assembly Replacement: 步骤 21 中的图像 1,2 iPhone 5s Front Panel Assembly Replacement: 步骤 21 中的图像 2,2
    • Finally, disconnect the digitizer cable connector.

  22. iPhone 5s Front Panel Assembly Replacement: 步骤 22 中的图像 1,1
    • Remove the front panel assembly from the rear case.

结论

To reassemble your device, follow these instructions in reverse order.

34等其他人完成本指南。

Sam Goldheart

于10/18/12注册

465,243 声望

创作了538篇指南

团队

iFixit iFixit 的会员

Staff

136 名成员

创作了16,562篇指南

3条评论

... Log in for more steps.

-> Follow in reverse order is only new instruction -.-

Where are the steps for taking off the home button and the front camera and remounting those????

Haitham - 回复

This tutorial will give you all the info you need:

iPhone 5s LCD及数字转换器更换教程

iGuys -

Ich fand es einfach und sehr gut ausgezeichnet erklärt

Feisal Elsafty - 回复

添加评论

浏览统计数据:

过去 24 小时: 0

过去 7 天: 0

过去 30 天: 6

总计 14,666