简介
电池不耐用了?换一个新的吧。(链接为英文视频)
你所需要的
视频概述
-
-
-
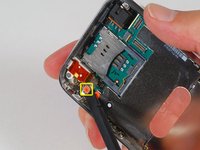
移除下列的 8 颗螺丝:
-
用于将主板固定至后壳的五颗 2.3 mm #00 半螺纹十字螺丝。
-
用于固定主板和摄像头的两颗 2.3 mm #00 全螺纹十字螺丝。
-
在 “Do not remove” 贴纸下方的一颗 2.9 mm #00 十字螺丝。
-
装回时的说明:
-
摄像头旁的那颗螺丝(右下角高亮标记的螺丝)有一条用于固定摄像头在位的金属条。
-


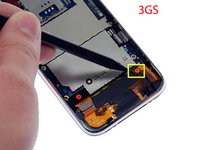


要重新组装您的设备,请按照相反的顺序执行这些指示。
938等其他人完成本指南。


36指南评论
I replaced the battery in both my iPhone and my wife's in the same session. Using the slideshow and directions I was able to successfully do the replacement. Of course my iPhone was the first one done so as to gain some experience before tackling my wife's iPhone. I had two minor issues in reassembling mine. Firstly, I completely missed re-installing the number 3 cable. It wasn't till I was reassembling my wife's iPhone that I realized I'd missed it. Not sure what it supports as I had my phone up and running, checked the GPS, etc while it wasn't connected. Secondly, my camera wasn't seated properly and I got the strangest imagery when I launched it. All green and black, looking like one of those ghost buster reality shows using night vision. Fortunately, both issues were easy to correct. Outstanding directions and slides! Oh yeah finally, the kits for the battery comes with both a #00 Phillips screwdriver and a spudge, however, I ordered the extra spudge and got one that is better suited for prying the battery up.
Hey,
first of all - BIG UPS AND THX for everything.
That means FAST shipping to germany and the great tutorials, manuals etc.
I did change the battery in less than 15 minutes whit ur manual this was easy as.... dunno :).
the "hardest part" was to remove the battery from the cover - but with a bit of tact it works fine.
So thx :)
Incredibly easy to make the swap. Thanks for the great writeup. I was able to complete the battery replacement within about 20 minutes. I've swapped an iPod battery before and although this was a bit more complex it really wasn't that tough. Anyone who's a bit handy should be able to complete it with no trouble at all. Thanks.
Great instructions, very clear. A couple points:
1) The screwdriver I had wasn't working that well, so I had to use a different one. I found that a 0# worked fine (although I suspect a 00# would work better.0
2) When I reassembled the phone, the home button didn't work. You really need to press down on the bottom of the screen when you screw the bottom screws (by the dock connector) back in. Otherwise, the contacts for the home button won't reliably hit.
dlinsalata - 回复 分享