跳转到主内容

当前版本的文档还未经巡查,您可以查看最新的已查核版本

你所需要的

  1. , 加热iOpener: 步骤 1 中的图像 1,2 , 加热iOpener: 步骤 1 中的图像 2,2
    • 在操作前我们推荐你清空微波炉,在底部的任何讨厌的食物残渣最终都可能粘在iOpener上。

    • 将iOpener放在微波炉中央 。

    • 对于旋转式微波炉:确保盘子可以自由旋转。如果转盘卡住了,iOpener可能会过热并燃烧

  2. : 步骤 2 中的图像 1,1
    • 加热iOpener三十秒

    • 在整个维修过程中,如果iOpener 冷却了,在微波炉中每次重新加热额外的三十秒。

    • 注意在维修过程中不要过度加热iOpener,过热可能会导致iOpener爆炸。

    • 如果iOpener过热膨胀,千万不要触碰iOpener。

    • 如果iOpener中间部分依然烫的没法碰,请等待冷却后再使用,加热好的iOpener 应该可以保持热度十分钟

  3. : 步骤 3 中的图像 1,1
    • 把iOpener从微波炉中拿出来,捏着两边扁平边缘中的一个以避免碰到中心热的部分。

    • iOpener会非常烫,所以拿着它的时候千万要小心。必要的时候可以使用烤箱手套。

  4. , 加热iOpener的替代方案: 步骤 4 中的图像 1,2 , 加热iOpener的替代方案: 步骤 4 中的图像 2,2
    • 如果你没有微波炉,请按照此步骤在沸水中加热iOpener。

    • 在锅或平底锅里装满足够的水来完全淹没iOpener。

    • 把水加热到沸腾。关火。

    • 将iOpener放入热水中2-3分钟。确保iOpener完全浸入水中。

    • 用钳子从热水中提取加热的iOpener。

    • 用毛巾彻底擦干iOpener。

    • iOpener会很燙,所以拿取時請小心的從iOpener的邊邊拿

    • 你的iOpener已准备好使用!如果你需要重新加热iOpener,请将水加热到沸点,关火,并将iOpener放入水中2-3分钟。

  5. , 前面板: 步骤 5 中的图像 1,3 , 前面板: 步骤 5 中的图像 2,3 , 前面板: 步骤 5 中的图像 3,3
    • 如果您的显示屏玻璃已经碎裂,防止显示屏玻璃在您维修时进一步伤害您,请使用胶带来固定已经碎裂的屏幕。

    • 给iPad 的正面整面贴上胶带。

    • 这一步将保证在您翘起和移除显示屏时能够保持完整。

    • 尽量根据下面的指南进行操作。但,一旦玻璃破碎,请停下拆解并使用金属撬刀撬出玻璃,避免更多的碎裂。

    • 戴上安全眼镜来保护你的眼睛。 小心操作不要损坏了LCD内屏。

  6. : 步骤 6 中的图像 1,2 : 步骤 6 中的图像 2,2
    • 将iOpener放置在iPad左侧。也就是Home键左侧位置。

    • 将iOpener放置至少一分钟来软化玻璃下面的粘合剂。

  7. : 步骤 7 中的图像 1,3 : 步骤 7 中的图像 2,3 : 步骤 7 中的图像 3,3
    • 虽然iPad看起来是一体化高度集成的,但在玻璃面板下面有许多细小的部件,避免伤害那些部件,只能加热或撬动指南内所描述到的区域。

    • 在您按照本指南操作时,请小心下述区域。

    • 前置摄像头

    • 天线

    • 显示排线

  8. 这个步骤还没有翻译 帮忙翻译一下

    : 步骤 8 中的图像 1,3 : 步骤 8 中的图像 2,3 : 步骤 8 中的图像 3,3
    在这个步骤中使用的工具:
    Anti-Clamp
    $24.95
    购买
    • The next three steps demonstrate the Anti-Clamp, a tool we designed to make the opening procedure easier. If you aren't using the Anti-Clamp, skip down three steps for an alternate method.

    • For complete instructions on how to use the Anti-Clamp, check out this guide.

    • Pull the blue handle backwards to unlock the Anti-Clamp's arms.

    • Place an object under your iPad so it rests level between the suction cups.

    • Position the suction cups near the middle of the left edge—one on the top, and one on the bottom.

    • Hold the bottom of the Anti-Clamp steady and firmly press down on the top cup to apply suction.

    • If you find that the surface of your iPad is too slippery for the Anti-Clamp to hold onto, use tape to create a grippier surface.

  9. 这个步骤还没有翻译 帮忙翻译一下

    : 步骤 9 中的图像 1,3 : 步骤 9 中的图像 2,3 : 步骤 9 中的图像 3,3
    • Pull the blue handle forward to lock the arms.

    • Turn the handle clockwise 360 degrees or until the cups start to stretch.

    • Make sure the suction cups remain aligned with each other. If they begin to slip out of alignment, loosen the suction cups slightly and realign the arms.

  10. 这个步骤还没有翻译 帮忙翻译一下

    : 步骤 10 中的图像 1,2 : 步骤 10 中的图像 2,2
    • Wait one minute to give the adhesive a chance to release and present an opening gap.

    • If your screen isn't getting hot enough, you can use a hair dryer to heat along the left edge of the iPad.

    • For complete instructions on how to use a hair dryer, check out this guide.

    • Insert an opening pick under the screen when the Anti-Clamp creates a large enough gap.

    • If the Anti-Clamp doesn't create a sufficient gap, apply more heat to the area and rotate the handle clockwise half a turn.

    • Don't crank more than a half a turn at a time, and wait one minute between turns. Let the Anti-Clamp and time do the work for you.

    • Skip the next two steps.

  11. : 步骤 11 中的图像 1,3 : 步骤 11 中的图像 2,3 : 步骤 11 中的图像 3,3
    • 将吸盘小心的放在刚加热的一侧中间的位置。

    • 确保吸盘已经牢牢吸住前玻璃面板。

    • 使用一只手在固定住iPad,另一只手慢慢提起吸盘,将前玻璃面板与后壳分离。

    • 如果你的 iPad 屏幕严重破裂,用一层光滑的透明包装胶带覆盖它可能有助于吸盘粘附。 或者,使用一条坚固的胶带(如大力胶/管道胶带)并将其折叠成手柄

  12. : 步骤 12 中的图像 1,3 : 步骤 12 中的图像 2,3 : 步骤 12 中的图像 3,3
    • 在刚刚打开的缝隙处放置一个撬片。

    • 切勿将撬片插入深度超过黑色边框,这样深入过度可能会使LCD屏幕受损。

    • 然后取下吸盘。

  13. : 步骤 13 中的图像 1,1
    • 再次加热iOpener然后放置在刚才的位置。

    • 小心,请勿在维修过程中过度加热iOpener。 在重新加热iOpener之前请至少等待10分钟。

  14. : 步骤 14 中的图像 1,3 : 步骤 14 中的图像 2,3 : 步骤 14 中的图像 3,3
    • 沿着第一个撬片的开的口处插入另外一个翘片同时向下滑动,让撬片分离粘合剂。

  15. : 步骤 15 中的图像 1,3 : 步骤 15 中的图像 2,3 : 步骤 15 中的图像 3,3
    • 继续沿着下方继续滑动来将粘合剂分离。

    • 如果撬片卡住了,请沿着iPad的侧面滚动撬片,然后继续进行分离工作。

  16. : 步骤 16 中的图像 1,3 : 步骤 16 中的图像 2,3 : 步骤 16 中的图像 3,3
    • 将第一个插入iPad的撬片向上滑动到iPad的左上角

    • 撬片可能会出现图片上的情况,请不要慌张。 只需将撬片拉出一点点来继续进行维修工作。 但要避免这种情况,因为粘合剂可能会粘附在LCD显示屏上变得难以清理。

  17. : 步骤 17 中的图像 1,1
    • 重新加热iOpener 并将其放置在iPad顶部边缘位置且高于前置摄像头。

    • 小心,请勿在维修过程中过度加热iOpener。 在重新加热iOpener之前请至少等待10分钟。

    • 如果您有可以弯折的iOpener,您可以弯折其使其同时加热左上角边缘位置。

  18. : 步骤 18 中的图像 1,3 : 步骤 18 中的图像 2,3 : 步骤 18 中的图像 3,3
    • 在左顶部插入撬片来分离粘合剂。

  19. : 步骤 19 中的图像 1,3 : 步骤 19 中的图像 2,3 : 步骤 19 中的图像 3,3
    • 滑动撬片直到快接近前置摄像头位置时停下

    • 第三张图片展示了iPad前置摄像头的位置。

    • 避免使用撬片直接滑过前置摄像头,这样做可能会污损到摄像头。 接下来的步骤将会详细说明如何避免损伤前置摄像头。

  20. : 步骤 20 中的图像 1,3 : 步骤 20 中的图像 2,3 : 步骤 20 中的图像 3,3
    • 轻轻拉出些许撬片,并沿着前置摄像头顶部位置慢慢的滑动。

  21. : 步骤 21 中的图像 1,3 : 步骤 21 中的图像 2,3 : 步骤 21 中的图像 3,3
    • 将刚才那片撬片稍微滑过前置摄像头然后放在原位不动。

    • 拿另一片撬片插入到摄像头的左侧位置然后滑动到转角位置,完成对该边缘部分的粘合剂分离工作。

  22. : 步骤 22 中的图像 1,3 : 步骤 22 中的图像 2,3 : 步骤 22 中的图像 3,3
    • 将刚才那片撬片稍微深入iPad之中,从摄像头处滑动到右上角。

  23. : 步骤 23 中的图像 1,1
    • 将撬片放在原位,以防粘合剂再次粘连。

    • 重新加热iOpener将其放在有锁定和音量按钮一侧。

  24. : 步骤 24 中的图像 1,2 : 步骤 24 中的图像 2,2
    • 滑动右上角的撬片,分离那部分的粘合剂。

    • 将这个撬片就放在这,防止粘合剂重新粘连。 重新拿一个撬片来进行下一步。

  25. : 步骤 25 中的图像 1,3 : 步骤 25 中的图像 2,3 : 步骤 25 中的图像 3,3
    • 在右侧插入一个新的撬片来分离粘合剂,滑动到中部位置时停下。

    • 显示屏排线大约位于距离iPad底部大约一半的位置。 当您从底部向上滑动撬片大概4.5"(约11.43cm)位置时请停止滑动。

  26. : 步骤 26 中的图像 1,1
    • 就把撬片放在停下的位置,然后重新加热iOpener然后放置在iPad的底部。

  27. : 步骤 27 中的图像 1,3 : 步骤 27 中的图像 2,3 : 步骤 27 中的图像 3,3
    • 滑动左下边的撬片来分离粘合剂。

    • 滑动到左下角时停止滑动。 然后放置在此。

    • 第三张图片展示了在iPad 下方的2个天线和Home键

    • 接下来的步骤将会指导您如何避免伤害这些部件。 只加热和撬动指南所指示的部位。

  28. : 步骤 28 中的图像 1,3 : 步骤 28 中的图像 2,3 : 步骤 28 中的图像 3,3
    • 将原撬片放置在原位,以防粘合剂重新粘合。

    • 拿一片新的撬片,轻轻的从左天线处滑动到home键前。

    • 只能从iPad外边缘向内滑动 请勿按照相反方向滑动 这样可能会损坏天线。

    • 如果您需要再次滑动来清理粘合剂,请取出撬片然后从外边缘重新插入再向内滑动。

    • 将撬片放置不动。

  29. : 步骤 29 中的图像 1,3 : 步骤 29 中的图像 2,3 : 步骤 29 中的图像 3,3
    • 拿一片新的撬片来从刚才那片撬片右边继续滑动。

    • 滑过Home键和右侧天线。只使用尖端来去除粘合剂。

  30. : 步骤 30 中的图像 1,3 : 步骤 30 中的图像 2,3 : 步骤 30 中的图像 3,3
    • 松开粘合剂后,你现在可以将撬片插入右下角附近。 向左滑动拨片,并在离Home键不远的地方停下来。

    • 就和左侧一样,相反方向的滑动可能会损伤天线。

  31. : 步骤 31 中的图像 1,1
    • 重新加热iOpener 并将其放置在有音量按键的一侧。

  32. : 步骤 32 中的图像 1,2 : 步骤 32 中的图像 2,2
    • 请小心操作本步骤。 花点时间来确保粘合剂是热并柔软的,并且您已经使用撬片打开了所有开口。 以及不要害怕停止和重新加热。

    • 在音量控制侧面相反的那一面,你应该确保那一面的每个角都已插入撬片。 旋转撬片然后轻轻提起玻璃面板,沿着显示屏排线边缘清理掉最后的粘合剂。

    • 如果在此步骤遇到很大的阻力难以撬起屏幕请重新加热iOpener 然后将其放置在难以撬起的区域。

  33. : 步骤 33 中的图像 1,2 : 步骤 33 中的图像 2,2
    • 慢慢的提起玻璃面板,来进一步分离粘合剂。

  34. : 步骤 34 中的图像 1,3 : 步骤 34 中的图像 2,3 : 步骤 34 中的图像 3,3
    • 在支起玻璃面板的同时,用撬片分离掉最后的粘合剂。

    • 一定要小心操作,不要切割或损坏任何显示排线。

  35. : 步骤 35 中的图像 1,2 : 步骤 35 中的图像 2,2
    • 一旦粘合剂全部分离掉,就像打开书一样将玻璃面板放在工作台上。

    • 在重新组装过程中,用异丙醇清洁外壳(以及前玻璃面板,如果你打算重新使用它的话)上的粘合剂残留物,并使用我们的 显示器粘合剂应用指南预切粘合剂条更换粘合剂。

    • 在重新组装过程中,很容易夹住前玻璃和 iPad 框架之间的柔性电缆。 请注意柔性电缆,并确保它们轻轻折叠并塞入框架下方。 如果柔性电缆中的折叠被完全压平,则它可能会损坏而无法修复。

  36. , LCD: 步骤 36 中的图像 1,3 , LCD: 步骤 36 中的图像 2,3 , LCD: 步骤 36 中的图像 3,3
    • 剥离固定LCD屏幕螺丝上的胶带。

  37. : 步骤 37 中的图像 1,1
    • 拆下固定LCD屏幕的Phillips螺丝。

    • 3个4.0 mm螺丝

    • 1个4.8 mm螺丝

  38. : 步骤 38 中的图像 1,3 : 步骤 38 中的图像 2,3 : 步骤 38 中的图像 3,3
    • 因为LCD屏幕任然在Home键附近有许多排线与iPad Air主体相连,切勿尝试完全的将LCD屏移开。 仅可从前置摄像头尾端处抬起屏幕。

    • 使用撬棒扁平的一段来从前置摄像头一边撬起一道可以让你手指抓住LCD 屏幕的缝隙。

    • 从前置摄像头处提起iPad Air 的LCD屏幕,就像翻书一样将它翻转到Home键一侧。

    • 小心驶得万年船,切勿操之过急。在您进行翻转的时候请同时盯着LCD排线。

    • 放下LCD屏幕,以便来处理LCD的排线。

    • 请将LCD屏幕放置在柔软、干净、无绒的表面。

  39. : 步骤 39 中的图像 1,3 : 步骤 39 中的图像 2,3 : 步骤 39 中的图像 3,3
    在这个步骤中使用的工具:
    Battery Blocker
    $3.99
    购买
    • 卸下将电池连接器固定到主板的 2.3 毫米十字螺丝。

    • 为降低短路风险,你可以 插入电池隔离片或修改后的撬片来断开电池。

    • 使用电池隔离片隔离电池时要非常小心。 电池触点容易损坏,造成不可逆转的损坏。

    • 将电池阻挡器滑到主板的电池接口区域下方,并在工作时将其留在原位。

    • 如果你在主板下方安装电池隔离片时遇到问题,你可以尝试使用扑克牌断开电池连接。

  40. : 步骤 40 中的图像 1,1
    • 取下3个显示排线支架上的1.4 mm Phillips螺丝。

  41. : 步骤 41 中的图像 1,2 : 步骤 41 中的图像 2,2
    • 使用撬棒扁平一段来将支架从逻辑板上撬起。

    • 显示屏的排线就在支架下方,因此请勿将撬棒深入过深,这样可能会损坏排线。

  42. : 步骤 42 中的图像 1,1
    • 取下LCD显示屏。

  43. , 前面板: 步骤 43 中的图像 1,2 , 前面板: 步骤 43 中的图像 2,2
    • 拆下覆盖home键带状电缆连接器的任何胶带。

  44. : 步骤 44 中的图像 1,3 : 步骤 44 中的图像 2,3 : 步骤 44 中的图像 3,3
    • 使用撬棒的扁平端将home键带状电缆ZIF接口向上翻转。

    • 小心地将Home键带状电缆水平拉出 ZIF 接口。

  45. : 步骤 45 中的图像 1,3 : 步骤 45 中的图像 2,3 : 步骤 45 中的图像 3,3
    • 使用撬棒的扁平端或指甲将两个数字转换器电缆连接器从它们的插座中直接弹出。

    • 为了避免损坏iPad,只能在连接器上撬动,而不能翘逻辑板上的插座。

  46. : 步骤 46 中的图像 1,2 : 步骤 46 中的图像 2,2
    • 小心地将被粘合剂固定到后壳上的home键带状连接线缆剥下。

  47. : 步骤 47 中的图像 1,2 : 步骤 47 中的图像 2,2
    在这个步骤中使用的工具:
    Polyimide Tape
    $9.99
    购买
    • 移除前面板组件

    • 在组装过程中,擦拭前面板组件上任何的灰尘和指纹,确保显示屏干净。

    • 如果您的新屏幕遇到“幽灵”或“幻影”触摸输入问题,可以通过在面板背面的标注区域粘贴一层非常薄的绝缘胶带,例如Kapton (聚酰亚胺)胶带,来解决这个问题。 iFixit面板具有良好的绝缘性,不需要粘贴任何胶带。

    • 若无适当的绝缘措施,数字转换器的这些区域可能会与其他组件接地,导致触摸输入故障。

    • 这些绝缘材料是肉眼不可见的,这与许多iPad上的泡沫防尘条不同。

  48. 这个步骤还没有翻译 帮忙翻译一下

    : 步骤 48 中的图像 1,2 : 步骤 48 中的图像 2,2
    • Insert a spudger under the right antenna cable closest to the edge of the iPad and lift upward to disconnect the antenna cable connector.

  49. 这个步骤还没有翻译 帮忙翻译一下

    : 步骤 49 中的图像 1,3 : 步骤 49 中的图像 2,3 : 步骤 49 中的图像 3,3
    • There are two large pieces of tape wrapped around the right antenna cable, covering the left antenna cable's tape.

    • Peel the tape up from the rear case.

  50. 这个步骤还没有翻译 帮忙翻译一下

    : 步骤 50 中的图像 1,2 : 步骤 50 中的图像 2,2
    • Insert a spudger under the left antenna cable, the connector farthest from the edge of the iPad. Lift upward to disconnect the antenna cable connector.

  51. 这个步骤还没有翻译 帮忙翻译一下

    : 步骤 51 中的图像 1,3 : 步骤 51 中的图像 2,3 : 步骤 51 中的图像 3,3
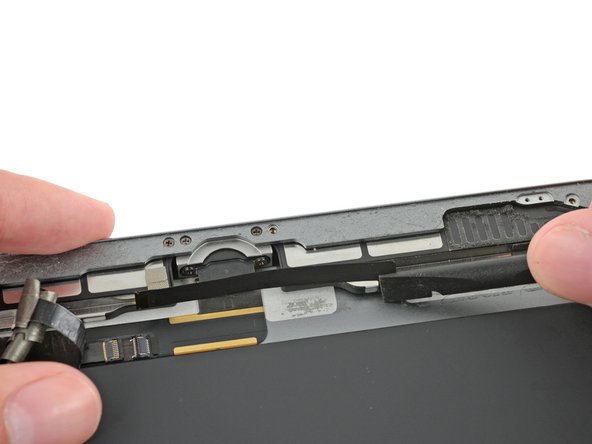
    • There are six pieces of tape wrapped around the left antenna cable, securing it to the rear case.

    • Use tweezers to gently peel up each piece of tape, freeing the antenna cable as you go.

  52. 这个步骤还没有翻译 帮忙翻译一下

    : 步骤 52 中的图像 1,3 : 步骤 52 中的图像 2,3 : 步骤 52 中的图像 3,3
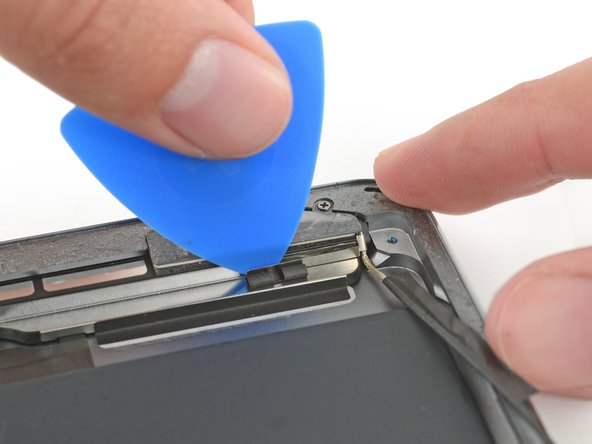
    • There is a bracket crimped onto the antenna cable that is adhered to the speaker enclosure. The adhesive must be severed in order to extract the antenna.

    • Carefully insert an opening pick between the speaker enclosure and the antenna cable bracket.

    • Slide the pick to the right to cut the adhesive.

    • Push the bracket away from the speaker to clear it of the tape under it.

  53. 这个步骤还没有翻译 帮忙翻译一下

    : 步骤 53 中的图像 1,1
    • Remove the following Phillips #000 screws:

    • Two 1.4 mm screws

    • One 2.3 mm screw

  54. 这个步骤还没有翻译 帮忙翻译一下

    : 步骤 54 中的图像 1,3 : 步骤 54 中的图像 2,3 : 步骤 54 中的图像 3,3
    • Insert the flat end of a spudger between the antenna and the speaker assembly.

    • Slide the spudger toward the home button recess to cut the foam adhesive securing the antenna.

  55. 这个步骤还没有翻译 帮忙翻译一下

    : 步骤 55 中的图像 1,1
    • Remove the left antenna from the iPad.

  56. 这个步骤还没有翻译 帮忙翻译一下

    : 步骤 56 中的图像 1,3 : 步骤 56 中的图像 2,3 : 步骤 56 中的图像 3,3
    • Peel the tape toward the home button to uncover the speaker cable connector.

    • Be sure to only peel the tape—not the speaker ribbon cable.

  57. 这个步骤还没有翻译 帮忙翻译一下

    : 步骤 57 中的图像 1,2 : 步骤 57 中的图像 2,2
    • Use the pointed end of a spudger to flip up the retaining flap on the left speaker cable connector.

  58. 这个步骤还没有翻译 帮忙翻译一下

    : 步骤 58 中的图像 1,2 : 步骤 58 中的图像 2,2
    • Slide the speaker cable straight out of its ZIF connector.

  59. 这个步骤还没有翻译 帮忙翻译一下

    : 步骤 59 中的图像 1,2 : 步骤 59 中的图像 2,2
    • Remove the tape holding the speaker to the rear case.

  60. 这个步骤还没有翻译 帮忙翻译一下

    : 步骤 60 中的图像 1,1
    • Remove the 2.2 mm Phillips #000 screw securing the speaker to the rear case.

  61. 这个步骤还没有翻译 帮忙翻译一下

    : 步骤 61 中的图像 1,2 : 步骤 61 中的图像 2,2
    • Fold the speaker cable up slightly.

  62. 这个步骤还没有翻译 帮忙翻译一下

    : 步骤 62 中的图像 1,3 : 步骤 62 中的图像 2,3 : 步骤 62 中的图像 3,3
    • Insert a fingernail in the groove in the speaker housing near the corner of the rear case.

    • Pull the speaker down away from the corner of the case.

  63. 这个步骤还没有翻译 帮忙翻译一下

    : 步骤 63 中的图像 1,3 : 步骤 63 中的图像 2,3 : 步骤 63 中的图像 3,3
    • Use a spudger to help pull the speaker out from under the edge of the rear case.

    • Remove the left speaker from the iPad.

终点

3等其他人完成本指南。

Sam Goldheart

于10/18/12注册

465,777 声望

创作了538篇指南

团队

iFixit iFixit 的会员

Staff

135 名成员

创作了16,817篇指南

0条评论

添加评论

浏览统计数据:

过去 24 小时: 3

过去 7 天: 8

过去 30 天: 15

总计 6,476