跳转到主内容

当前版本的文档还未经巡查,您可以查看最新的已查核版本

iMac Intel 21.5 英寸 Retina 4K 显示屏(2017 年)主板更换

你所需要的

  1. iMac Intel 21.5 英寸 Retina 4K 显示屏(2017 年)主板更换, 显示屏组件: 步骤 1 中的图像 1,1
    在这个步骤中使用的工具:
    iMac Intel 21.5" Cardboard Service Wedge
    $4.99
    购买
    • 如果铰链可以自由活动,iMac将会失去平衡,维修很难进行。有了 iMac 维修支撑盒,维修操作将会更加丝滑,但是没有这玩意儿也行。

    • 如果你使用的是 iFixit 硬纸板维修楔,请按照 这些组装说明 将其组装在一起。

    • 在开始你的iMac的任何维修操作之前:拔掉电源线,按住电源按钮至少十秒钟,以释放电源的电容器。

    • 特别注意!不要触摸电源线上的电容器引线或任何外露焊点,只能触摸电路板边缘。

  2. iMac Intel 21.5 英寸 Retina 4K 显示屏(2017 年)主板更换: 步骤 2 中的图像 1,2 iMac Intel 21.5 英寸 Retina 4K 显示屏(2017 年)主板更换: 步骤 2 中的图像 2,2
    • 从显示屏的左边开始,就是靠近电源按钮的一侧。将 iMac 开屏工具插入玻璃面板和后部外壳之间的缝隙中。

    • 在 iMac开屏工具中心的支点会防止你将轮子插太深。如果使用别的没有防呆设计的工具,插入请不要超过0.95厘米。否则,您可能会切断天线电缆并造成严重损坏。

  3. iMac Intel 21.5 英寸 Retina 4K 显示屏(2017 年)主板更换: 步骤 3 中的图像 1,3 iMac Intel 21.5 英寸 Retina 4K 显示屏(2017 年)主板更换: 步骤 3 中的图像 2,3 iMac Intel 21.5 英寸 Retina 4K 显示屏(2017 年)主板更换: 步骤 3 中的图像 3,3
    • 像用披萨刀一样用这个工具——沿着缝隙一直滚动就行,里面的泡沫双面胶就会被割开了。

    • 这个工具一定要用往前推的,不要往回拉,否则轮子会掉。

    • 按照如上所述方法,沿着显示器的左侧使用这个工具。

  4. iMac Intel 21.5 英寸 Retina 4K 显示屏(2017 年)主板更换: 步骤 4 中的图像 1,3 iMac Intel 21.5 英寸 Retina 4K 显示屏(2017 年)主板更换: 步骤 4 中的图像 2,3 iMac Intel 21.5 英寸 Retina 4K 显示屏(2017 年)主板更换: 步骤 4 中的图像 3,3
    • 沿着屏幕顶端左上角前进,继续使用工具。

  5. iMac Intel 21.5 英寸 Retina 4K 显示屏(2017 年)主板更换: 步骤 5 中的图像 1,2 iMac Intel 21.5 英寸 Retina 4K 显示屏(2017 年)主板更换: 步骤 5 中的图像 2,2
    • 沿着显示器的左上角切胶。

  6. iMac Intel 21.5 英寸 Retina 4K 显示屏(2017 年)主板更换: 步骤 6 中的图像 1,2 iMac Intel 21.5 英寸 Retina 4K 显示屏(2017 年)主板更换: 步骤 6 中的图像 2,2
    • 沿着显示器的顶部继续。

    • 你可能需要重复上述操作数次,以确保尽可能地将胶分开。

  7. iMac Intel 21.5 英寸 Retina 4K 显示屏(2017 年)主板更换: 步骤 7 中的图像 1,3 iMac Intel 21.5 英寸 Retina 4K 显示屏(2017 年)主板更换: 步骤 7 中的图像 2,3 iMac Intel 21.5 英寸 Retina 4K 显示屏(2017 年)主板更换: 步骤 7 中的图像 3,3
    • 将工具从显示屏右上角推进去。

  8. iMac Intel 21.5 英寸 Retina 4K 显示屏(2017 年)主板更换: 步骤 8 中的图像 1,2 iMac Intel 21.5 英寸 Retina 4K 显示屏(2017 年)主板更换: 步骤 8 中的图像 2,2
    • 沿著显示屏右侧使用工具向下滚动。

  9. iMac Intel 21.5 英寸 Retina 4K 显示屏(2017 年)主板更换: 步骤 9 中的图像 1,2 iMac Intel 21.5 英寸 Retina 4K 显示屏(2017 年)主板更换: 步骤 9 中的图像 2,2
    • 将开屏工具沿着屏幕右侧推到底。

    • 此时,你需要在整个显示器周围重复数次切胶操作,以确保可以去除更多的胶。

  10. iMac Intel 21.5 英寸 Retina 4K 显示屏(2017 年)主板更换: 步骤 10 中的图像 1,3 iMac Intel 21.5 英寸 Retina 4K 显示屏(2017 年)主板更换: 步骤 10 中的图像 2,3 iMac Intel 21.5 英寸 Retina 4K 显示屏(2017 年)主板更换: 步骤 10 中的图像 3,3
    • 虽然开屏工具切除了大部分的胶,但显示屏的些许的胶还是会黏在外壳。塑料卡是最后分离粘合剂的必要工具。

    • 让 iMac 躺在桌面上,屏幕朝天。

    • 从 iMac 的右上角开始,往屏幕和后壳之间插一张塑料卡。

    • 请注意不要将塑料卡插入超过0.95厘米,否则可能会损坏内部组件。

  11. iMac Intel 21.5 英寸 Retina 4K 显示屏(2017 年)主板更换: 步骤 11 中的图像 1,2 iMac Intel 21.5 英寸 Retina 4K 显示屏(2017 年)主板更换: 步骤 11 中的图像 2,2
    • 轻柔地扭动塑料卡,这样可以把屏幕和后壳之间撬个缝。

    • 别撬大劲儿了。这个缝不大于0.6厘米就行。

  12. iMac Intel 21.5 英寸 Retina 4K 显示屏(2017 年)主板更换: 步骤 12 中的图像 1,3 iMac Intel 21.5 英寸 Retina 4K 显示屏(2017 年)主板更换: 步骤 12 中的图像 2,3 iMac Intel 21.5 英寸 Retina 4K 显示屏(2017 年)主板更换: 步骤 12 中的图像 3,3
    • 将卡片往前滑至机身顶端中间,以去除显示器右上角剩余的黏胶。

    • 请确定避开 iSight 摄像头,否则摄像头可能会损坏。

  13. iMac Intel 21.5 英寸 Retina 4K 显示屏(2017 年)主板更换: 步骤 13 中的图像 1,2 iMac Intel 21.5 英寸 Retina 4K 显示屏(2017 年)主板更换: 步骤 13 中的图像 2,2
    • 將塑料卡再次插入右上角做稍微的固定,防止黏胶再次黏上显示屏。

  14. iMac Intel 21.5 英寸 Retina 4K 显示屏(2017 年)主板更换: 步骤 14 中的图像 1,3 iMac Intel 21.5 英寸 Retina 4K 显示屏(2017 年)主板更换: 步骤 14 中的图像 2,3 iMac Intel 21.5 英寸 Retina 4K 显示屏(2017 年)主板更换: 步骤 14 中的图像 3,3
    • 在显示屏和框架之间的空隙插入第二张塑料卡,位置大概在 iMac 左上角顶端。

  15. iMac Intel 21.5 英寸 Retina 4K 显示屏(2017 年)主板更换: 步骤 15 中的图像 1,2 iMac Intel 21.5 英寸 Retina 4K 显示屏(2017 年)主板更换: 步骤 15 中的图像 2,2
    • 轻轻地向上扭动卡片,稍微增加显示器和框架之间的空隙。

    • 与另一边一样,慢慢地扭动卡片使黏胶分离,请注意不要给显示屏玻璃施加太大的压力。

  16. iMac Intel 21.5 英寸 Retina 4K 显示屏(2017 年)主板更换: 步骤 16 中的图像 1,3 iMac Intel 21.5 英寸 Retina 4K 显示屏(2017 年)主板更换: 步骤 16 中的图像 2,3 iMac Intel 21.5 英寸 Retina 4K 显示屏(2017 年)主板更换: 步骤 16 中的图像 3,3
    • 将塑料卡向中间滑动,在 iSight 摄像头之前停止。

  17. iMac Intel 21.5 英寸 Retina 4K 显示屏(2017 年)主板更换: 步骤 17 中的图像 1,2 iMac Intel 21.5 英寸 Retina 4K 显示屏(2017 年)主板更换: 步骤 17 中的图像 2,2
    • 将塑料卡插入左上角。

  18. iMac Intel 21.5 英寸 Retina 4K 显示屏(2017 年)主板更换: 步骤 18 中的图像 1,3 iMac Intel 21.5 英寸 Retina 4K 显示屏(2017 年)主板更换: 步骤 18 中的图像 2,3 iMac Intel 21.5 英寸 Retina 4K 显示屏(2017 年)主板更换: 步骤 18 中的图像 3,3
    • 如图所示,将两张塑料卡片插入角落附近,轻轻地往侧边扭动来增加显示屏跟主机壳的间隙。

    • 如果有部分的黏胶而无法完全分离的时候,停止扭转,使用其中一张卡片来切开剩余的黏胶。

    • 开始将显示屏上部从框架拉起。

    • 只需抬起显示屏几英寸——因为显示屏的数据线和电源线仍然和主板相连。

  19. iMac Intel 21.5 英寸 Retina 4K 显示屏(2017 年)主板更换, 显示屏排线: 步骤 19 中的图像 1,2 iMac Intel 21.5 英寸 Retina 4K 显示屏(2017 年)主板更换, 显示屏排线: 步骤 19 中的图像 2,2
    • 将显示屏向上抬起,以便于接触到连接器,但不要抬的过高,以免拉伸排线并对其连接造成压力(约 8 英寸)。

    • 用一只手扶住显示屏,同时用另一只手拔下显示屏电源线。

  20. iMac Intel 21.5 英寸 Retina 4K 显示屏(2017 年)主板更换: 步骤 20 中的图像 1,3 iMac Intel 21.5 英寸 Retina 4K 显示屏(2017 年)主板更换: 步骤 20 中的图像 2,3 iMac Intel 21.5 英寸 Retina 4K 显示屏(2017 年)主板更换: 步骤 20 中的图像 3,3
    • 继续用一只手支撑显示屏,然后将显示屏数据线上的金属固定扣翻起。

    • 小心地将显示屏数据线从主板上的插槽中拔出。

    • 务必将显示屏数据线连接器直接从其插槽中直线拉出,保持与主板平行,以避免损坏。

  21. iMac Intel 21.5 英寸 Retina 4K 显示屏(2017 年)主板更换, 显示屏组件分离: 步骤 21 中的图像 1,2 iMac Intel 21.5 英寸 Retina 4K 显示屏(2017 年)主板更换, 显示屏组件分离: 步骤 21 中的图像 2,2
    • 将显示器抬起至近垂直位置。

    • 此时,显示器底部仍然有一条粘性胶带,会像铰链一样将显示器固定在框架上。你可以通过多次上下移动显示器来松动这个胶带。

  22. iMac Intel 21.5 英寸 Retina 4K 显示屏(2017 年)主板更换: 步骤 22 中的图像 1,3 iMac Intel 21.5 英寸 Retina 4K 显示屏(2017 年)主板更换: 步骤 22 中的图像 2,3 iMac Intel 21.5 英寸 Retina 4K 显示屏(2017 年)主板更换: 步骤 22 中的图像 3,3
    • 请务必小心,不要触碰电容器引线或电源背面任何裸露的焊点(红色方框)。

    • 抓住显示屏底部边缘粘胶条末端的小标签,将胶条拉向 iMac 顶部,将其取下。

    • 对另一条胶条重复此步骤并将其取下。

    • 如果任一胶条在取下前断裂,请使用塑料卡划开剩余的粘胶。

  23. iMac Intel 21.5 英寸 Retina 4K 显示屏(2017 年)主板更换: 步骤 23 中的图像 1,3 iMac Intel 21.5 英寸 Retina 4K 显示屏(2017 年)主板更换: 步骤 23 中的图像 2,3 iMac Intel 21.5 英寸 Retina 4K 显示屏(2017 年)主板更换: 步骤 23 中的图像 3,3
    • 将显示器从框架上抬起并将其从 iMac 上取下。

    • 可能需要从一侧慢慢抬起以撕去剩余的粘性带。

    • 要非常小心地操作显示屏--它很重,而且是玻璃制成的。

    • 胶条剪断后,不能用于将显示屏重新密封到位。请按照 本指南 的步骤更换将显示器固定到后机箱的胶条。

  24. iMac Intel 21.5 英寸 Retina 4K 显示屏(2017 年)主板更换, 下部支撑架: 步骤 24 中的图像 1,2 iMac Intel 21.5 英寸 Retina 4K 显示屏(2017 年)主板更换, 下部支撑架: 步骤 24 中的图像 2,2
    • 卸下固定下支撑托架的五颗十字螺丝:

    • 四颗 3.2 毫米螺丝

    • 一颗 1.7 毫米螺丝

    • 你可能需要剥开 iMac 机壳底部边缘的显示屏粘合剂,才能拧上螺丝。

  25. iMac Intel 21.5 英寸 Retina 4K 显示屏(2017 年)主板更换: 步骤 25 中的图像 1,1
    • 从 iMac 机身上卸下下部支撑托架(又称 "下巴带")。

  26. iMac Intel 21.5 英寸 Retina 4K 显示屏(2017 年)主板更换, 硬盘支架: 步骤 26 中的图像 1,1
    • 卸下固定 iMac 硬盘托架的下列 T10 Torx 螺钉:

    • 两颗 21 毫米螺丝

    • 一颗 9 毫米螺丝

    • 一颗 27 毫米螺丝

  27. iMac Intel 21.5 英寸 Retina 4K 显示屏(2017 年)主板更换: 步骤 27 中的图像 1,2 iMac Intel 21.5 英寸 Retina 4K 显示屏(2017 年)主板更换: 步骤 27 中的图像 2,2
    • 从 iMac 中移除左侧和右侧的硬盘支架。

  28. iMac Intel 21.5 英寸 Retina 4K 显示屏(2017 年)主板更换, 电源: 步骤 28 中的图像 1,3 iMac Intel 21.5 英寸 Retina 4K 显示屏(2017 年)主板更换, 电源: 步骤 28 中的图像 2,3 iMac Intel 21.5 英寸 Retina 4K 显示屏(2017 年)主板更换, 电源: 步骤 28 中的图像 3,3
    • 接下来的几个步骤会让你的手靠近电源供应器的暴露面。请不要触摸电源供应器的表面或任何暴露的焊接点。触摸它可能会导致来自连接到电路板上的许多大电容器的高电压电击。

    • 使用撬棒的尖端,推动电源按钮排线接口的每一侧,并轻轻将其从插座中取出。

  29. iMac Intel 21.5 英寸 Retina 4K 显示屏(2017 年)主板更换: 步骤 29 中的图像 1,2 iMac Intel 21.5 英寸 Retina 4K 显示屏(2017 年)主板更换: 步骤 29 中的图像 2,2
    • 用撬棒的尖端推动电源控制排线接口的两侧,轻轻将其从插座中取出。

  30. iMac Intel 21.5 英寸 Retina 4K 显示屏(2017 年)主板更换: 步骤 30 中的图像 1,1
    • 卸下将电源固定在后部外壳上的两颗 7.2 毫米 T8 Torx 螺钉。

  31. iMac Intel 21.5 英寸 Retina 4K 显示屏(2017 年)主板更换: 步骤 31 中的图像 1,2 iMac Intel 21.5 英寸 Retina 4K 显示屏(2017 年)主板更换: 步骤 31 中的图像 2,2
    • 在处理电源供应器时,务必小心,不要触摸电容器引线或电源供应器背面的任何暴露的焊接点。只能通过边缘处理电路板。

    • 将电源供应器前倾。

  32. iMac Intel 21.5 英寸 Retina 4K 显示屏(2017 年)主板更换: 步骤 32 中的图像 1,3 iMac Intel 21.5 英寸 Retina 4K 显示屏(2017 年)主板更换: 步骤 32 中的图像 2,3 iMac Intel 21.5 英寸 Retina 4K 显示屏(2017 年)主板更换: 步骤 32 中的图像 3,3
    • 轻轻向上拉电源供应器,把它从后部外壳中取出。

    • 将电源供应器逆时针旋转,使右侧上升到约比左侧高一英寸的位置。

  33. iMac Intel 21.5 英寸 Retina 4K 显示屏(2017 年)主板更换: 步骤 33 中的图像 1,2 iMac Intel 21.5 英寸 Retina 4K 显示屏(2017 年)主板更换: 步骤 33 中的图像 2,2
    • 将电源供应器向右滑动,以清除后部外壳上的螺丝柱。

  34. iMac Intel 21.5 英寸 Retina 4K 显示屏(2017 年)主板更换: 步骤 34 中的图像 1,3 iMac Intel 21.5 英寸 Retina 4K 显示屏(2017 年)主板更换: 步骤 34 中的图像 2,3 iMac Intel 21.5 英寸 Retina 4K 显示屏(2017 年)主板更换: 步骤 34 中的图像 3,3
    • 将电源供应器前倾并从后部外壳的凹槽中取出。

    • 不要尝试完全将电源供应器从 iMac 中取出,因为它仍然连接到主板上。

  35. iMac Intel 21.5 英寸 Retina 4K 显示屏(2017 年)主板更换: 步骤 35 中的图像 1,3 iMac Intel 21.5 英寸 Retina 4K 显示屏(2017 年)主板更换: 步骤 35 中的图像 2,3 iMac Intel 21.5 英寸 Retina 4K 显示屏(2017 年)主板更换: 步骤 35 中的图像 3,3
    • 务必小心,不要触摸电源供应器背面的电容器引线或任何暴露的焊接点。只能通过边缘处理电路板。

    • 不要让任何暴露的焊接点接触金属表面,因为这可能会导致短路。

    • 翻转电源供应器,查看位于主板后面的 DC 电源排线连接。

    • 要断开排线连接,请挤压连接器背面、主板后面的释放夹,并将连接器拉出。

  36. iMac Intel 21.5 英寸 Retina 4K 显示屏(2017 年)主板更换: 步骤 36 中的图像 1,3 iMac Intel 21.5 英寸 Retina 4K 显示屏(2017 年)主板更换: 步骤 36 中的图像 2,3 iMac Intel 21.5 英寸 Retina 4K 显示屏(2017 年)主板更换: 步骤 36 中的图像 3,3
    • 将 iMac 倒置放在背面有助于接下来的几个步骤。

    • 使用撬棒的平头端,按下 AC 输入排线接口侧面的释放夹

    • 在用撬棒按住释放夹的同时,抓住 AC 输入排线,并将接口直接拉出插座。

  37. iMac Intel 21.5 英寸 Retina 4K 显示屏(2017 年)主板更换: 步骤 37 中的图像 1,1
    • 将电源供应器从 iMac 中取出。

  38. iMac Intel 21.5 英寸 Retina 4K 显示屏(2017 年)主板更换, 风扇: 步骤 38 中的图像 1,2 iMac Intel 21.5 英寸 Retina 4K 显示屏(2017 年)主板更换, 风扇: 步骤 38 中的图像 2,2
    • 轻轻将风扇排线接口从主板上的插座上拉出。

  39. iMac Intel 21.5 英寸 Retina 4K 显示屏(2017 年)主板更换: 步骤 39 中的图像 1,1
    • 拧下连接风扇和后部外壳的三颗10毫米T10Torx螺丝。

    • 最上面的螺丝上有一个橡胶支撑物粘在其头部,用来支持显示屏,请让它留在原位。

  40. iMac Intel 21.5 英寸 Retina 4K 显示屏(2017 年)主板更换: 步骤 40 中的图像 1,2 iMac Intel 21.5 英寸 Retina 4K 显示屏(2017 年)主板更换: 步骤 40 中的图像 2,2
    • 从iMac上移除风扇。

  41. iMac Intel 21.5 英寸 Retina 4K 显示屏(2017 年)主板更换, 硬盘组件: 步骤 41 中的图像 1,3 iMac Intel 21.5 英寸 Retina 4K 显示屏(2017 年)主板更换, 硬盘组件: 步骤 41 中的图像 2,3 iMac Intel 21.5 英寸 Retina 4K 显示屏(2017 年)主板更换, 硬盘组件: 步骤 41 中的图像 3,3
    • 从主板最近的边缘提起硬盘并拉出凹槽。

    • 硬盘是通过一条SATA排线连接——请先不要把硬盘从你的 iMac 强行拔出。

  42. iMac Intel 21.5 英寸 Retina 4K 显示屏(2017 年)主板更换: 步骤 42 中的图像 1,2 iMac Intel 21.5 英寸 Retina 4K 显示屏(2017 年)主板更换: 步骤 42 中的图像 2,2
    • 使用撬棒轻轻地撬开大的塑料接口来断开SATA电源和数据排线。

  43. iMac Intel 21.5 英寸 Retina 4K 显示屏(2017 年)主板更换: 步骤 43 中的图像 1,1
    • 从 iMac 上移除硬盘组件。

  44. iMac Intel 21.5 英寸 Retina 4K 显示屏(2017 年)主板更换, 硬盘托架: 步骤 44 中的图像 1,1
    • 拧下用于固定硬盘托盘到后部外壳的7.3毫米T8型Torx螺丝。

  45. iMac Intel 21.5 英寸 Retina 4K 显示屏(2017 年)主板更换: 步骤 45 中的图像 1,1
    • 将硬盘托架取出。

  46. iMac Intel 21.5 英寸 Retina 4K 显示屏(2017 年)主板更换, 主板部件: 步骤 46 中的图像 1,2 iMac Intel 21.5 英寸 Retina 4K 显示屏(2017 年)主板更换, 主板部件: 步骤 46 中的图像 2,2
    • 轻轻地拉起左侧扬声器排线从主板插座处垂直拉起。

  47. iMac Intel 21.5 英寸 Retina 4K 显示屏(2017 年)主板更换: 步骤 47 中的图像 1,1
    • 将左侧扬声器排线从后部固定处垂直向上拉出。

  48. 这个步骤还没有翻译 帮忙翻译一下

    iMac Intel 21.5 英寸 Retina 4K 显示屏(2017 年)主板更换: 步骤 48 中的图像 1,2 iMac Intel 21.5 英寸 Retina 4K 显示屏(2017 年)主板更换: 步骤 48 中的图像 2,2
    • Similarly to the previous step, de-route the SATA and power cables by pulling the braid straight up out of the retaining clip.

  49. 这个步骤还没有翻译 帮忙翻译一下

    iMac Intel 21.5 英寸 Retina 4K 显示屏(2017 年)主板更换: 步骤 49 中的图像 1,2 iMac Intel 21.5 英寸 Retina 4K 显示屏(2017 年)主板更换: 步骤 49 中的图像 2,2
    • Peel up the piece of tape connecting the left speaker connector to the SATA power and data cables.

  50. 这个步骤还没有翻译 帮忙翻译一下

    iMac Intel 21.5 英寸 Retina 4K 显示屏(2017 年)主板更换: 步骤 50 中的图像 1,3 iMac Intel 21.5 英寸 Retina 4K 显示屏(2017 年)主板更换: 步骤 50 中的图像 2,3 iMac Intel 21.5 英寸 Retina 4K 显示屏(2017 年)主板更换: 步骤 50 中的图像 3,3
    • Flip up the metal retaining bracket on the FaceTime camera cable connector.

    • Pull the FaceTime camera cable straight out of its socket on the logic board.

    • This is a delicate connector that can be easily damaged.

  51. 这个步骤还没有翻译 帮忙翻译一下

    iMac Intel 21.5 英寸 Retina 4K 显示屏(2017 年)主板更换: 步骤 51 中的图像 1,1
    • Remove the two 4.0 mm T5 Torx screws securing the four antenna connectors to the AirPort/Bluetooth card.

  52. 这个步骤还没有翻译 帮忙翻译一下

    iMac Intel 21.5 英寸 Retina 4K 显示屏(2017 年)主板更换: 步骤 52 中的图像 1,3 iMac Intel 21.5 英寸 Retina 4K 显示屏(2017 年)主板更换: 步骤 52 中的图像 2,3 iMac Intel 21.5 英寸 Retina 4K 显示屏(2017 年)主板更换: 步骤 52 中的图像 3,3
    • Disconnect all four antenna connectors by prying them straight up from their sockets on the AirPort/Bluetooth card.

  53. 这个步骤还没有翻译 帮忙翻译一下

    iMac Intel 21.5 英寸 Retina 4K 显示屏(2017 年)主板更换: 步骤 53 中的图像 1,2 iMac Intel 21.5 英寸 Retina 4K 显示屏(2017 年)主板更换: 步骤 53 中的图像 2,2
    • Gently pull the right speaker cable connector straight down and out of its socket on the logic board.

  54. 这个步骤还没有翻译 帮忙翻译一下

    iMac Intel 21.5 英寸 Retina 4K 显示屏(2017 年)主板更换: 步骤 54 中的图像 1,3 iMac Intel 21.5 英寸 Retina 4K 显示屏(2017 年)主板更换: 步骤 54 中的图像 2,3 iMac Intel 21.5 英寸 Retina 4K 显示屏(2017 年)主板更换: 步骤 54 中的图像 3,3
    • Use the flat edge of a spudger to pry the headphone jack cable connector from its socket on the logic board.

    • Push the cable slightly to the right.

  55. 这个步骤还没有翻译 帮忙翻译一下

    iMac Intel 21.5 英寸 Retina 4K 显示屏(2017 年)主板更换: 步骤 55 中的图像 1,1
    • Peel off the tape covering the exhaust duct.

  56. 这个步骤还没有翻译 帮忙翻译一下

    iMac Intel 21.5 英寸 Retina 4K 显示屏(2017 年)主板更换: 步骤 56 中的图像 1,1
    • Remove the following T8 Torx screws securing the exhaust duct to the rear enclosure:

    • Two 6.2 mm screws

    • Two 4.7 mm screws

  57. 这个步骤还没有翻译 帮忙翻译一下

    iMac Intel 21.5 英寸 Retina 4K 显示屏(2017 年)主板更换: 步骤 57 中的图像 1,3 iMac Intel 21.5 英寸 Retina 4K 显示屏(2017 年)主板更换: 步骤 57 中的图像 2,3 iMac Intel 21.5 英寸 Retina 4K 显示屏(2017 年)主板更换: 步骤 57 中的图像 3,3
    • Use the tip of a spudger to flip open the retaining flap on the microphone ribbon cable ZIF socket.

    • Be sure you are prying up on the hinged retaining flap, not the socket itself.

    • Gently pull the microphone ribbon cable straight out of its socket.

  58. 这个步骤还没有翻译 帮忙翻译一下

    iMac Intel 21.5 英寸 Retina 4K 显示屏(2017 年)主板更换: 步骤 58 中的图像 1,1
    • Remove the four 7.3 mm T8 Torx screws securing the logic board to the rear enclosure.

  59. 这个步骤还没有翻译 帮忙翻译一下

    iMac Intel 21.5 英寸 Retina 4K 显示屏(2017 年)主板更换: 步骤 59 中的图像 1,3 iMac Intel 21.5 英寸 Retina 4K 显示屏(2017 年)主板更换: 步骤 59 中的图像 2,3 iMac Intel 21.5 英寸 Retina 4K 显示屏(2017 年)主板更换: 步骤 59 中的图像 3,3
    • Tilt the top of the logic board away from the rear enclosure.

    • As you tilt the logic board, pull the right speaker connector to the right and out of the way of the board.

    • Lift the logic board straight up and out of the iMac.

    • Be careful not to snag the board on any of the rear enclosure's screw posts.

  60. 这个步骤还没有翻译 帮忙翻译一下

    iMac Intel 21.5 英寸 Retina 4K 显示屏(2017 年)主板更换: 步骤 60 中的图像 1,2 iMac Intel 21.5 英寸 Retina 4K 显示屏(2017 年)主板更换: 步骤 60 中的图像 2,2
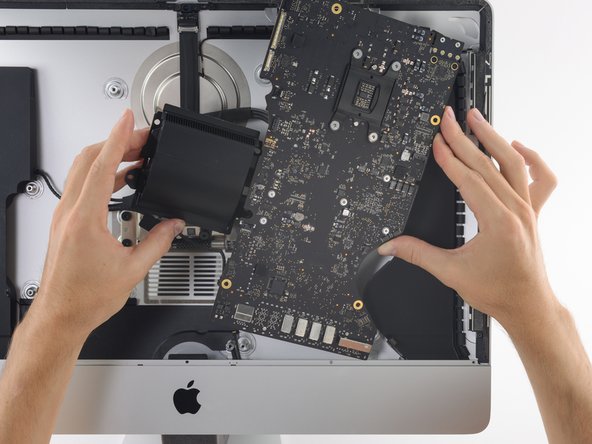
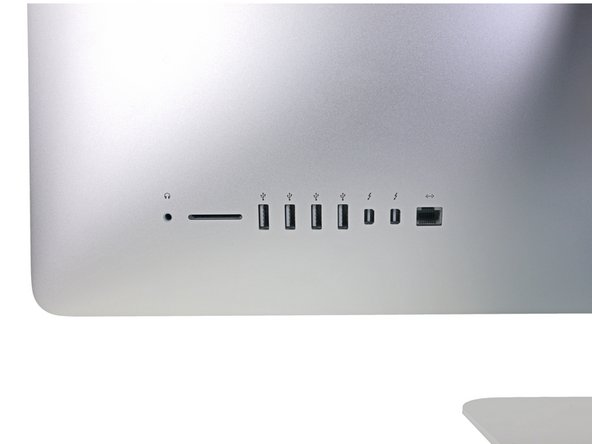
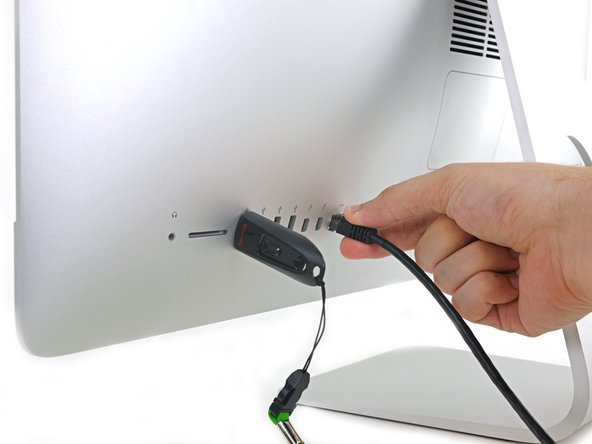
    • When reassembling your iMac, be very careful to align the exterior I/O ports correctly. The logic board can sit crooked even when secured with all its screws.

    • Use a USB flash drive and/or ethernet cable to keep the logic board seated correctly while you tighten the screws.

  61. iMac Intel 21.5 英寸 Retina 4K 显示屏(2017 年)主板更换, SATA数据和电源线缆: 步骤 61 中的图像 1,3 iMac Intel 21.5 英寸 Retina 4K 显示屏(2017 年)主板更换, SATA数据和电源线缆: 步骤 61 中的图像 2,3 iMac Intel 21.5 英寸 Retina 4K 显示屏(2017 年)主板更换, SATA数据和电源线缆: 步骤 61 中的图像 3,3
    • SATA数据线接口上有一个卡扣,必须按下去才能拆卸。

    • 在用拇指按住卡扣的同时,将SATA数据连接器从主板上的插座上抬起并断开连接。

  62. iMac Intel 21.5 英寸 Retina 4K 显示屏(2017 年)主板更换: 步骤 62 中的图像 1,2 iMac Intel 21.5 英寸 Retina 4K 显示屏(2017 年)主板更换: 步骤 62 中的图像 2,2
    • 握住硬盘电源接口,轻轻将其从主板上的插座中拔出。

  63. 这个步骤还没有翻译 帮忙翻译一下

    iMac Intel 21.5 英寸 Retina 4K 显示屏(2017 年)主板更换: 步骤 63 中的图像 1,2 iMac Intel 21.5 英寸 Retina 4K 显示屏(2017 年)主板更换: 步骤 63 中的图像 2,2
    • Two clips secure the RAM module in place, one on each side. Using your fingers, spread the clips away from the RAM module.

    • When released, the RAM module will pop up at a slight angle.

  64. 这个步骤还没有翻译 帮忙翻译一下

    iMac Intel 21.5 英寸 Retina 4K 显示屏(2017 年)主板更换: 步骤 64 中的图像 1,2 iMac Intel 21.5 英寸 Retina 4K 显示屏(2017 年)主板更换: 步骤 64 中的图像 2,2
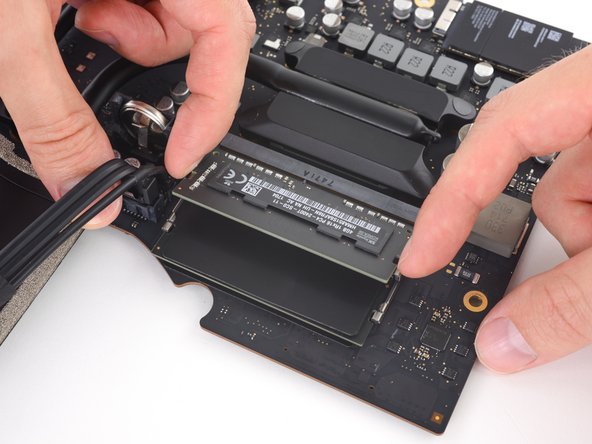
    • Lift the RAM module to an angle of about 30 degrees and slide it out.

    • When handling the RAM module, touch only the outside edges. Take care not to touch the gold-colored contact points along the bottom edge.

    • To install a new RAM module, slide it in place at about the same angle until it is snug, and then swing it downward until the two clips snap into place.

  65. 这个步骤还没有翻译 帮忙翻译一下

    iMac Intel 21.5 英寸 Retina 4K 显示屏(2017 年)主板更换: 步骤 65 中的图像 1,2 iMac Intel 21.5 英寸 Retina 4K 显示屏(2017 年)主板更换: 步骤 65 中的图像 2,2
    • Peel off the four black tamper-evident stickers covering the heat sink mounting screws.

    • Remove the four T10 screws that secure the heat sink from the backside of the logic board.

    • During reassembly, tighten these screws one full turn at a time, alternating in a cross pattern. This will gradually increase the clamping pressure evenly across the surface of the CPU. Continue gradually tightening the screws until they're snug and the entire spring plate lays flat against the logic board.

  66. 这个步骤还没有翻译 帮忙翻译一下

    iMac Intel 21.5 英寸 Retina 4K 显示屏(2017 年)主板更换: 步骤 66 中的图像 1,2 iMac Intel 21.5 英寸 Retina 4K 显示屏(2017 年)主板更换: 步骤 66 中的图像 2,2
    • Lift the heat sink retaining spring and its bracket off the logic board.

  67. 这个步骤还没有翻译 帮忙翻译一下

    iMac Intel 21.5 英寸 Retina 4K 显示屏(2017 年)主板更换: 步骤 67 中的图像 1,1
    • Fully loosen the three captive T8 screws securing the heat sink over the GPU.

    • Remove the two 5.4 mm T8 screws securing the heat pipe to the logic board.

  68. 这个步骤还没有翻译 帮忙翻译一下

    iMac Intel 21.5 英寸 Retina 4K 显示屏(2017 年)主板更换: 步骤 68 中的图像 1,1
    • Note that the CPU will most likely remain stuck to the underside of the heat sink as it's lifted out. Take care not to damage it.

    • Lift and remove the heat sink assembly from the logic board.

    • When reassembling your iMac, remove the CPU from the heat sink and reinstall it separately from the heat sink. This will make sure it's installed correctly and prevent damage.

    • Follow our thermal paste application guide to reapply the thermal paste to the graphics processor (GPU). You should also replace the heavy thermal compound or apply thermal pads to the VRAM chips.

  69. 这个步骤还没有翻译 帮忙翻译一下

    iMac Intel 21.5 英寸 Retina 4K 显示屏(2017 年)主板更换: 步骤 69 中的图像 1,1
    • Remove the two 3.3 mm T5 Torx screws securing the AirPort/Bluetooth card to the logic board.

  70. 这个步骤还没有翻译 帮忙翻译一下

    iMac Intel 21.5 英寸 Retina 4K 显示屏(2017 年)主板更换: 步骤 70 中的图像 1,3 iMac Intel 21.5 英寸 Retina 4K 显示屏(2017 年)主板更换: 步骤 70 中的图像 2,3 iMac Intel 21.5 英寸 Retina 4K 显示屏(2017 年)主板更换: 步骤 70 中的图像 3,3
    • Slightly lift the AirPort/Bluetooth card and pull it straight out its socket.

    • Do not use excessive force to pull the end of the AirPort/Bluetooth card away from its socket on the logic board. Doing so may damage the socket.

    • When reinstalling the card, be sure it is properly seated before reinstalling the retaining screws.

    • If the AirPort/Bluetooth card is properly seated, its screw holes should align with those on the logic board.

  71. iMac Intel 21.5 英寸 Retina 4K 显示屏(2017 年)主板更换, 主板: 步骤 71 中的图像 1,1
    • 只剩下主板了

    • 如果你的 iMac 配备了 Fusion Drive 选件,你还需要从主板背面移除固态硬盘,并将其转移到新的主板上。按以下步骤移除固态硬盘

    • 主板包括 PRAM 电池。如果更换的主板不包括电池,可以按照 这些步骤 从旧主板转移电池。

    • 重新组装 iMac 时,请将 CPU 从散热器上取下,并将其与散热器分开重新安装 。这将确保安装正确并防止损坏。

    • 请按照我们的 散热膏使用指南 重新为图形处理器 (GPU) 涂抹散热膏。您还应为 VRAM 芯片更换导热膏或使用导热垫。

    • 在重新组装主板时,请注意 I/O 接口的位置。将电路板装回机箱后,将 USB 或 Thunderbolt 排线插入其中一个接口,使其完全对齐。

结论

要重新组装设备,请按照相反的说明进行操作。

4等其他人完成本指南。

由衷感谢以下译者:

en zh

100%

Yanqi Wang正在帮助我们修复这个世界! 您也想加入吗?
开始翻译 ›

Adam O'Camb

于04/11/15注册

197,111 声望

创作了416篇指南

5条评论

Hello, very good explanation .

Got a question please

I have the imac 4k 21.5 late 2015, can I change the motherboard? To be able to upgrade ram, does or fits in the 2015 body and with all parts?

Eleuterio Sousa Ramos - 回复

I did it. Everything went very well, but the two thunderbolt plugs are not working after all. LAn and USb is doing well. Any suggestions about it?

Gunter Holder - 回复

I am running into the same issue after upgrading the RAM and SSD. Have you found a fix?

William Sandidge -

Can the GPU be upgraded?

Mien Yockmann - 回复

Re” I did it. Everything went very well, but the two thunderbolt plugs are not working after all. LAn and USb is doing well. Any suggestions about it?” You need to disassemble the iMac again to the point where the logic board is loose (step 58-59 on this guide). Connect a thunderbolt cable, a USB cable and and ethernet cable to the back of the iMac with the logic board in place but the logic board screws not tightened. This will ensure the ports are correctly lined. Tighten the logic board screws and finish the reassembly (at this point you can disconnect the cables.) . This should solve the problem.

jvilella - 回复

添加评论

浏览统计数据:

过去 24 小时: 4

过去 7 天: 46

过去 30 天: 220

总计 15,978