跳转到主内容

eufy RoboVac 11 Front Cover and Motherboard Replacement

你所需要的

  1. eufy RoboVac 11 Front Cover and Motherboard Replacement, Front Cover and Motherboard: 步骤 1 中的图像 1,2 eufy RoboVac 11 Front Cover and Motherboard Replacement, Front Cover and Motherboard: 步骤 1 中的图像 2,2
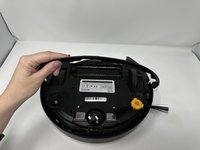
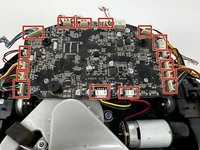
    • Remove the nine 10 mm screws with the Phillips #1 precision screwdriver.

    • Keep track of these screws. They are the same length as the interior screws but wider in diameter.

  2. eufy RoboVac 11 Front Cover and Motherboard Replacement: 步骤 2 中的图像 1,2 eufy RoboVac 11 Front Cover and Motherboard Replacement: 步骤 2 中的图像 2,2
    • Remove the six 7 mm screws on the bumper with the Phillips #1 screwdriver.

  3. eufy RoboVac 11 Front Cover and Motherboard Replacement: 步骤 3 中的图像 1,3 eufy RoboVac 11 Front Cover and Motherboard Replacement: 步骤 3 中的图像 2,3 eufy RoboVac 11 Front Cover and Motherboard Replacement: 步骤 3 中的图像 3,3
    • Remove the top plate from the body of the device.

    • Unplug the bumper from the motherboard.

  4. eufy RoboVac 11 Front Cover and Motherboard Replacement: 步骤 4 中的图像 1,2 eufy RoboVac 11 Front Cover and Motherboard Replacement: 步骤 4 中的图像 2,2
    • Remove the three 10 mm motherboard screws with a Phillips #1 screwdriver.

    • Cleaning the motherboard and inside of the device outdoors with a compressed air cleaner will help the robot last longer.

  5. eufy RoboVac 11 Front Cover and Motherboard Replacement: 步骤 5 中的图像 1,2 eufy RoboVac 11 Front Cover and Motherboard Replacement: 步骤 5 中的图像 2,2
    • Unplug the cables from the motherboard.

结论

To reassemble your device, follow these instructions in reverse order.

另外一个人完成了本指南。

Kyleigh Hill

于09/27/22注册

223 声望

创作了2篇指南

团队

0条评论

添加评论

浏览统计数据:

过去 24 小时: 0

过去 7 天: 6

过去 30 天: 34

总计 770