简介
This guide will require a new calculator, as well as some soldering. If you're not sure how to solder, see iFixit's soldering guide.
你所需要的
-
-
-
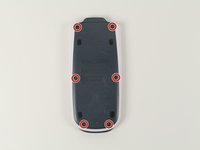
Using the #00 screwdriver, unscrew the six, 6mm Phillips screws.
-
Use the spudger (or fingernail) to pry into the space between the blue back cover and the white body to take off the back cover.
 询问修复机器人
-
-
-
Using the #00 Phillips screwdriver unscrew the two, 3mm Phillips screws located near the top of the calculator.
-
Lift the metal plate from the battery and set it to the side.
-
-
-
Use the spudger (or fingernail) to lift the battery from the black holder.
-
-
-
-
Put the new CR2032 battery in. Never insert a different type of battery!
-
Reverse the steps 2 and 1.
-
-
-
-
-
Using the Phillips #00 screwdriver, carefully remove the two 3mm screws holding the screen in place.
-
-
-
Gently lift the screen up from the front of the calculator, carefully disconnecting the ribbon cable from the larger green board.
-
-
-
Once the screen has been removed, it should still have all connecting wires and the ribbon cable attached to it.
-
-




To reassemble your device, follow these instructions in reverse order.
3等其他人完成本指南。

团队

Cal Poly, Team 11-2, Forte Fall 2015 Cal Poly, Team 11-2, Forte Fall 2015 的会员
CPSU-FORTE-F15S11G2
4 名成员
创作了12篇指南
4指南评论
IMO this does not appear to be a repairable or serviceable part. Upon removal, the soldered or self-adhered conductors on the ribbon cable usually separate and tear off the ribbon cable, and are left stuck on the board. Unless you very very very very carefully scrape them off or they can be de-soldered, there's no replacing the display. The same problem will occur in reverse when trying to remove a good screen from a donor calculator, which is almost as expensive as the actual calculator (10-15$ USD). It's possible... just not sure it's worth it.
Rad Beltron - 回复 分享
