跳转到主内容
Sony Cyber-shot DSC-W570 LCD Screen  Replacement

Sony Cyber-shot DSC-W570 LCD Screen Replacement

Thomas Plummer

Thomas Plummer5 其他贡献者

最后更新于 March 2, 2025

没有估计
中等
正在学习的学生
缺少前提条件

This is a guide to replace dead pixels, cracked screens, and malfunctioning button terminals.

你所需要的

工具

查看更多...

  1. Sony Cyber-shot DSC-W570 LCD Screen  Replacement, Case Cover: 步骤 1 中的图像 1,1
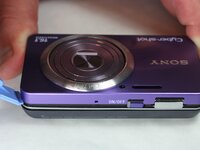
    • Begin by facing the camera bottom side up to reveal the two 2.93 mm long screws

    • Remove these two screws using a Philips #00 screwdriver

    • Make sure the battery compartment door is in lock position.

  2. Sony Cyber-shot DSC-W570 LCD Screen  Replacement: 步骤 2 中的图像 1,1
    • Turn the camera sideways on its left side making sure the two 2.93 mm long screws are facing upwards

    • Remove the two 2.93 mm long screws using a Phillips #00 screwdriver

    • Keep all screws on stable surface to not loose them

  3. Sony Cyber-shot DSC-W570 LCD Screen  Replacement: 步骤 3 中的图像 1,1
    • Turn the camera on its right side making sure it is facing upwards

    • Remove the last two 2.93 mm long screws using a Phillips #00 screwdriver

  4. Sony Cyber-shot DSC-W570 LCD Screen  Replacement: 步骤 4 中的图像 1,2 Sony Cyber-shot DSC-W570 LCD Screen  Replacement: 步骤 4 中的图像 2,2
    • Face the device with the camera lens facing upwards

    • Now that all the screws are unscrewed, the plastic opening tool will be used to remove the front cover.

    • Gently pry off each corner of the cover to remove it

    • Once all corners are pried off, gently lift off the cover and place it on the side

  5. Sony Cyber-shot DSC-W570 LCD Screen  Replacement: 步骤 5 中的图像 1,2 Sony Cyber-shot DSC-W570 LCD Screen  Replacement: 步骤 5 中的图像 2,2
    • Flip the device, making sure the screen is facing upwards

    • The back case should now be visible and ready to remove

    • Use the plastic opening tool to gently pry all along the corners and sides of the camera.

    • Gently lift off the entire back cover and place it on the side

  6. Sony Cyber-shot DSC-W570 LCD Screen  Replacement, LCD Screen: 步骤 6 中的图像 1,1
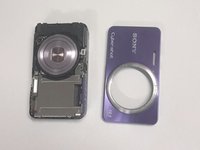
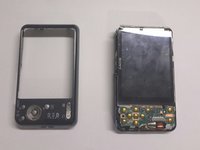
    • Taking off the previous cover will reveal the two cables connecting the LCD screen to the motherboard below the screen.

  7. Sony Cyber-shot DSC-W570 LCD Screen  Replacement: 步骤 7 中的图像 1,1
    • Remove the LCD screen from the side opposite the battery terminals.

    • Watch carefully for the two cords mentioned in the previous step. These will still be connected.

    • The side will flip up as shown in the next step.

  8. Sony Cyber-shot DSC-W570 LCD Screen  Replacement: 步骤 8 中的图像 1,1
    • Pull these two cords straight back to disconnect them from the respective housings.

    • Caution: The housing does not need to be moved or adjusted in any way. DO NOT pull the cords at an angle, it can destroy the cords and the housing. Pull Straight Back!

  9. Sony Cyber-shot DSC-W570 LCD Screen  Replacement: 步骤 9 中的图像 1,1
    • This is what the camera should look like after 2 cords and the screen have been removed.

    • The lens cord is being held to the side for a clearer view.

结论

To reassemble your device, follow these instructions in reverse order.

另外一个人完成了本指南。

Thomas Plummer

于01/21/15注册

164 声望

撰写一个指南

团队

USF Tampa, Team 9-1, Brown Winter 2015 USF Tampa, Team 9-1, Brown Winter 2015 的会员

USFT-BROWN-W15S9G1

5 名成员

创作了10篇指南

2指南评论

And the screen replacement how??

Pau Roqué Robert - 回复

添加评论

浏览统计数据:

过去 24 小时: 3

过去 7 天: 7

过去 30 天: 47

总计 1,366