跳转到主内容
加入维修社区 - 创建账户

Samsung Galaxy S21+ Back Cover Replacement

仅作为前提条件
本指南仅提供前提条件!本指南是另一个程序的一部分,不能单独使用。

你所需要的

  1. Samsung Galaxy S21+ Back Cover Replacement, Heat the back cover: 步骤 1 中的图像 1,1
    • Prepare an iOpener and apply it to the back cover for at least three minutes to loosen the adhesive underneath.

    • A hair dryer, heat gun, or hot plate may also be used, but be careful not to overheat the phone—the display and internal battery are both susceptible to heat damage.

  2. Samsung Galaxy S21+ Back Cover Replacement, Insert an opening pick: 步骤 2 中的图像 1,3 Samsung Galaxy S21+ Back Cover Replacement, Insert an opening pick: 步骤 2 中的图像 2,3 Samsung Galaxy S21+ Back Cover Replacement, Insert an opening pick: 步骤 2 中的图像 3,3
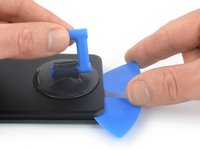
    • Secure a suction handle to the bottom edge of the back cover, as close to the edge as possible.

    • If the back cover is cracked, the suction handle may not stick. Try lifting it with strong tape, or superglue the suction handle in place and allow it to cure so you can proceed.

    • Lift the back cover with the suction handle to create a small gap between the back cover and the frame.

    • If you have trouble creating a gap, apply more heat to further soften the adhesive. Follow the iOpener instructions to avoid overheating.

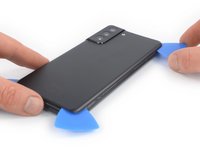
    • Insert an opening pick into the gap you created.

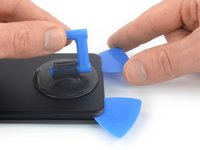
    • Slide the opening pick to the bottom left corner to slice the adhesive.

    • Leave the opening pick in place to prevent the adhesive from resealing.

  3. Samsung Galaxy S21+ Back Cover Replacement, Slice the adhesive: 步骤 3 中的图像 1,2 Samsung Galaxy S21+ Back Cover Replacement, Slice the adhesive: 步骤 3 中的图像 2,2
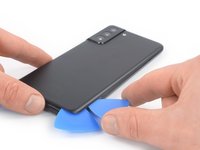
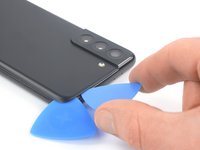
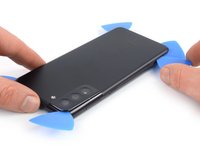
    • Insert a second opening pick at the bottom edge of your phone.

    • Slide the opening pick to the bottom right corner to slice the adhesive.

    • Leave the opening picks in place to prevent the adhesive from resealing.

  4. Samsung Galaxy S21+ Back Cover Replacement, Slice the adhesive: 步骤 4 中的图像 1,3 Samsung Galaxy S21+ Back Cover Replacement, Slice the adhesive: 步骤 4 中的图像 2,3 Samsung Galaxy S21+ Back Cover Replacement, Slice the adhesive: 步骤 4 中的图像 3,3
    • If the adhesive becomes hard to cut, it has most likely cooled down. Use your iOpener for two to three minutes to reheat it.

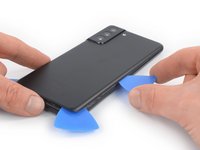
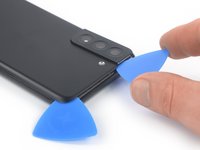
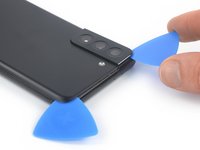
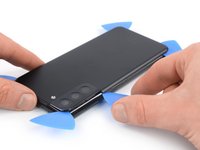
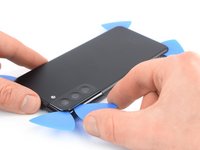
    • Insert a third opening pick at the bottom right corner of your phone.

    • Slide the opening pick along the right edge of your phone to slice the adhesive.

    • Leave the opening pick in the top right corner to prevent the adhesive from resealing.

  5. Samsung Galaxy S21+ Back Cover Replacement: 步骤 5 中的图像 1,3 Samsung Galaxy S21+ Back Cover Replacement: 步骤 5 中的图像 2,3 Samsung Galaxy S21+ Back Cover Replacement: 步骤 5 中的图像 3,3
    • When you slice near the camera assembly, insert only the tip of the opening pick (~4-5 mm) to avoid damaging or smearing the camera.

    • Insert a fourth opening pick underneath the top right corner of your phone.

    • Slide the opening pick along the top edge to slice the adhesive.

    • Leave the opening pick in the top left corner to prevent the adhesive from resealing.

  6. Samsung Galaxy S21+ Back Cover Replacement: 步骤 6 中的图像 1,3 Samsung Galaxy S21+ Back Cover Replacement: 步骤 6 中的图像 2,3 Samsung Galaxy S21+ Back Cover Replacement: 步骤 6 中的图像 3,3
    • Insert a fifth opening pick underneath the bottom left corner.

    • Slide the opening pick along the left edge of the back cover to slice the remaining adhesive.

    • When you slice near the power button, insert only the tip of the opening pick (~3-4 mm) to avoid damaging the power and volume button flex cable.

  7. Samsung Galaxy S21+ Back Cover Replacement, Remove the back cover: 步骤 7 中的图像 1,2 Samsung Galaxy S21+ Back Cover Replacement, Remove the back cover: 步骤 7 中的图像 2,2
    在这个步骤中使用的工具:
    Tweezers
    $4.99
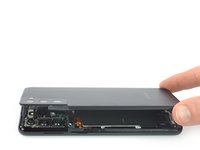
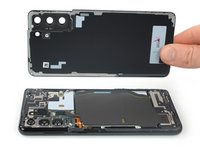
    • Remove the back cover.

    • During reassembly:

    • This is a good point to power on your phone and test all functions before sealing it up. Be sure to power your phone back down completely before you continue working.

    • Remove any adhesive chunks with a pair of tweezers or your fingers. Use some high concentration (over 90%) isopropyl alcohol to wipe away any adhesive residue.

    • If you're using Samsung custom-cut adhesives, follow this guide.

    • If you're using double-sided tape, follow this guide.

结论

To reassemble your device, follow these instructions in reverse order.

After you've completed the repair, download the Samsung Members App from the Galaxy Store or the Play Store, and follow the Samsung Self-Repair document (beginning page 9) to make sure your device is fully functional.

Take your e-waste to an R2 or e-Stewards certified recycler.

Repair didn’t go as planned? Try some basic troubleshooting, or ask our Answers community for help.

Dominik Schnabelrauch

于11/23/16注册

250,785 声望

创作了682篇指南

团队

iFixit iFixit 的会员

Staff

123 名成员

创作了24,054篇指南

0指南评论

添加评论

浏览统计数据:

过去 24 小时: 1

过去 7 天: 9

过去 30 天: 14

总计 184