简介
Replace the LCD in an hp envy m6-1125dx laptop.
你所需要的
-
-
Your screen is cracked. That's too bad! Let's get started.
-
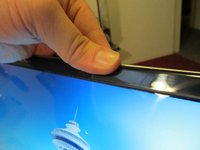
Using a credit card that you don't care for (We used an old Hotel key card), work the edge of the bezel off the screen.
-
-
-
With the bezel removed, there are four screws that keep the main LCD in place. Unlike other models, this hp envy m6-1125dx doesn't use side runners to connect to the hinge... it is merely an LCD with brackets.
-
All 4 screws are the same size. Do NOT disassemble the hinge screws, as it is not necessary.
-
-
-
-
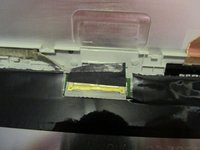
Here's the LCD Cable. There's an ABYSMAL amount of tape that keeps this in place (other laptops use massive sized tap to make sure it doesn't budge.
-
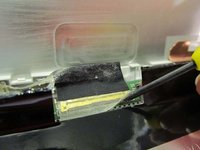
As seen in the second image, merely peel up the tiny piece of tape with a screwdriver. Once the tape is off the floor, lift up the black tab, and pull in the opposite direction of yourself to tug it out of place.
-
-
-
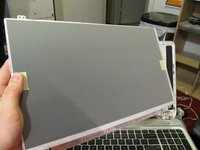
Once the new screen is in place (lying on the keyboard like the old one was, assuming it has proper protection on the glass) We will need to reconnect the LCD cable.
-
Remember to do this in the reverse order that you did it previously. Lift up the tape and black portion of the cable so it doesn't accidentally stick to anything, then slide the gold connector into place, re-taping as necessary.
-
Make sure that the LCD cable is completely inserted into the socket. If partially inserted your screen may become backlit but have no image.
-


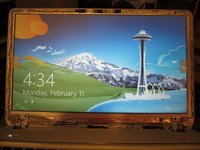
You're done!
17等其他人完成本指南。

4指南评论
The screen replacement went well, but I must have blown the backlight fuse. (there are normal images on the screen). Any help locating the backlight fuse???
hey sir my laptop screen is cracked so can you help me to fix the screen contact me on my facebook account or email me pirhashimkhan_spy@hotmail.com
pir Hashim - 回复
Great instructions!
First time I connected the LCD cable (a little bit tricky), the screen was lit up but there was no image. Then I made sure it was fully pushed together and connected and added a piece of duct tape to keep it in place and I got an image!
Great pictures, tips, and instructions.
Mark Strom - 回复