
Razer Book 13 NVMe M.2 SSD Replacement

简介
转到步骤 1Use this guide to replace a full or faulty solid state drive (SSD) in your Razer Book 13.
The SSD is a piece of hardware that stores and retrieves data in your computer. A failing SSD can cause your laptop to produce crashes or error messages like “file not found” or “file could not be moved.” In some cases, the computer may not boot at all which will require a new SSD to be installed.
This laptop comes with a limited size NVMe M.2 SSD with up to 500 GB. If you are running low on storage, you may want to use this guide to upgrade to a higher storage capacity.
This guide will not cover transferring of data from the old SSD to the new one or the installation of an operating system. Before starting the guide, make sure the computer is turned off and you are statically discharged.
你所需要的
修复工具包
本套装包含完成指南所需的所有零件和工具。


配件


工具


查看更多...
-
-
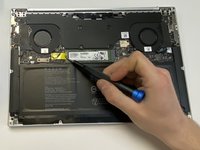
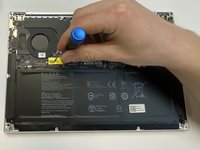
Remove the ten screws from the back plate of the laptop using a Torx T5 screwdriver.
-
-


To reassemble your device, follow these instructions in reverse order.
To reassemble your device, follow these instructions in reverse order.
4等其他人完成本指南。

团队

University of North Texas, Team S1-G16, Raign Spring 2021 University of North Texas, Team S1-G16, Raign Spring 2021 的会员
UNT-RAIGN-S21S1G16
2 名成员
创作了1篇指南
3指南评论
Hey Wesley, I couldn't find any documentation, videos, or photos of the thermal pad placement on the Razer Book anywhere. Could you please take off the vapor chamber and take a photo of the pad placement for me? It would help me tons.
Hi! I have the Razer Blade Stealth 13” Mercury White Intel® Iris™ Plus Graphics with only 256 GB PCIe M.2 SSD.
Can I upgrade this to 1TB?