跳转到主内容

Oontz Angle 3 ULTRA Battery Replacement

你所需要的

  1. Oontz Angle 3 ULTRA  Battery Replacement, Back Panel: 步骤 1 中的图像 1,3 Oontz Angle 3 ULTRA  Battery Replacement, Back Panel: 步骤 1 中的图像 2,3 Oontz Angle 3 ULTRA  Battery Replacement, Back Panel: 步骤 1 中的图像 3,3
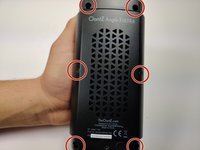
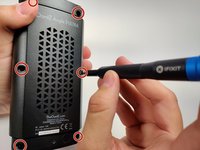
    • Remove the two black rubber sheaths around the edges of the speaker.

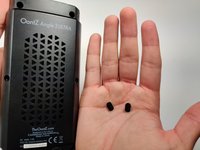
    • Under the symbol-marked sheath there is a white rubber covering for the buttons. Peel this away to reveal the panel underneath.

    • On two corners of its triangular face there is a small divot, which allows you to use your fingernails or a pair of tweezers to grip and peel away the covering.

  2. Oontz Angle 3 ULTRA  Battery Replacement: 步骤 2 中的图像 1,3 Oontz Angle 3 ULTRA  Battery Replacement: 步骤 2 中的图像 2,3 Oontz Angle 3 ULTRA  Battery Replacement: 步骤 2 中的图像 3,3
    • Use a JIS #0 screwdriver to remove the six screws to expose the motherboard.

  3. Oontz Angle 3 ULTRA  Battery Replacement: 步骤 3 中的图像 1,3 Oontz Angle 3 ULTRA  Battery Replacement: 步骤 3 中的图像 2,3 Oontz Angle 3 ULTRA  Battery Replacement: 步骤 3 中的图像 3,3
    • Using a pair of tweezers, pinch and pull the rubber fillings obstructing the screws.

  4. Oontz Angle 3 ULTRA  Battery Replacement: 步骤 4 中的图像 1,3 Oontz Angle 3 ULTRA  Battery Replacement: 步骤 4 中的图像 2,3 Oontz Angle 3 ULTRA  Battery Replacement: 步骤 4 中的图像 3,3
    • Using a JIS #0 screwdriver, remove the 6 screws holding the backplate in.

    • Remove the back panel off of the device.

  5. Oontz Angle 3 ULTRA  Battery Replacement, Battery: 步骤 5 中的图像 1,1
    • Make sure that the device is OFF before operating here, as an electrical spark may occur if the device is operating.

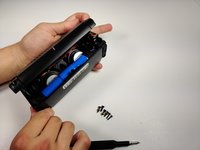
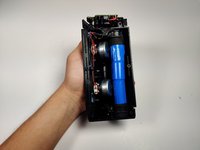
    • Once the motherboard is exposed after disassembly, follow the thick black and red cords from the battery pack to their attachments to the board.

    • Use the soldering iron to melt the positive and negative connections.

    • For more information on soldering and desoldering connections, please read the How to Solder and Desolder Connections Guide.

  6. Oontz Angle 3 ULTRA  Battery Replacement: 步骤 6 中的图像 1,1
    • After you have disconnected the battery from the motherboard, use a box cutter or exacto knife to carefully cut the blue wrapping around the battery.

    • Aligning the edge of the knife tangent to the battery works best for avoiding a cut to the electrolyte itself.

    • Please take extreme caution with this step. You may remove the blue tape with another method but if you do use an exacto knife, please do not cut into the battery.

  7. Oontz Angle 3 ULTRA  Battery Replacement: 步骤 7 中的图像 1,1
    • Once cut, it should require no more than your fingers to peel away the blue wrapping around the battery, and expose the terminal.

  8. Oontz Angle 3 ULTRA  Battery Replacement: 步骤 8 中的图像 1,1
    • Finally, use the soldering Iron on the two terminals of the battery connection to disconnect it from the wire.

    • To reconnect the battery, solder the two terminal connections, or use the replacement battery's wires to reattach to the motherboard

结论

To reassemble your device, follow these instructions in reverse order.

另外一个人完成了本指南。

2条评论

Could you please provide a source / part # for the replacement battery?

Is it just two 18650 style 3.7 Volt lithium batteries in series or parallel?

Alex - 回复

Was able to narrow down the issue to the board using a known good 18650 battery. Also have seen a couple forum posts saying it’s the board that goes bad on some of these units. Now I’m starting to wonder if it’s just a bad capacitor or something replaceable with a standard soldering iron…

Alex -

添加评论

浏览统计数据:

过去 24 小时: 5

过去 7 天: 9

过去 30 天: 43

总计 2,278